
TABLE OF CONTENTS
- Step 1: Navigating the Payments Window
- Step 2: Printing Receipts
- Step 3: Processing Cash Payments
- Step 5: Processing Seat Payments
- Step 6: Editing Payments
- Step 7: Merging Seats for Payment
- Step 8: Equal Splitting an Order
- Step 9: Equal Splitting An Item
- Step 10: Discounts & Comps
- Step 11: Third Party Payments
- Step 12: Tax Exempt
- Step 13: Auto-Gratuity
- Step 14: Manual Credit Card Entry
- Step 15: Credit Card Declines & Timeouts
- Additional Resources and Help!
Step 1: Navigating the Payments Window
- Access the Payments tab at the bottom right corner of the order ticket to accept payments and finalize an order
- Selecting Payments automatically dispatches any unsent items on Quick Orders to their designated kitchen prep stations
- Tap the X in the top-right corner at any time to close the payments view and return to the ordering screen
- Left Panel (Payment Options): List all available payment methods (Cash, Credit Card, Gift Card, Loyalty, Third-Party, etc.)
- Middle Section (Payment Controls): Displays the current Balance Due/Total, payment editing controls, a custom numeric keypad for entering exact payment amounts, and the Finalize button at the bottom
- Right Panel (Ticket & Seat View): Retains full visibility of the active order ticket, maintaining the same seat, printing, and order option controls available on the main ordering page
- Status Confirmation: A confirmation banner displays at the bottom of the page whenever payment amounts are applied or transactions are finalized
Step 2: Printing Receipts
- Full Order Receipt: Tap the Print icon to the left of the order header to print a single customer receipt displaying the itemized line items and totals broken downy by seat
- Individual Seat Receipt: Tap the Print icon directly next to a specific seat number to print a receipt for that individual seat's item only
- Print All Seats Simultaneously: Open the Order Options Menu in the top-right corner and select Print All Seats from the dropdown menu to print separate customer receipts for every seat on the order at once
- Once an order or seat is paid, tapping its respective Print icon prints a Finalized Receipt detailing applied payments, payment types, tip lines, and remaining balances
- Finalized receipt behavior at checkout is determined by your store settings configured in EZ Dine Studio
- OFF: The option to print a finalized receipt is hidden across all orders during checkout
- ON: The Print Finalized Receipt checkbox is automatically selected at checkout. Staff can manually uncheck the box if a physical receipt is not required
- Prompt: The Print Finalized Receipt checkbox remains unchecked by default at checkout and can be toggled ON whenever a customer requests a printed receipt
Step 3: Processing Cash Payments
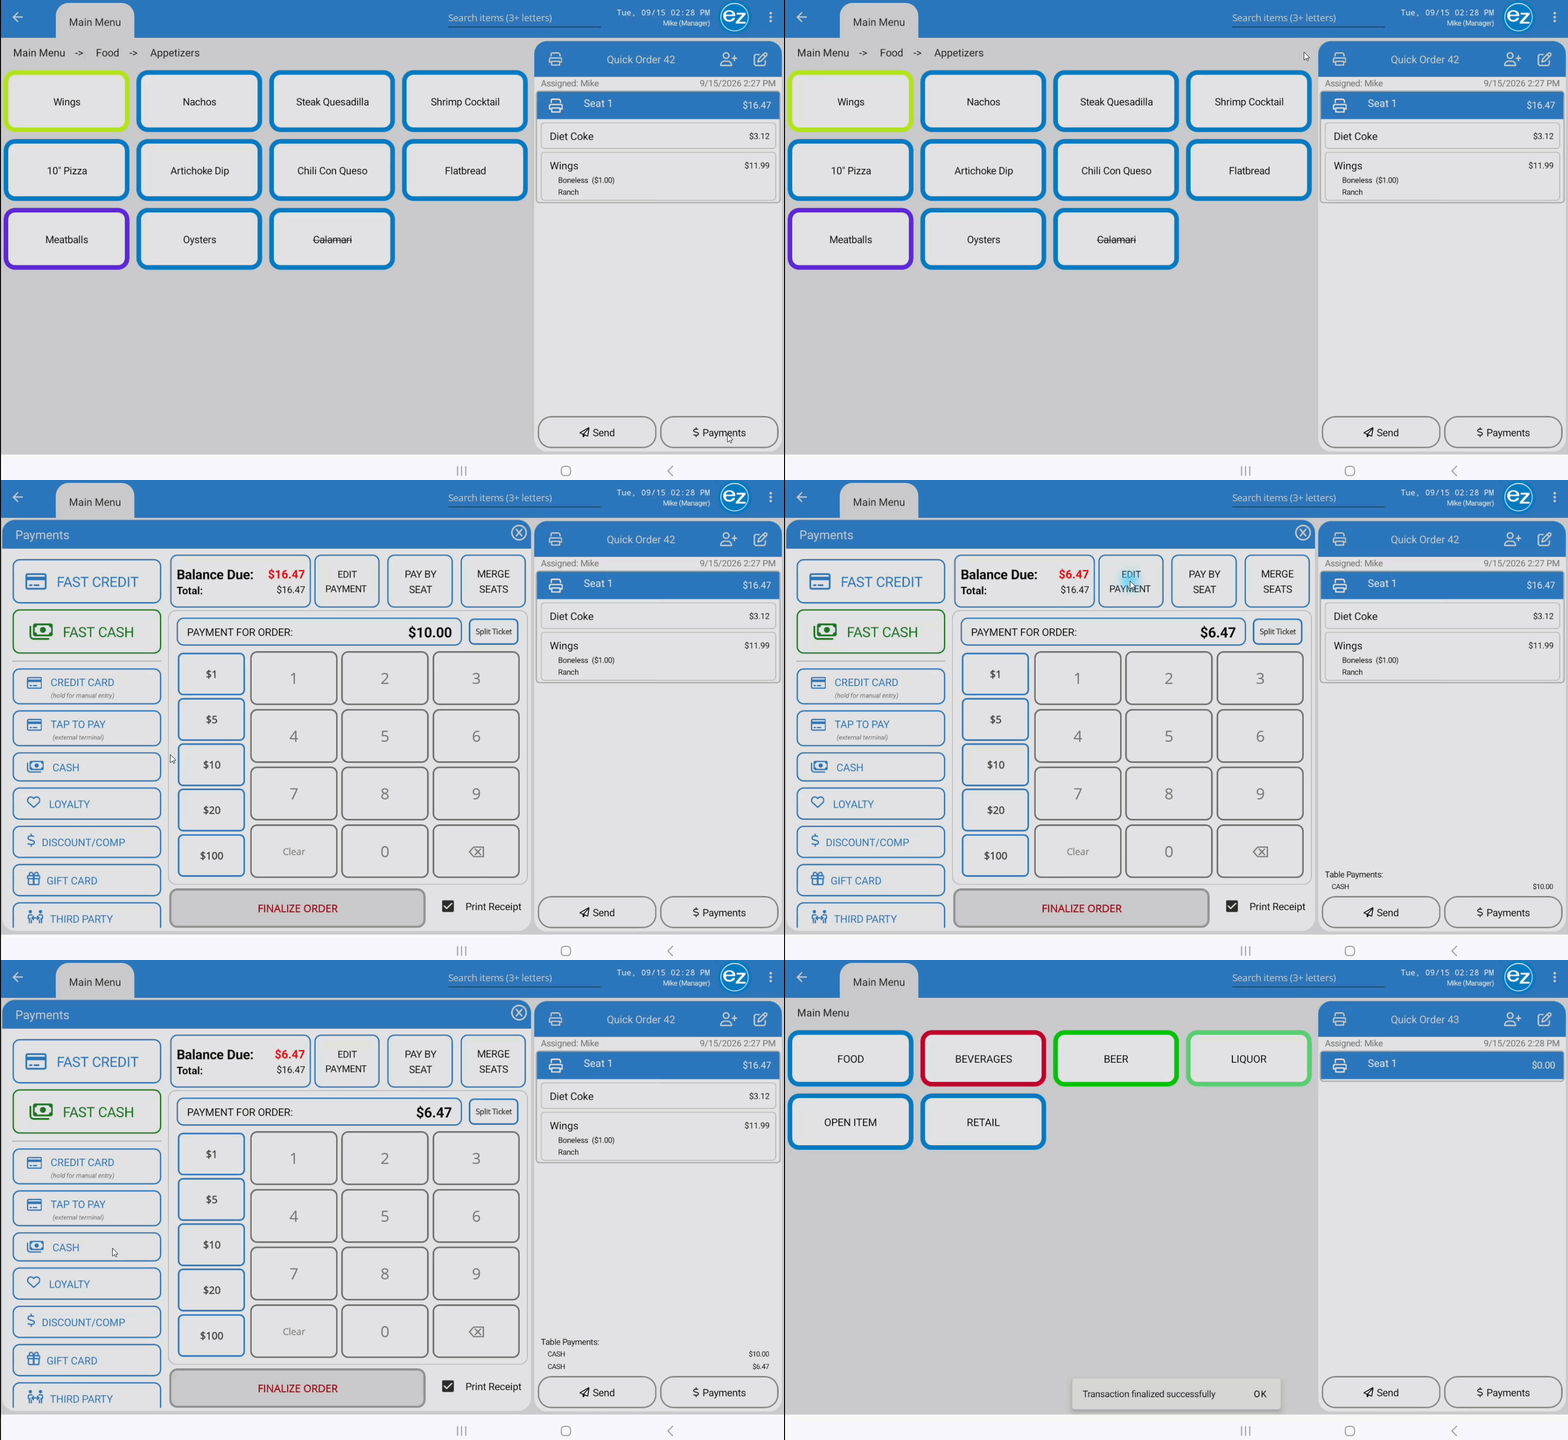
- Default Total: The active Balance Due automatically populates as the default payment amount. Tapping Cash applies this full default amount immediately
- Custom Payment Amounts: Tap the preset dollar amount buttons on the left panel of the numeric keypad. Tap Clear on the center keypad to zero out the default total and enter a custom amount on the numeric keypad
- Overpayment & Change Calculation: When cash received exceeds the Balance Due, the Change Due pop-up screen displays, Amount Paid. Amount Owed. Change Due
- Finalized Settlement: Applied payments log at the bottom of the order ticket. Once the Balance Due reaches $0.00, the Finalize buttons highlights in red and activates to complete the transaction
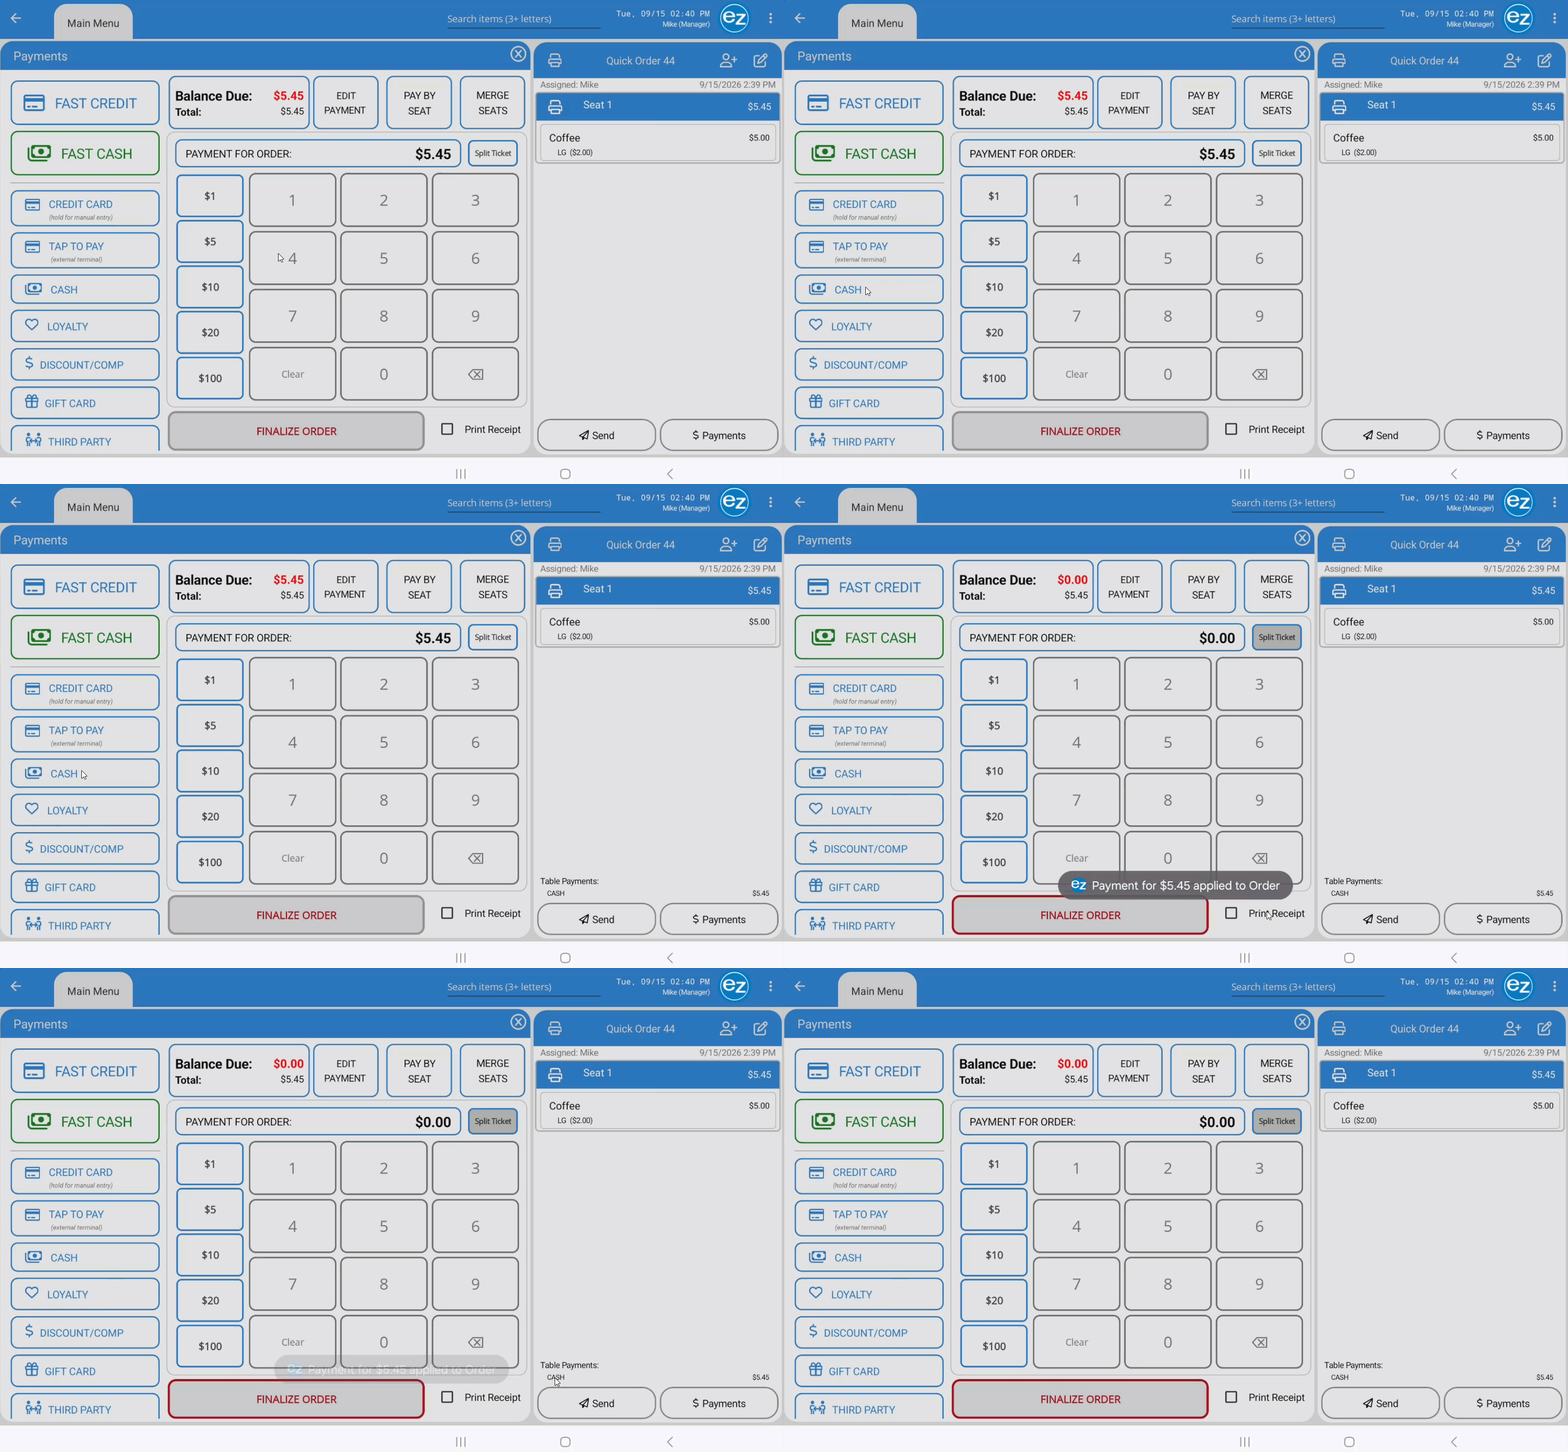
- One-Tap Settlement: Tapping Fast Cash automatically applies the exact cash amount for the entire ticket and finalizes the order in a single action
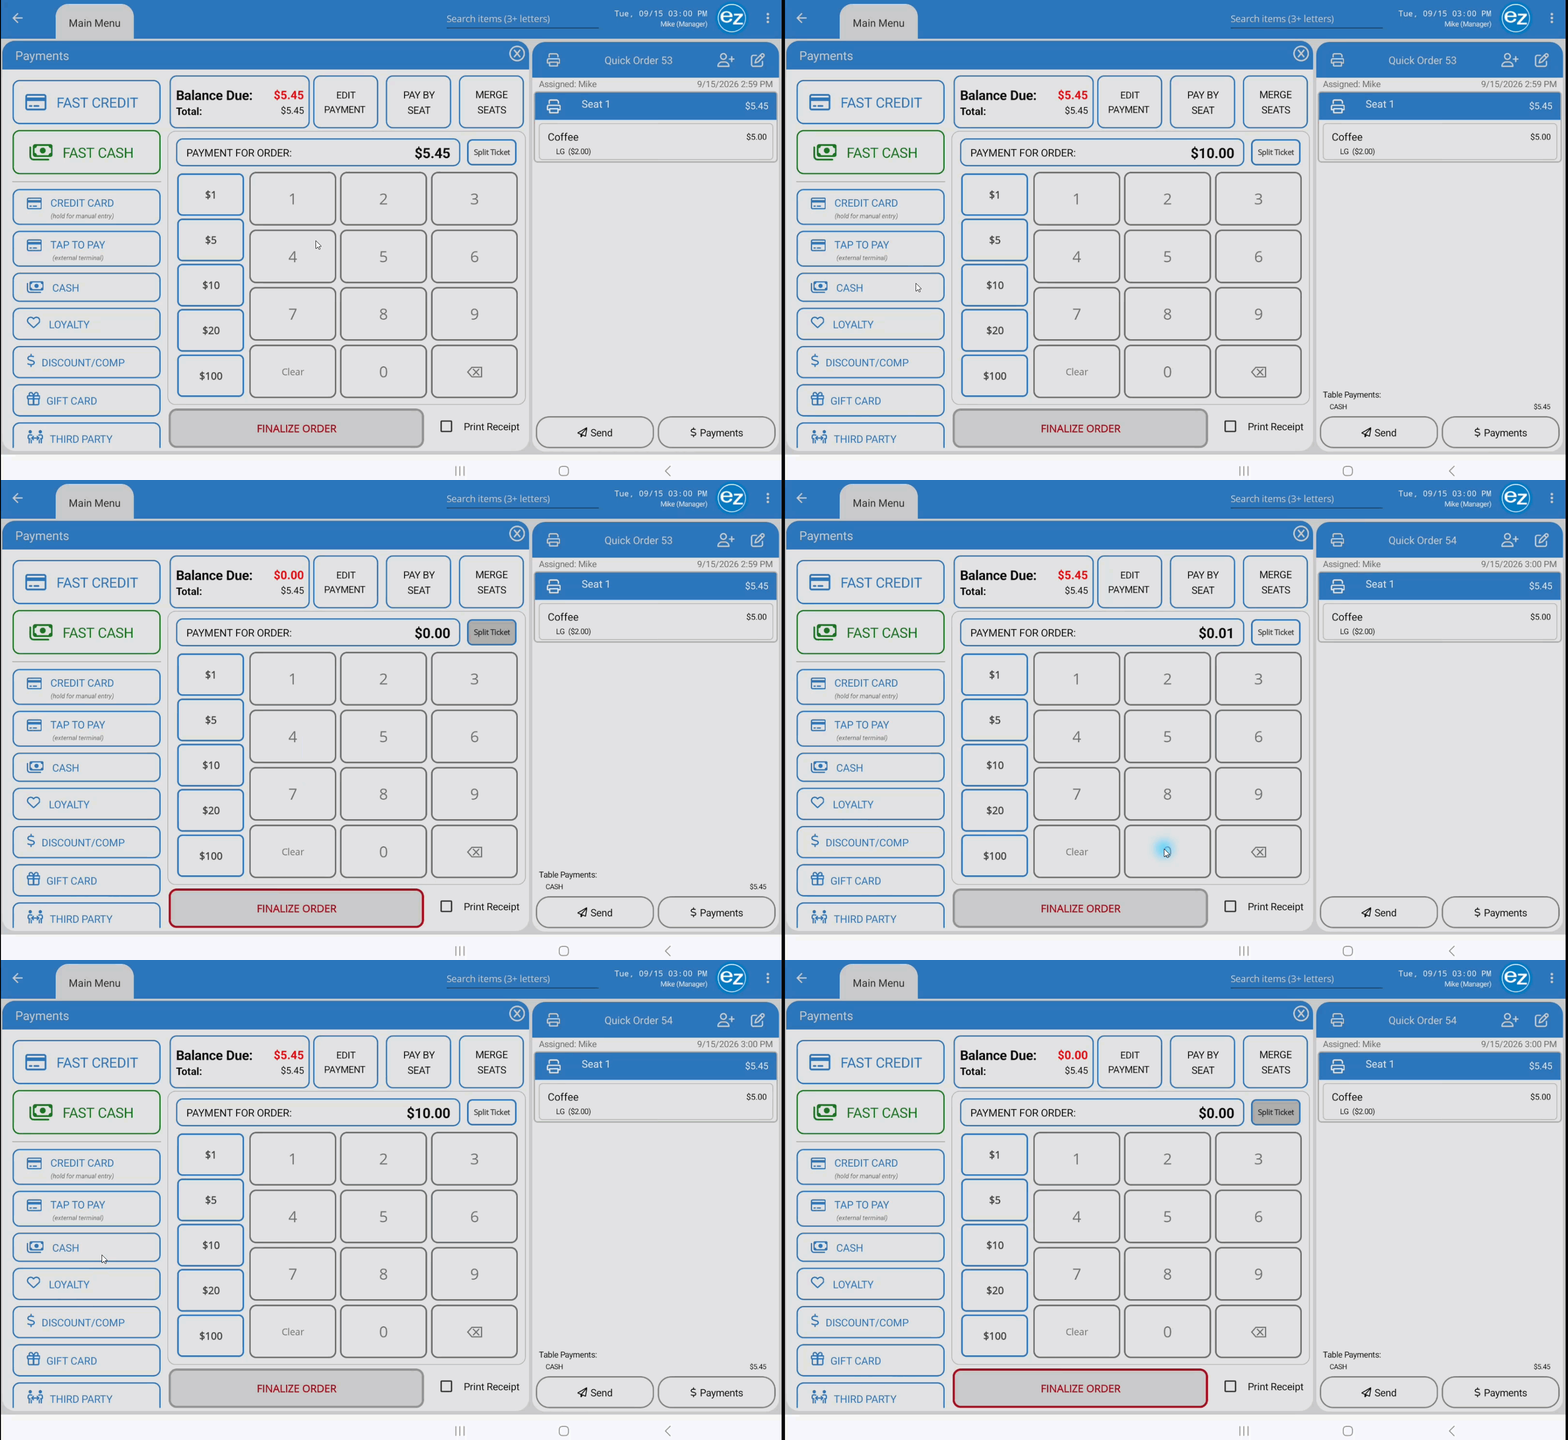
- Studio Configuration: If Fast Cash is disabled in Studio store settings, the Fast Cash tab disappears from the payments window, and the standard Cash payment expands to fill the space: Disable Fast Cash
Cash Payment
Custom Cash Payment
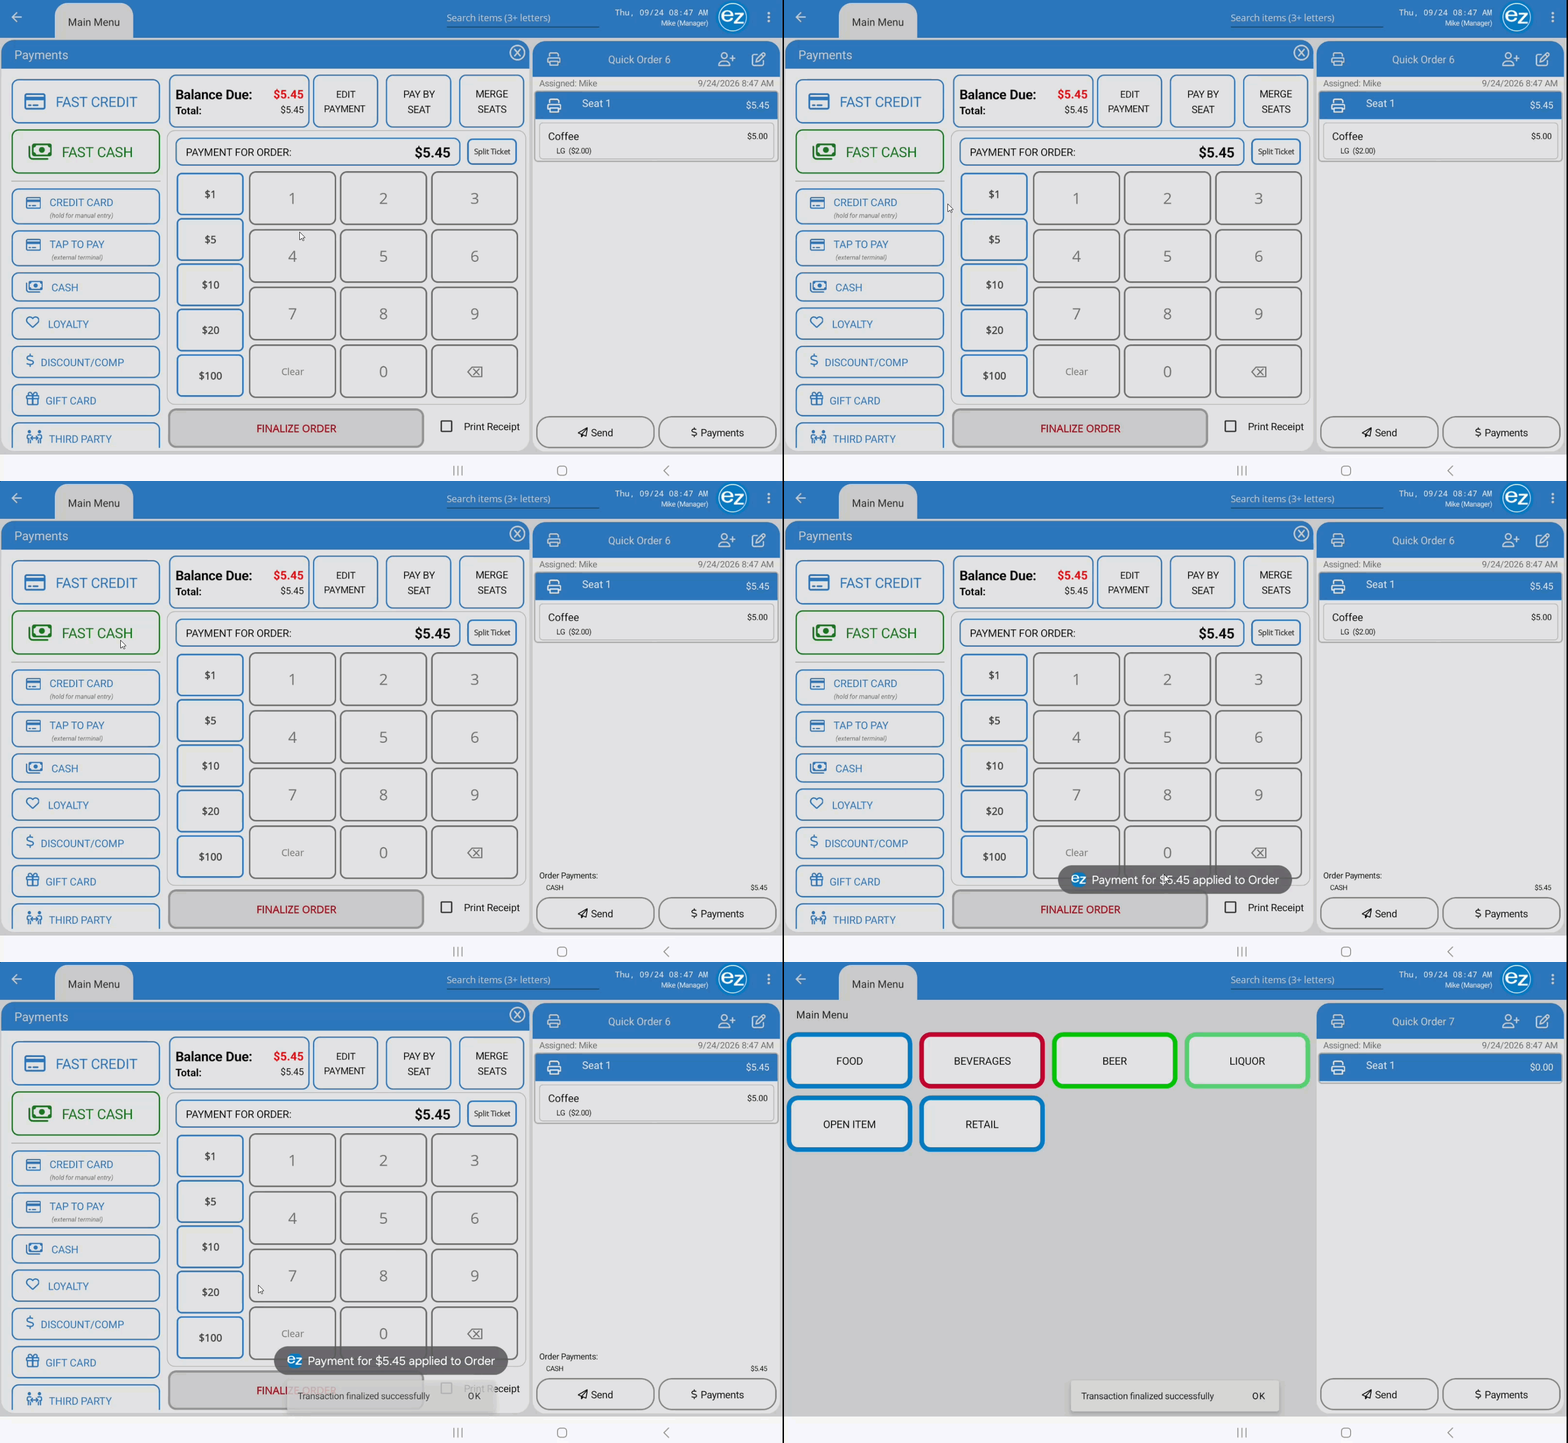
Fast Cash
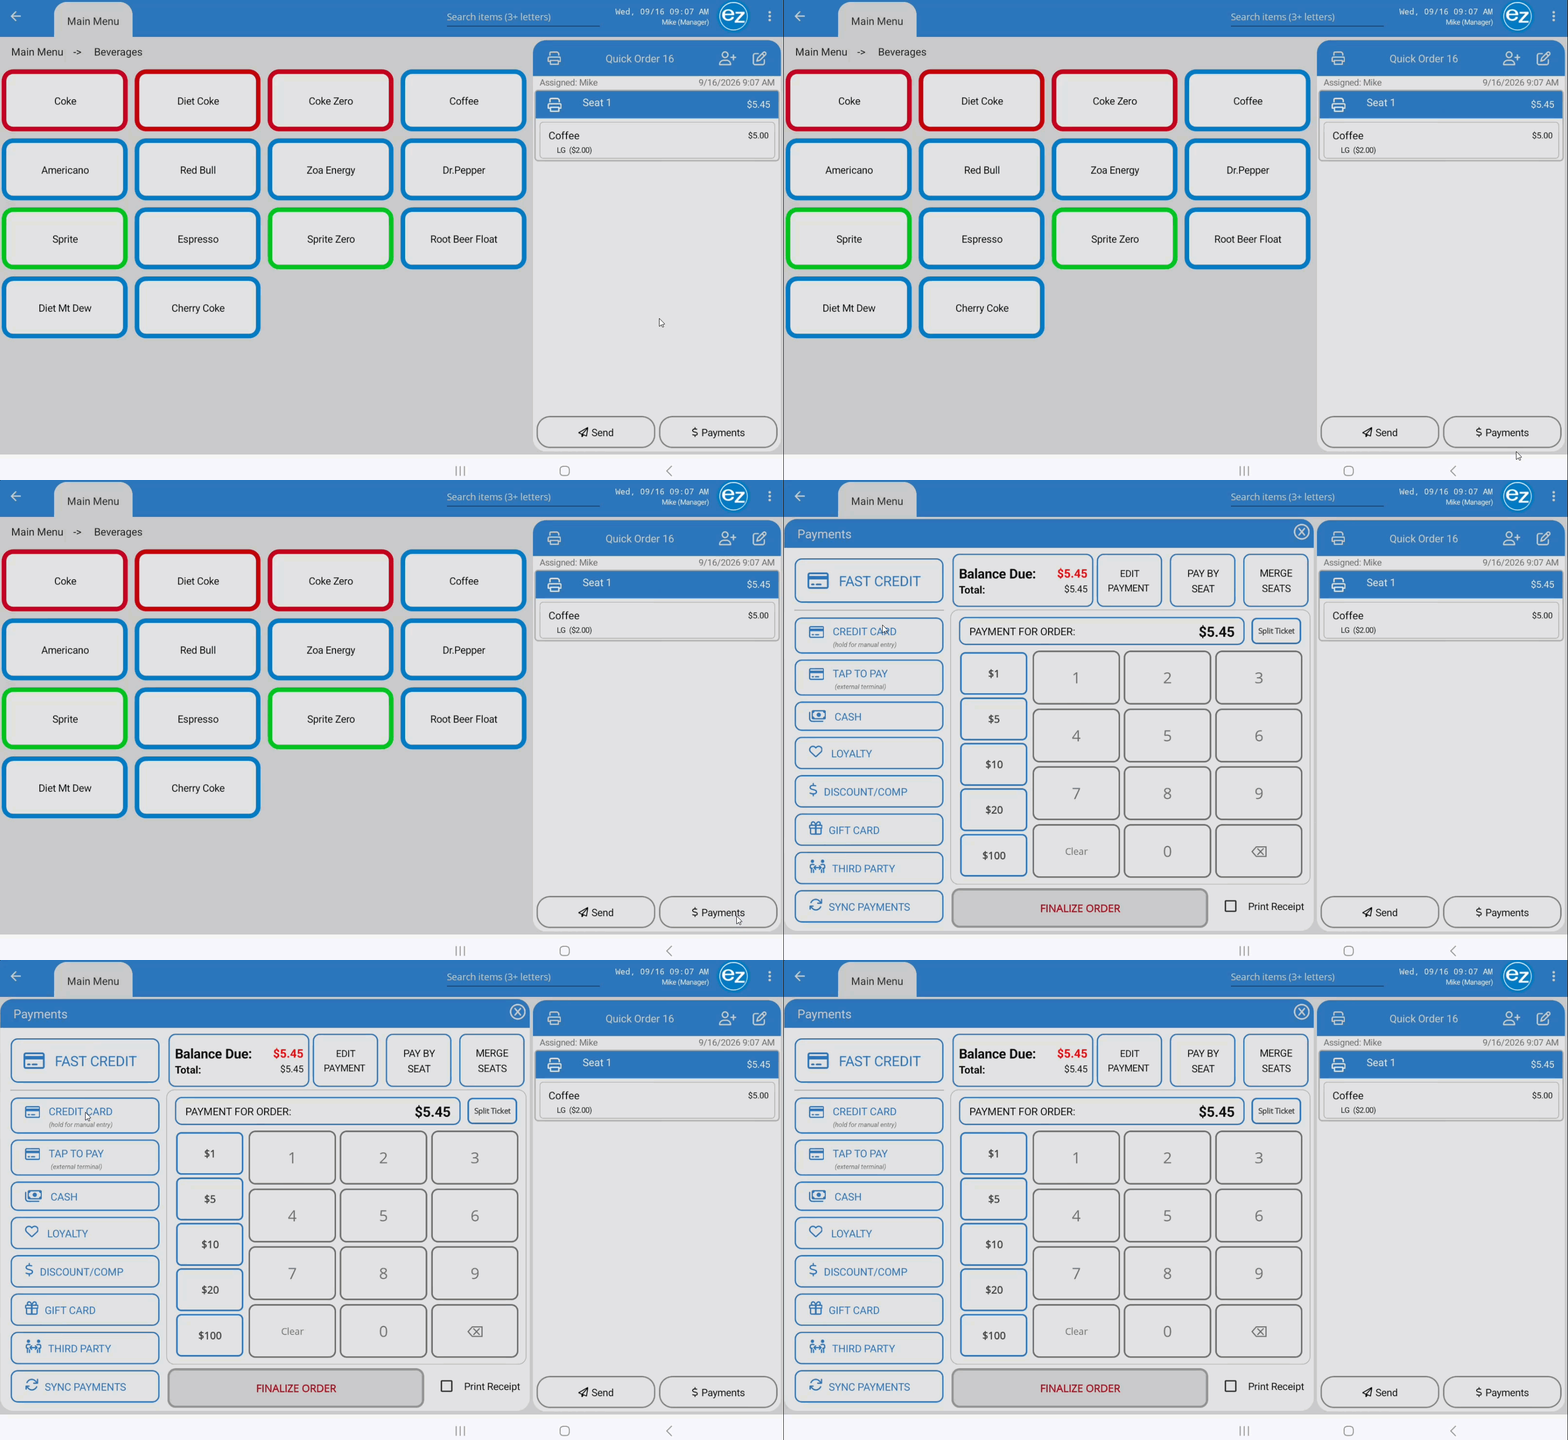
Hiding Fast Cash
Step 4: Processing Credit Card Payments
An active merchant processing account must be configured in EZ Dine Studio before processing card transactions. Refer to the Merchant Credit Card Settings guide for configuration details
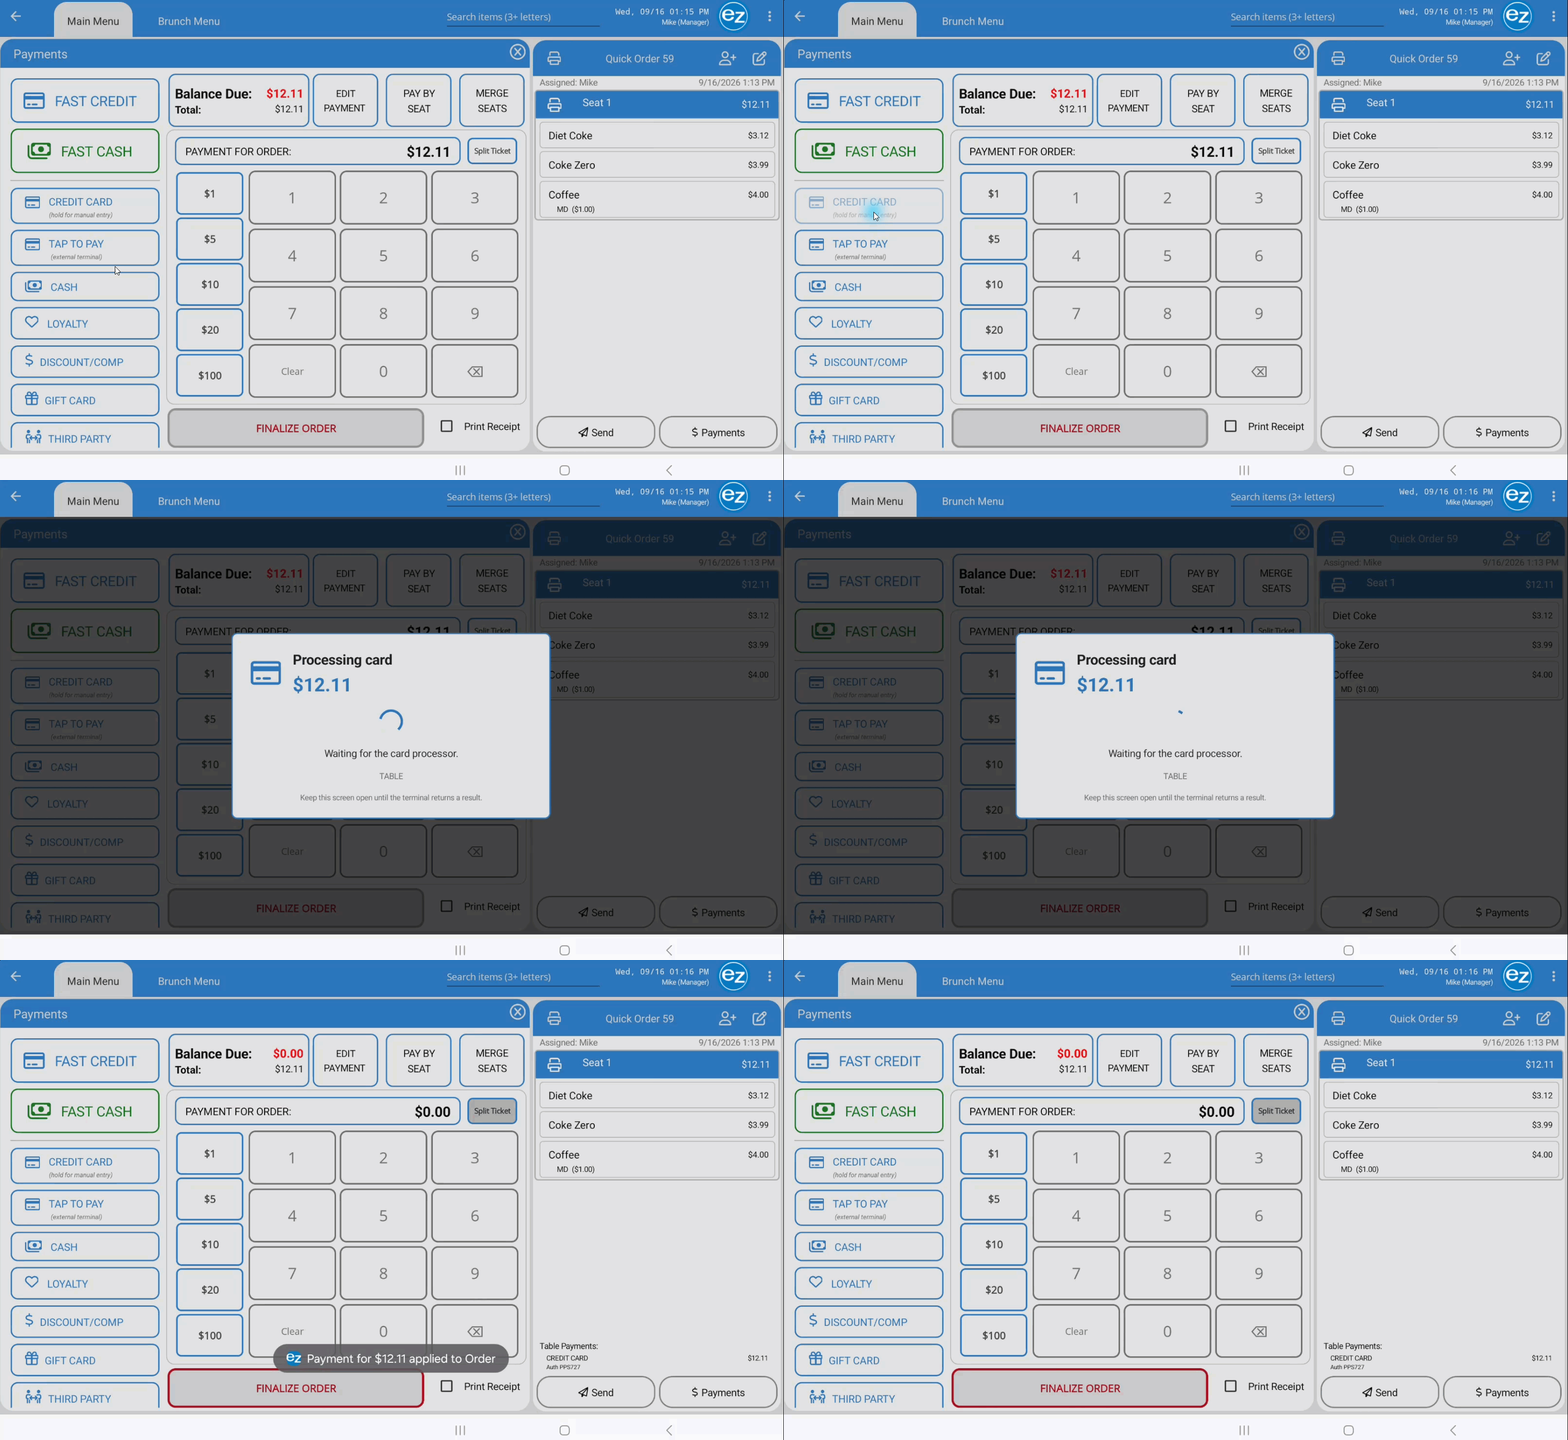
- Initiate Transaction: Tap Credit Card. The EZ Dine app automatically sends the full Balance Due to the connected card reader
- Card Processing: The payment screen locks and displays a processing indicator while completing the payment prompts on the card reader
- Verify & Finalize: Upon approval, the screen unlocks, the credit card Authorization ID (Auth ID) populates on the order ticket, and the Balance Due updates to $0.00. Tap the highlighted red Finalize Order button to complete the transaction
- Custom Card Amounts: Tap Clear on the center numeric keypad to zero out the default order balance. Enter a custom dollar amount using the keypad or tap a preset dollar button on the left panel. Select Credit Card to send the specified partial amount to the card reader
- Automatic Printing: Based on your EZ Dine Studio store settings, physical credit card receipts print automatically upon approval
- Auth ID Reference: The payment entry logs a unique Credit Card Auth ID directly below the credit card payment type. This Auth ID prints on all receipts for transaction auditing against merchant processor records
- Fast Credit Card: Tapping Fast Credit Card sends the full order total to the card reader and automatically finalizes the transaction as soon as the card approval is received, bypassing the final manual step
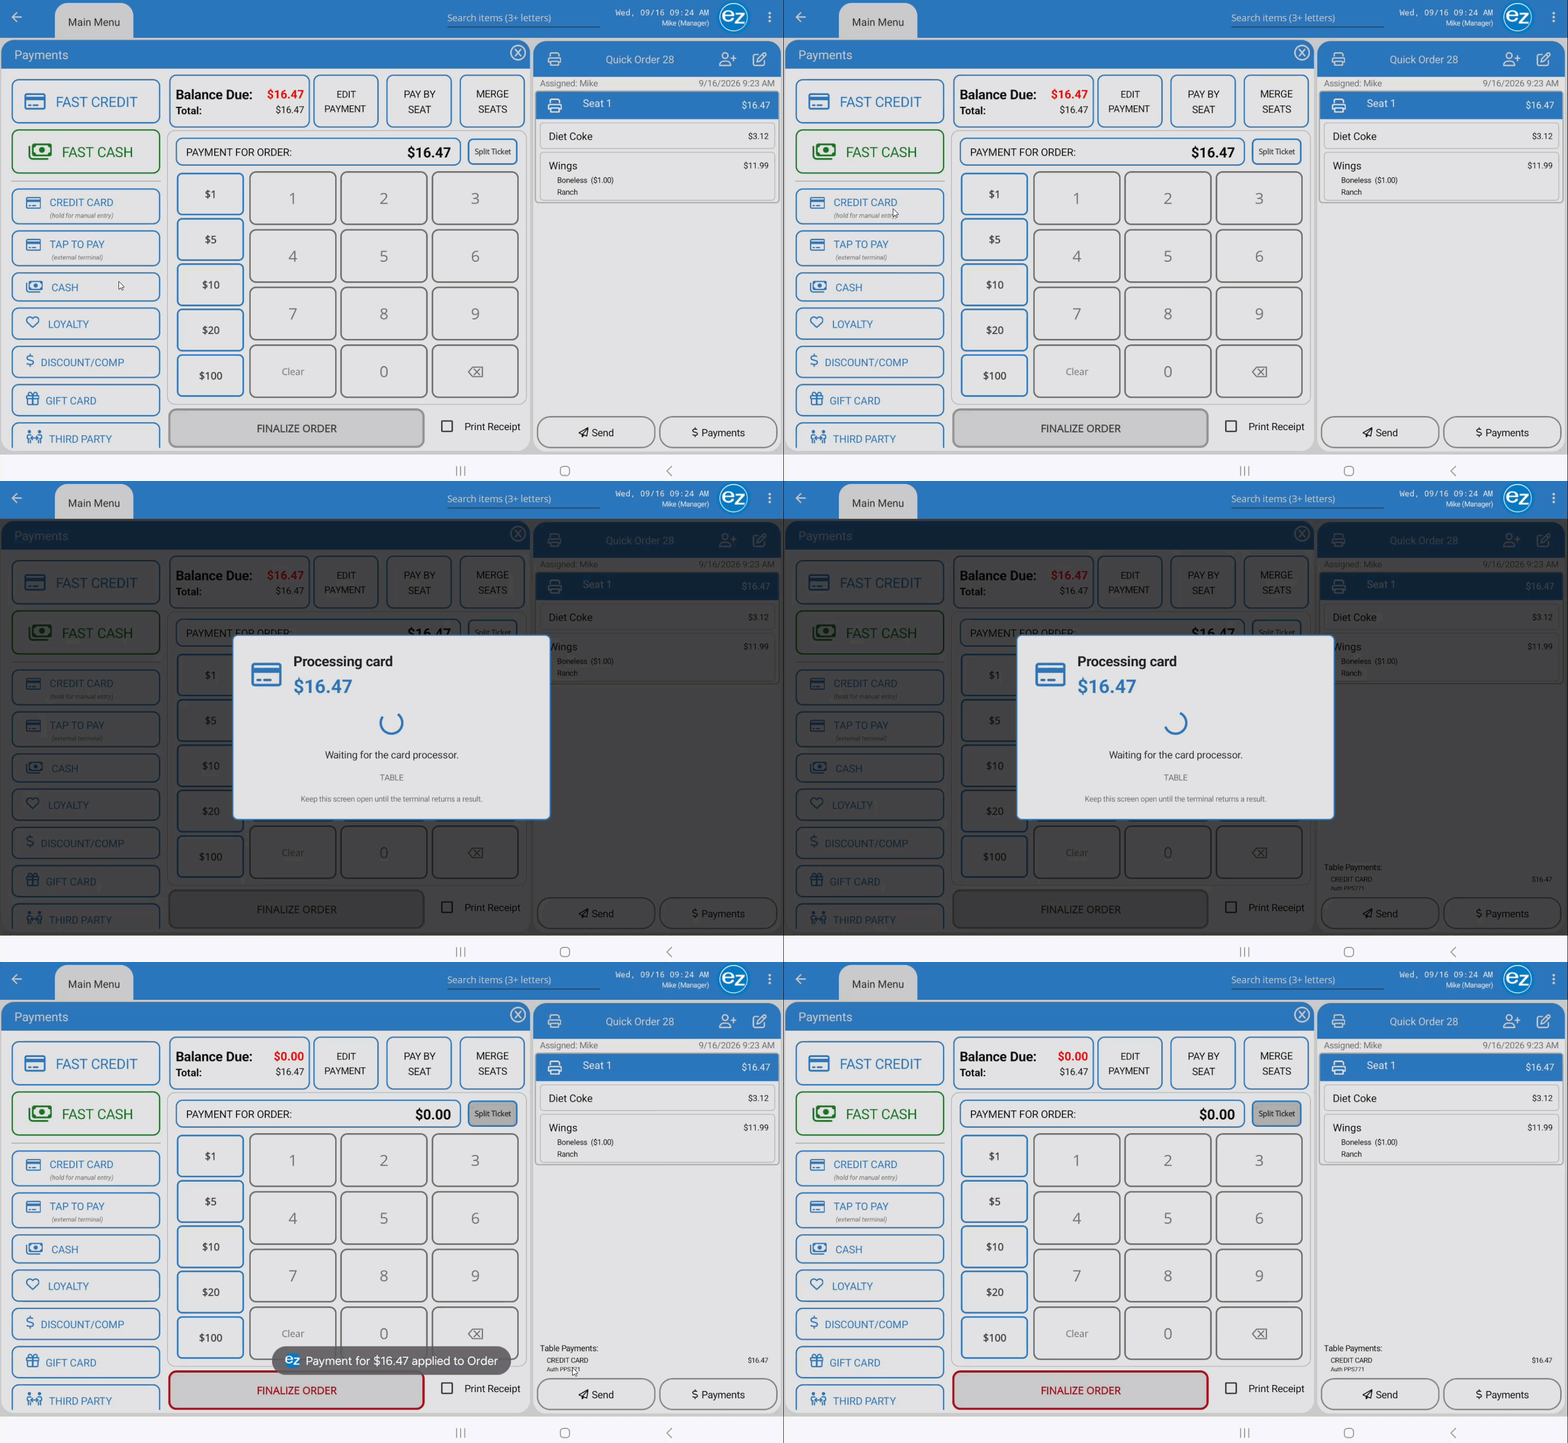
Credit Card
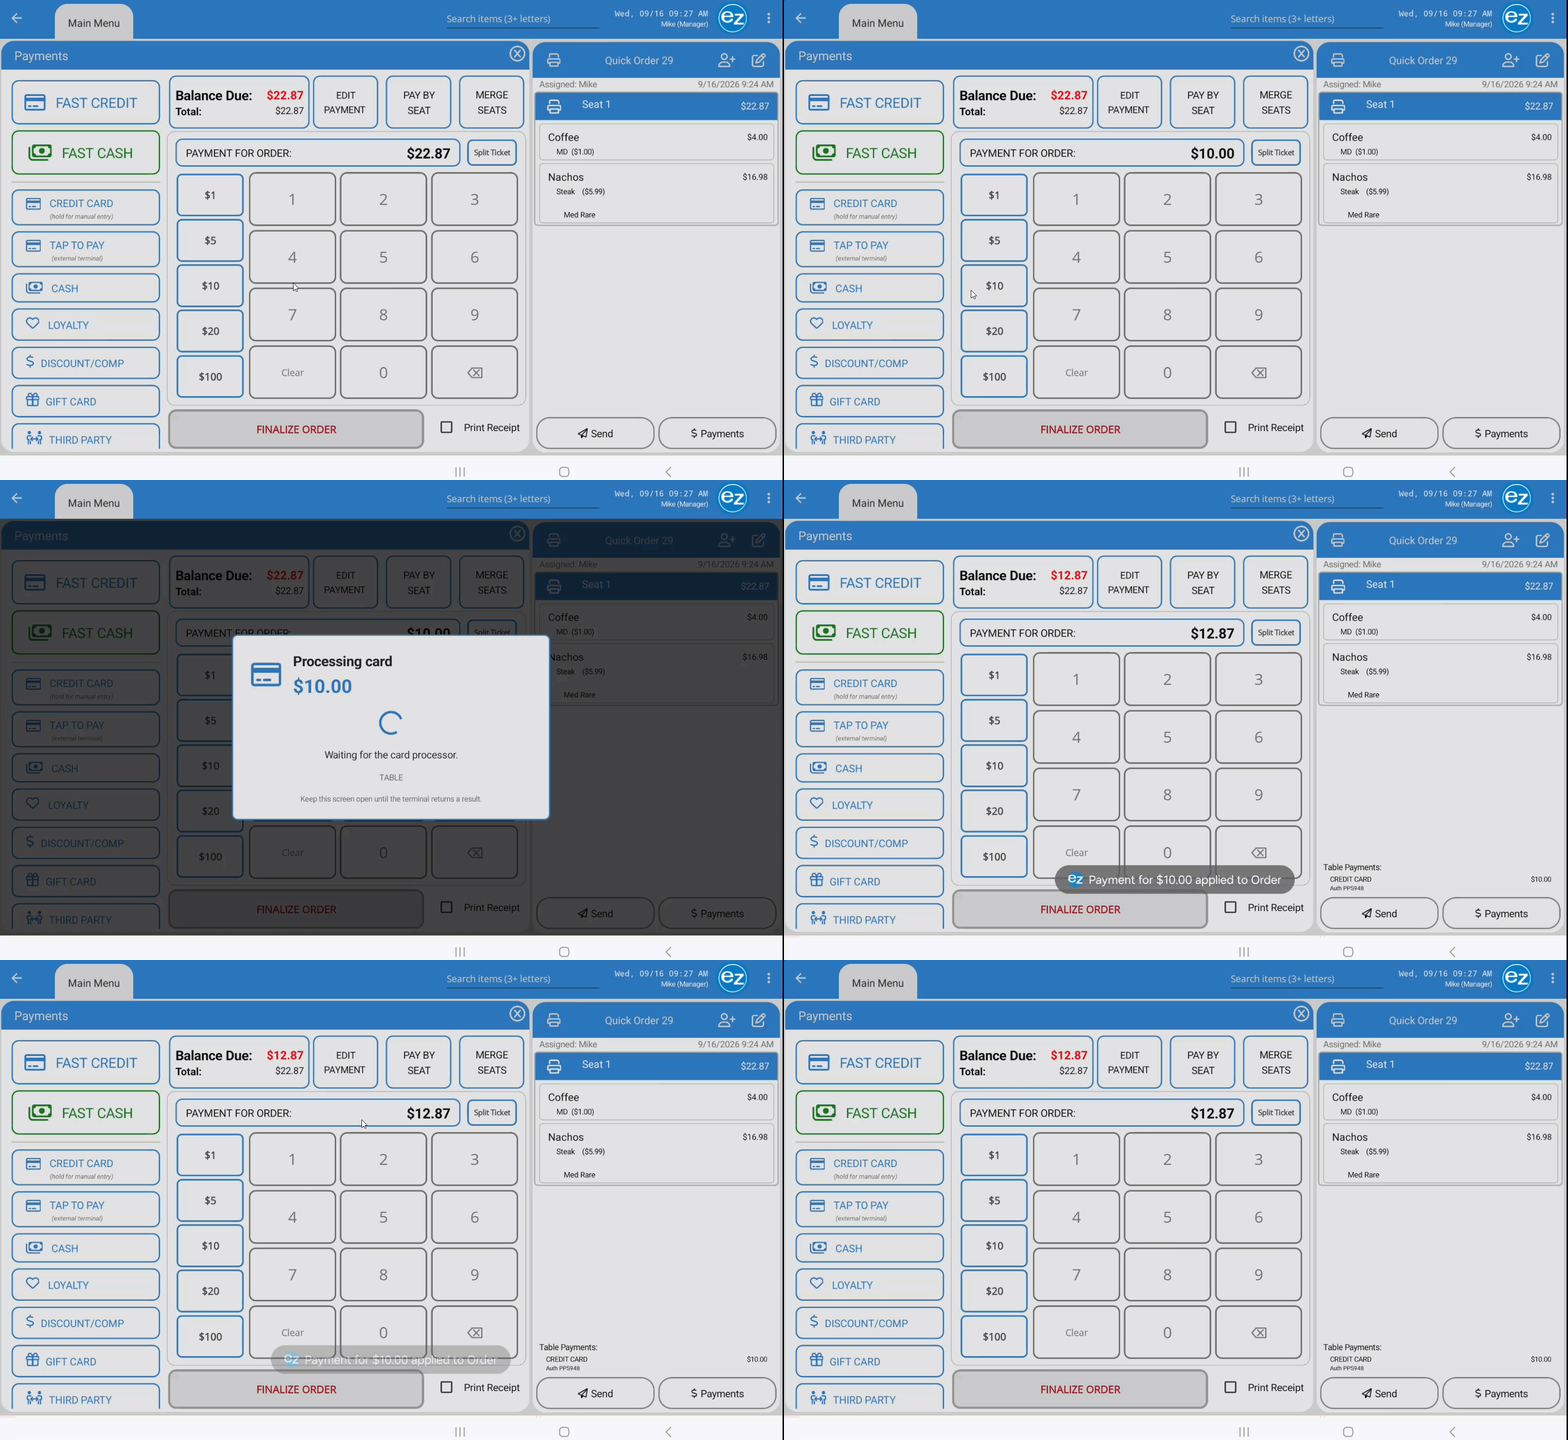
Custom Credit Card
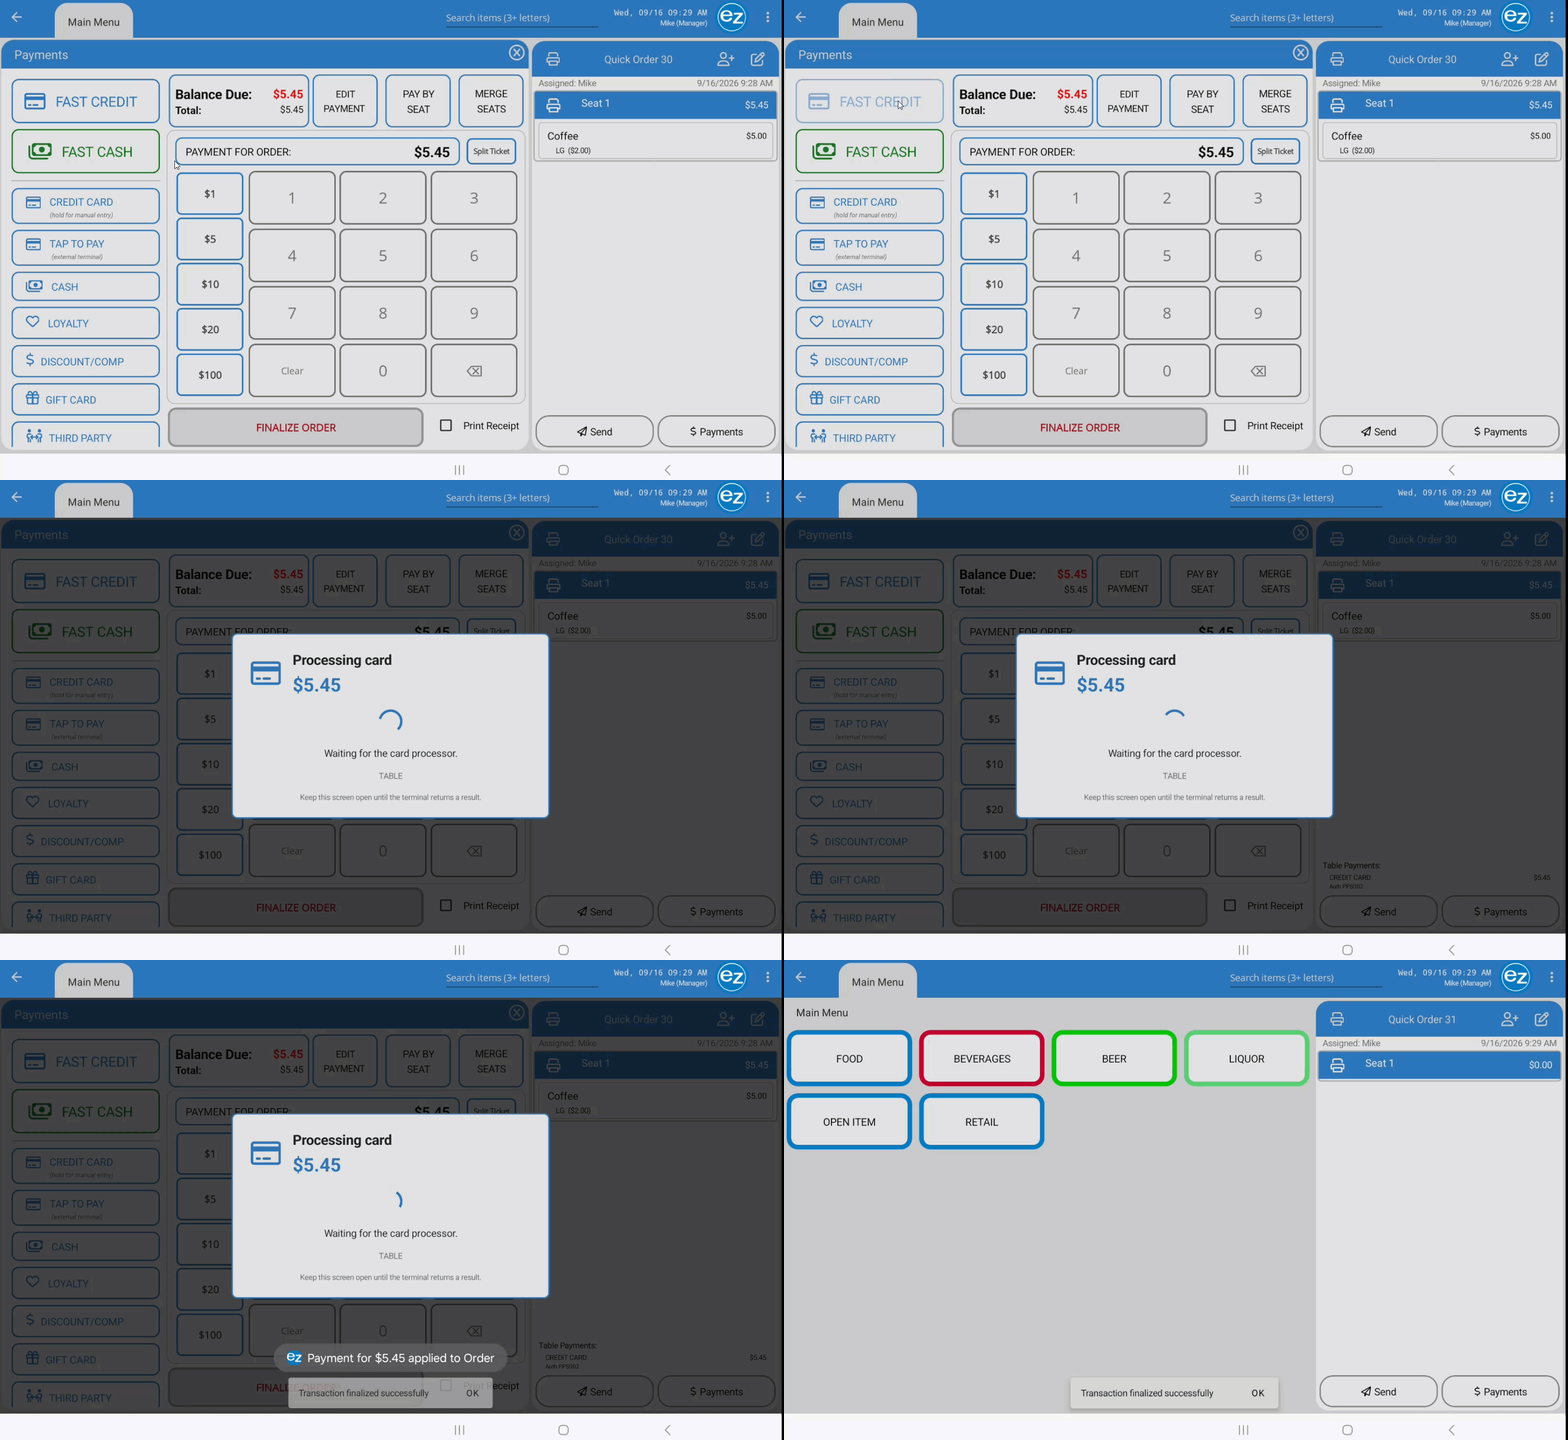
Fast Credit
Step 5: Processing Seat Payments
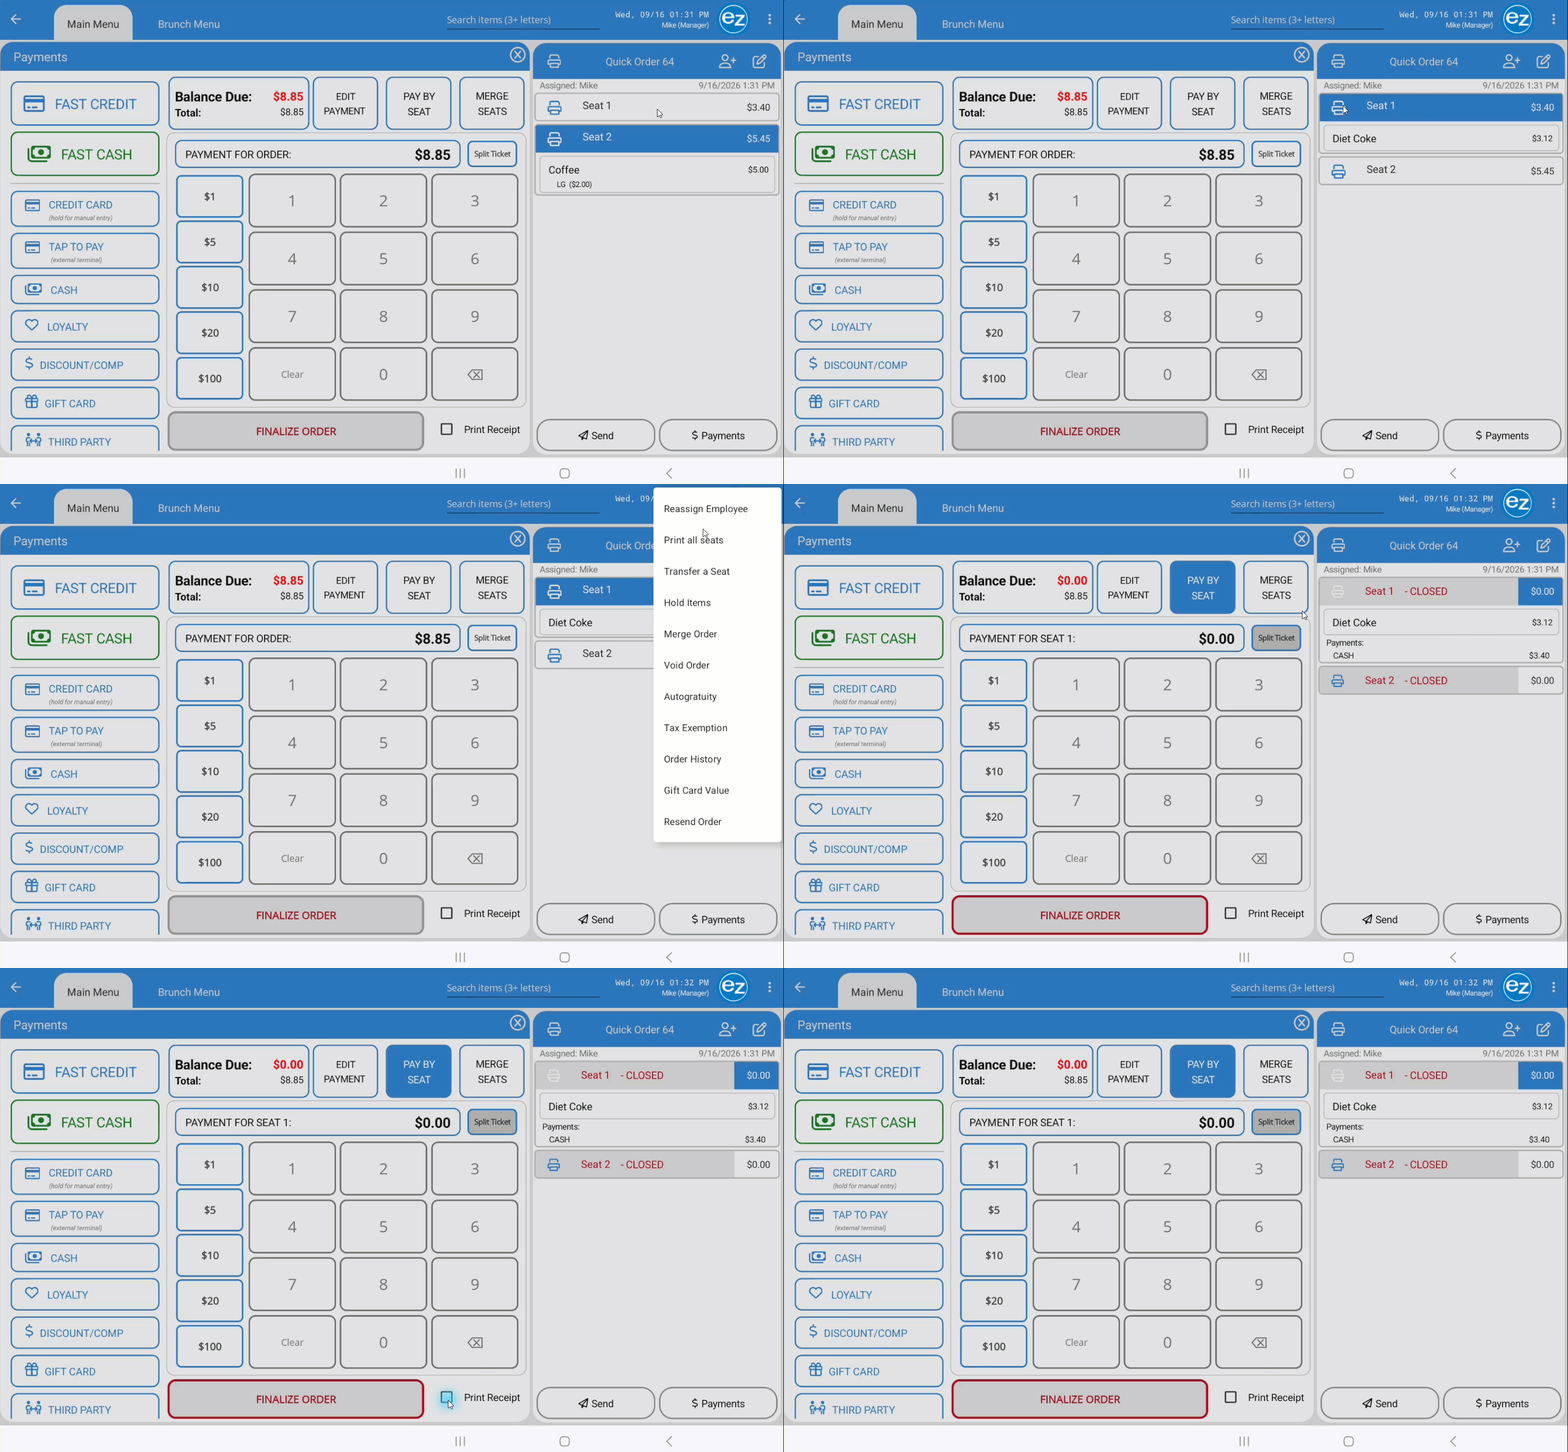
- Enable Pay By Seat to process separate payments for individual seats on a multi-seat order
- Tap Pay By Seat on the payment screen to activate seat-level payment controls
- Tap the target Seat Number. The payment balance header above the numeric keypad updates to reflect that seat's exact total. Select the payment method (Cash, Credit Card, Gift Card, etc.) and process the transaction
- Upon successful payment, the applied tender type and amount log directly below the seat's itemized list
- Closed Status: Once fully paid, the seat status updates to CLOSED. The seat header turns red and displays CLOSED in red text
- Seat Finalized Receipt: Tap the Print icon next to print a seat-specific finalized receipt detailing its items and applied tender
- Pay By Seat Restriction: When Pay By Seat is toggled ON, both the Fast Cash and Fast Credit buttons automatically become grayed out and unselectable
- Reopening a Closed Seat: Tap a closed seat header and confirm when prompted to edit. This reactivates the seat, allowing you to edit items or void/adjust applied payments
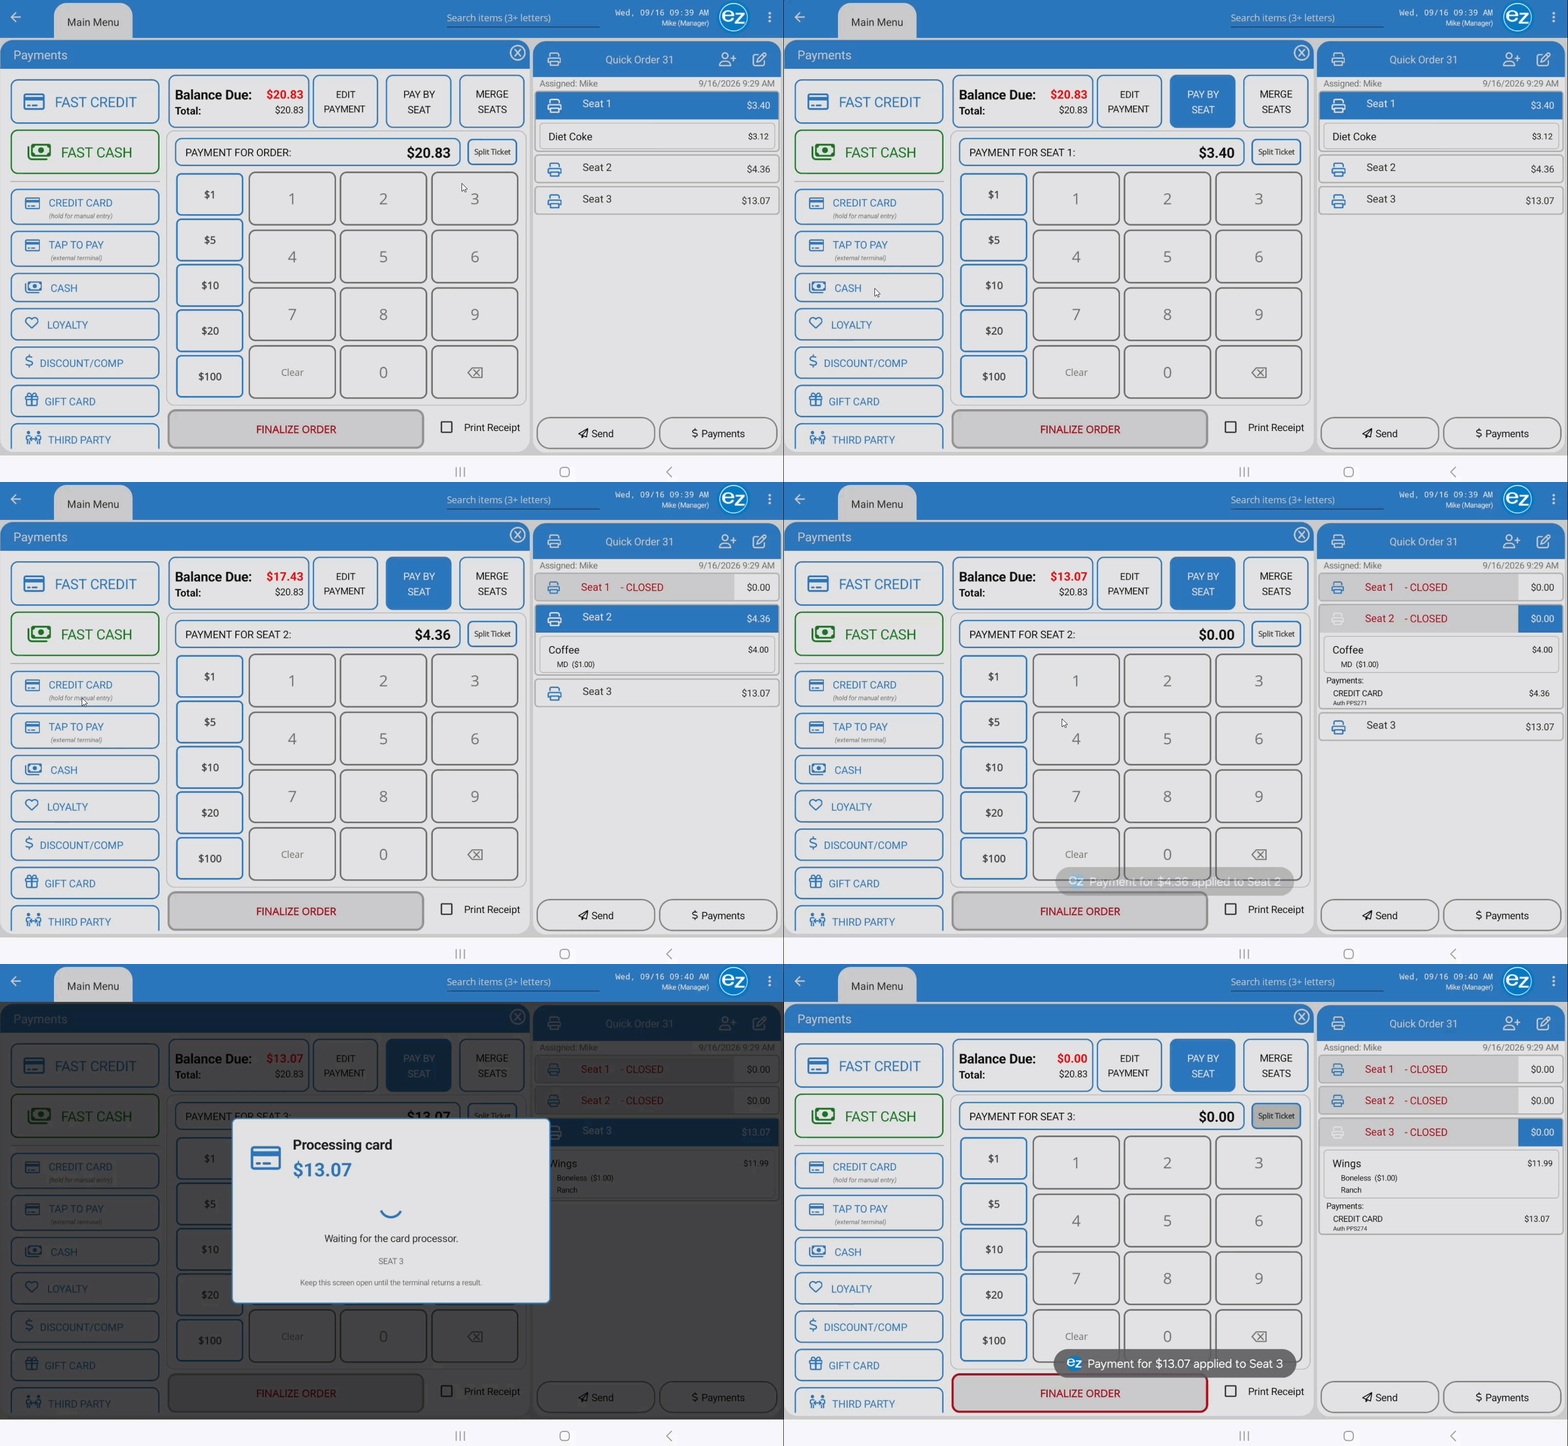
Pay By Seat
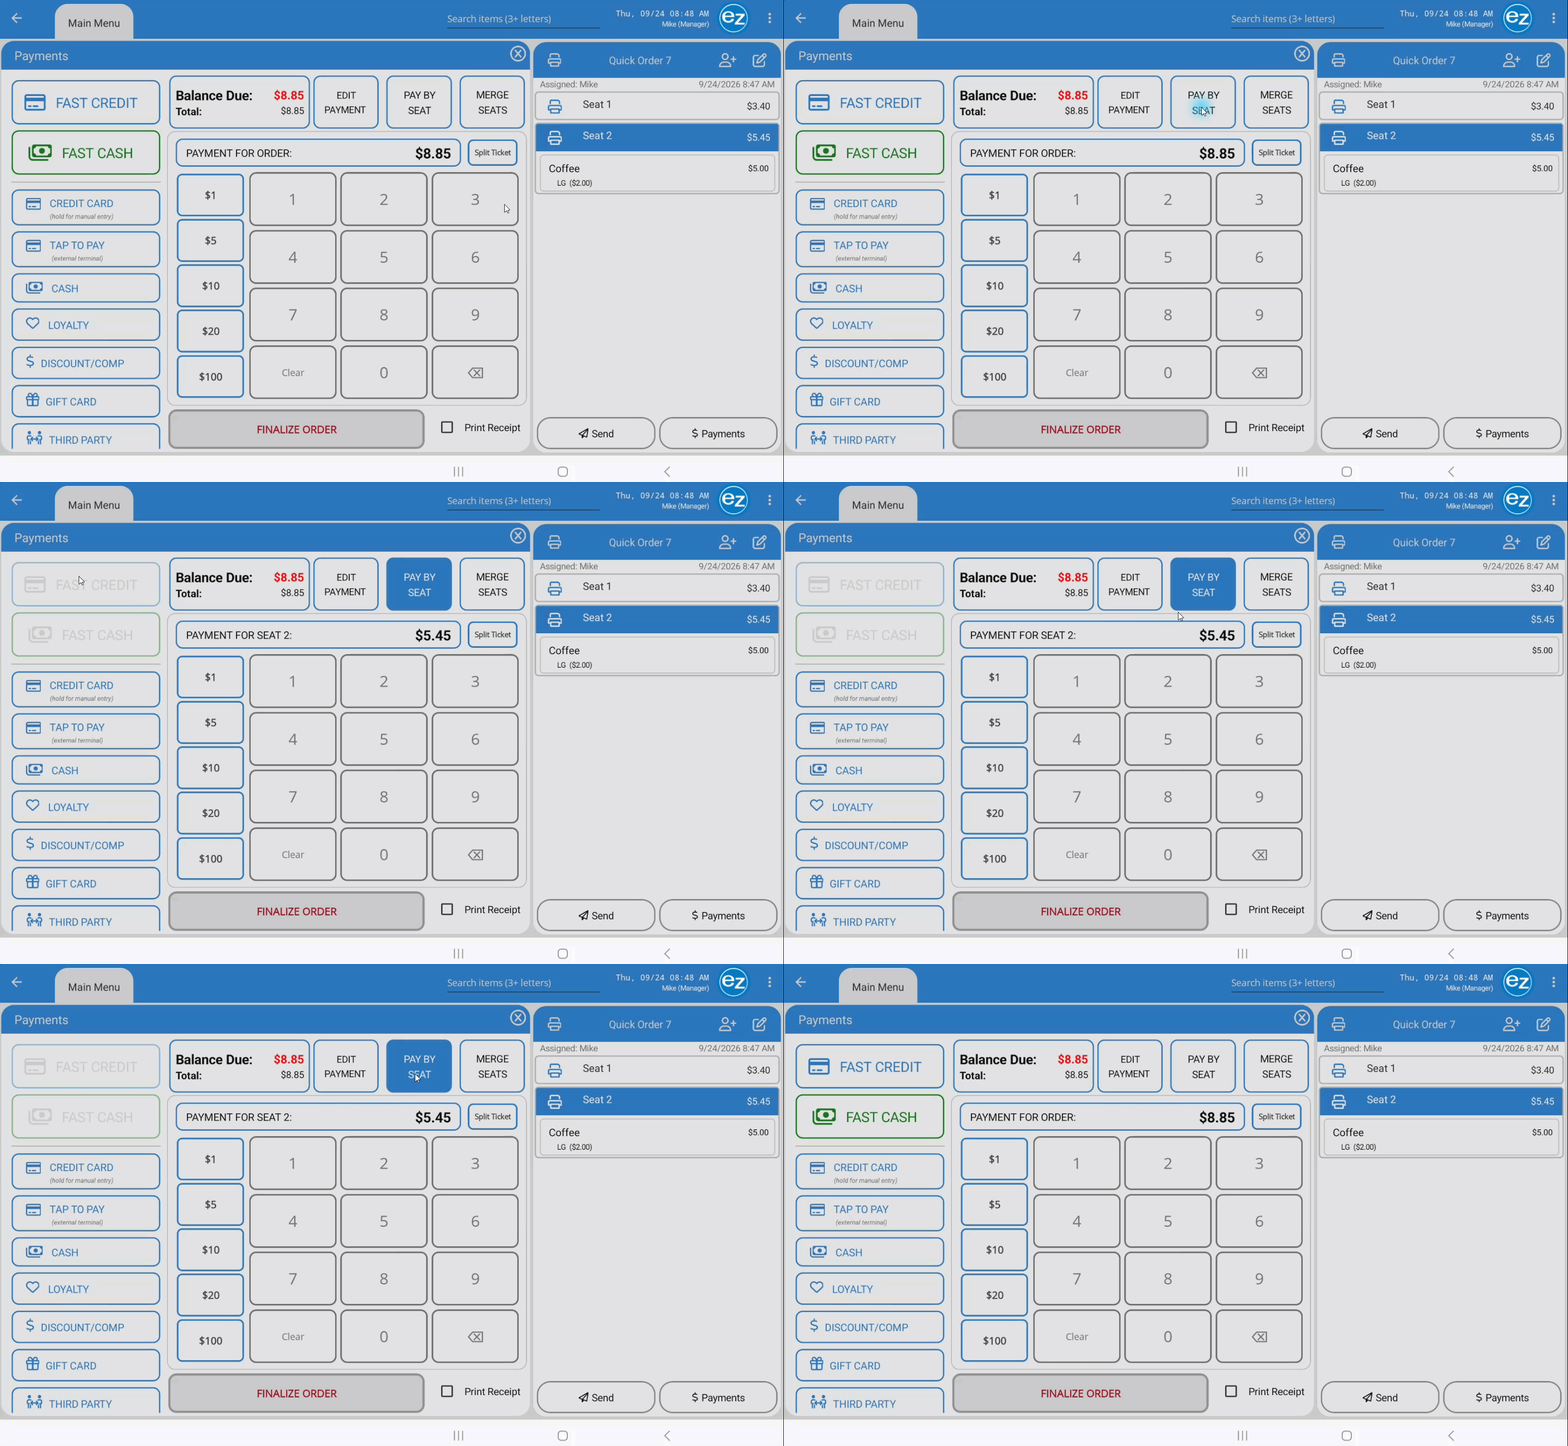
Pay By Seat Fast Buttons
Step 6: Editing Payments
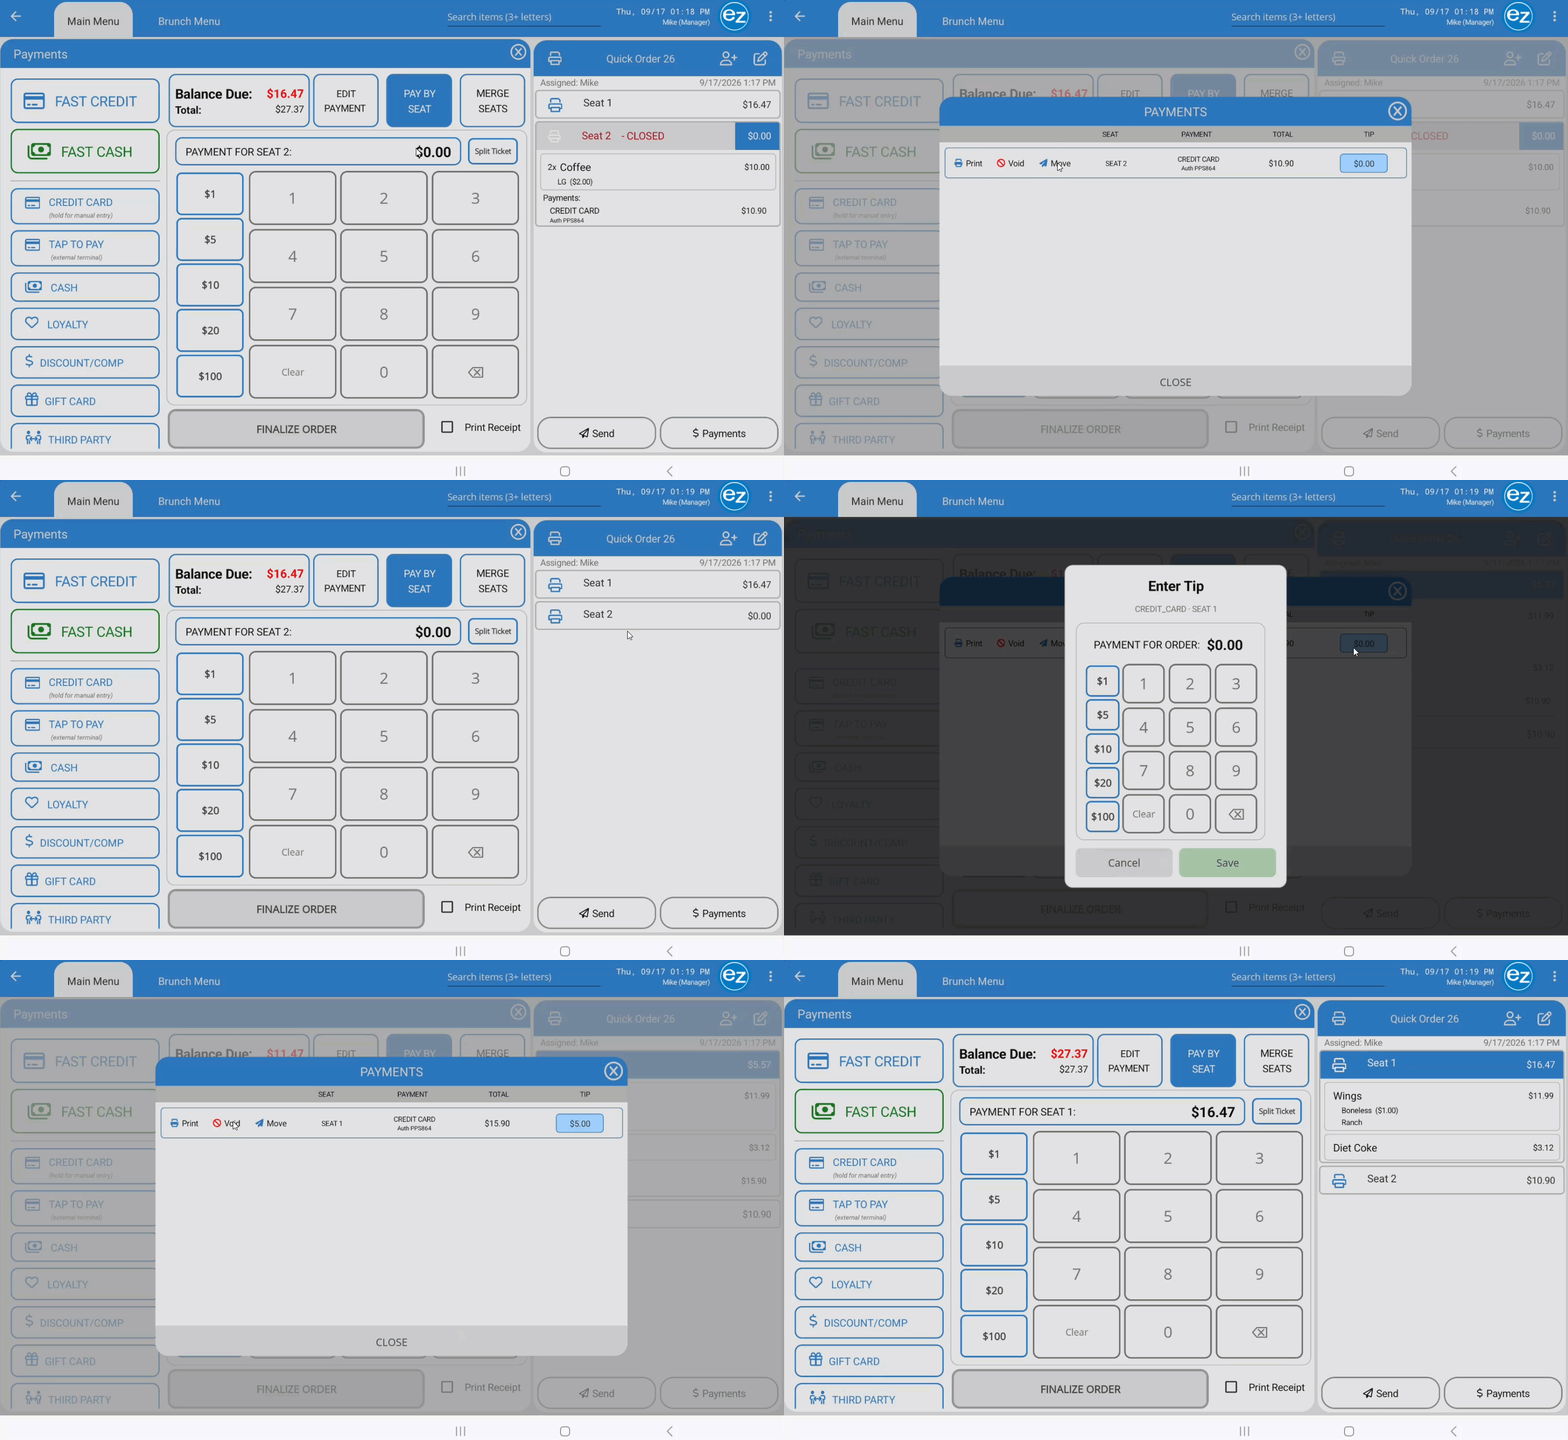
- Select Edit Payment on the payment screen to open the Payments window and manage applied payments. Each applied payment displays in its own row detailing the Seat, Payment Type, Total, and Tip
- Print: Reprints the credit card receipt for the selected transaction. Note: Credit card receipt printing must be enabled in EZ Dine Studio receipt settings
- Void: Removes the selected payment from the order. Requires Void Payment permissions. The EZ Dine app automatically prints a void receipt upon completion
- Move: Transfers an applied payment from one seat to another. Select the target seat in the Move Payments window; the updated seat automatically applies the payment on the order ticket
- Adding or Editing Tips: Tap the dollar amount listed under the Tip column (displays as $0.00 by default). On the Edit Tip keypad, select a preset dollar amount from the left panel or manually enter a custom tip value. Tap Save to apply the tip to the selected payment
- Existing the Window: Tap Close or select the X in the top-right corner to exist the Payments window and return to the payment page
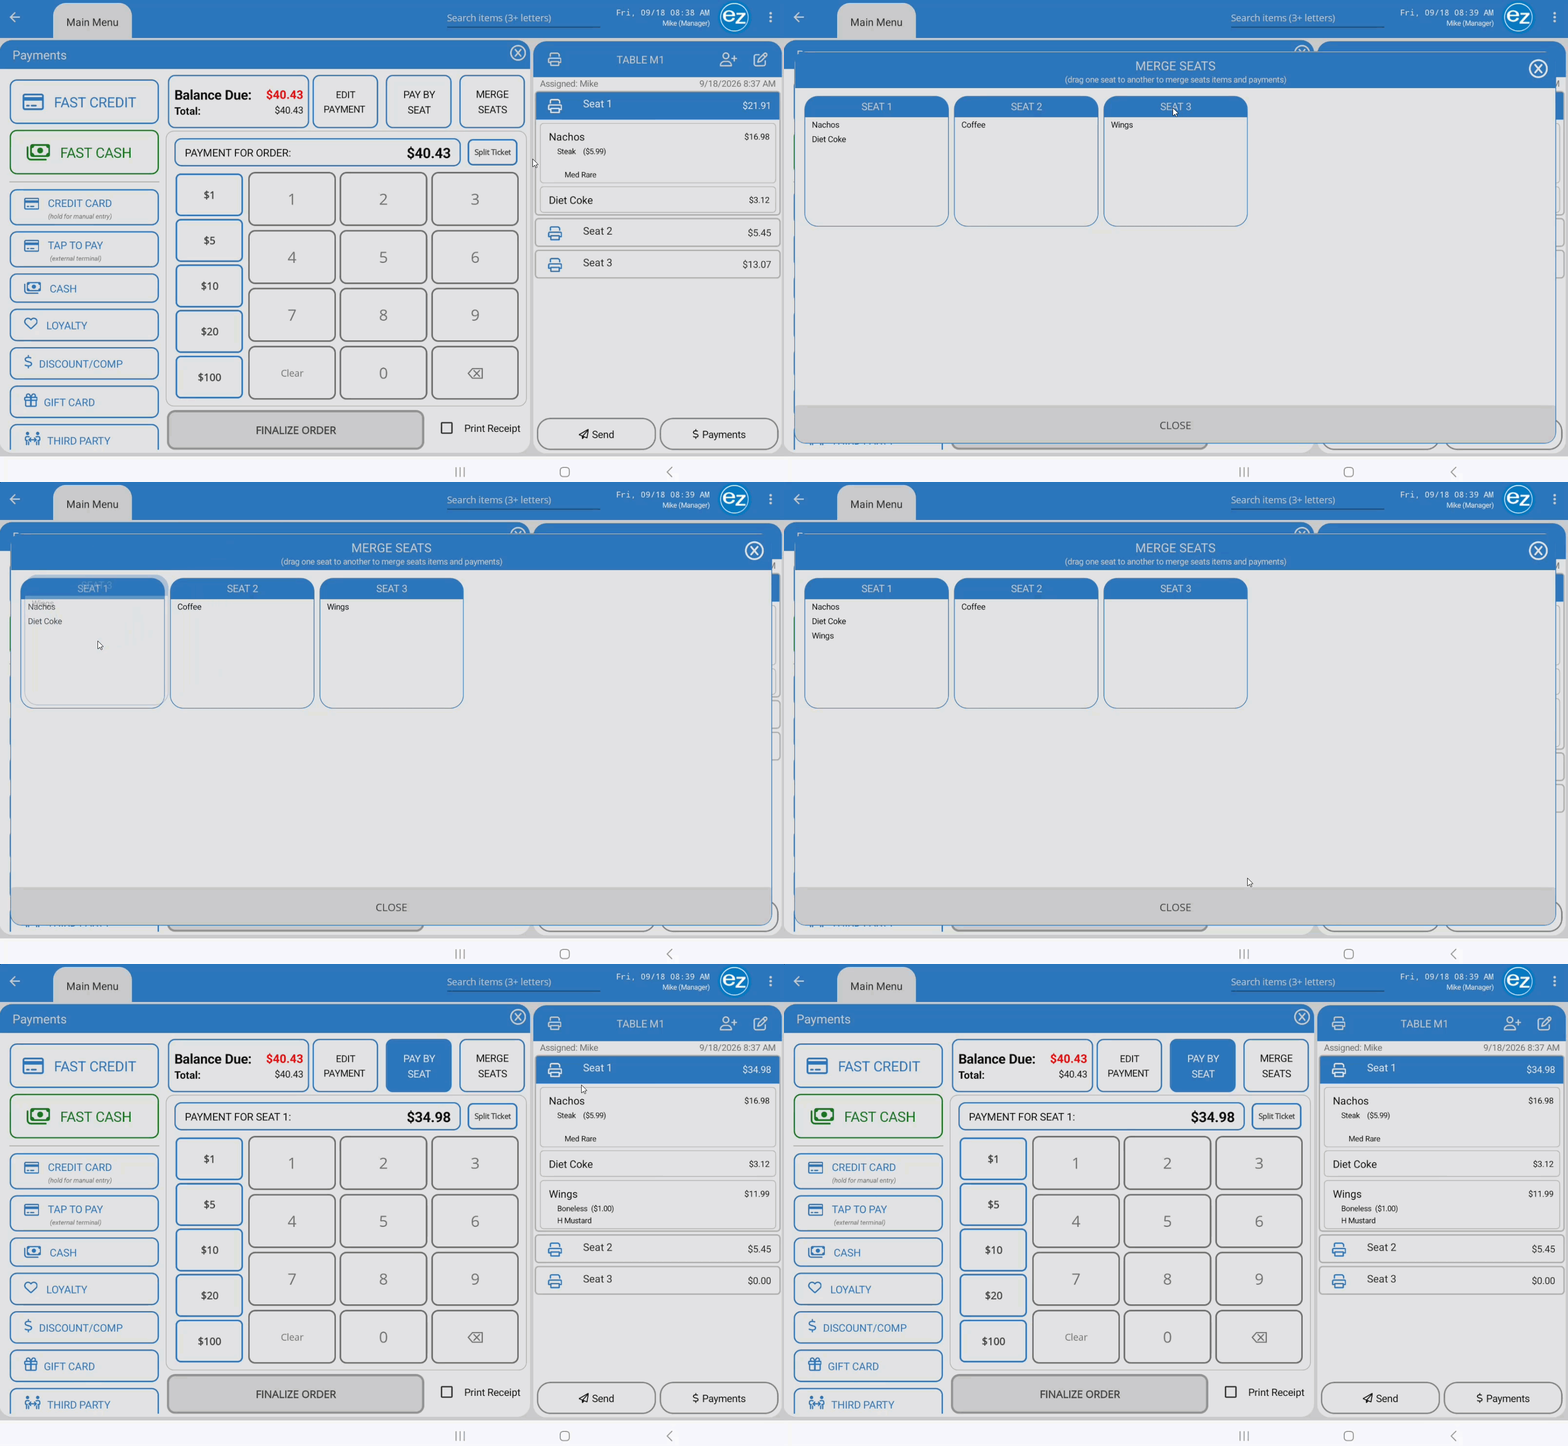
Step 7: Merging Seats for Payment
- Combine multiple seats together on the payment screen to consolidate items onto a single bill for guest checkout
- Tap Merge Seats on the payment screen to open the Merge Seats window
- Press and hold the seat for a few seconds until the seat highlight becomes active
- Tap Confirm on the pop-up prompt to transfer all items from the original seat to the target seat
- Tap Close or the X in the top-right corner to exist the Merge Seats window and return to payment page.
- Note: Merging seats transfers all items from one seat to another. To move individual items between seats, use the Move Items function on the main ordering/item modification screen
Step 8: Equal Splitting an Order
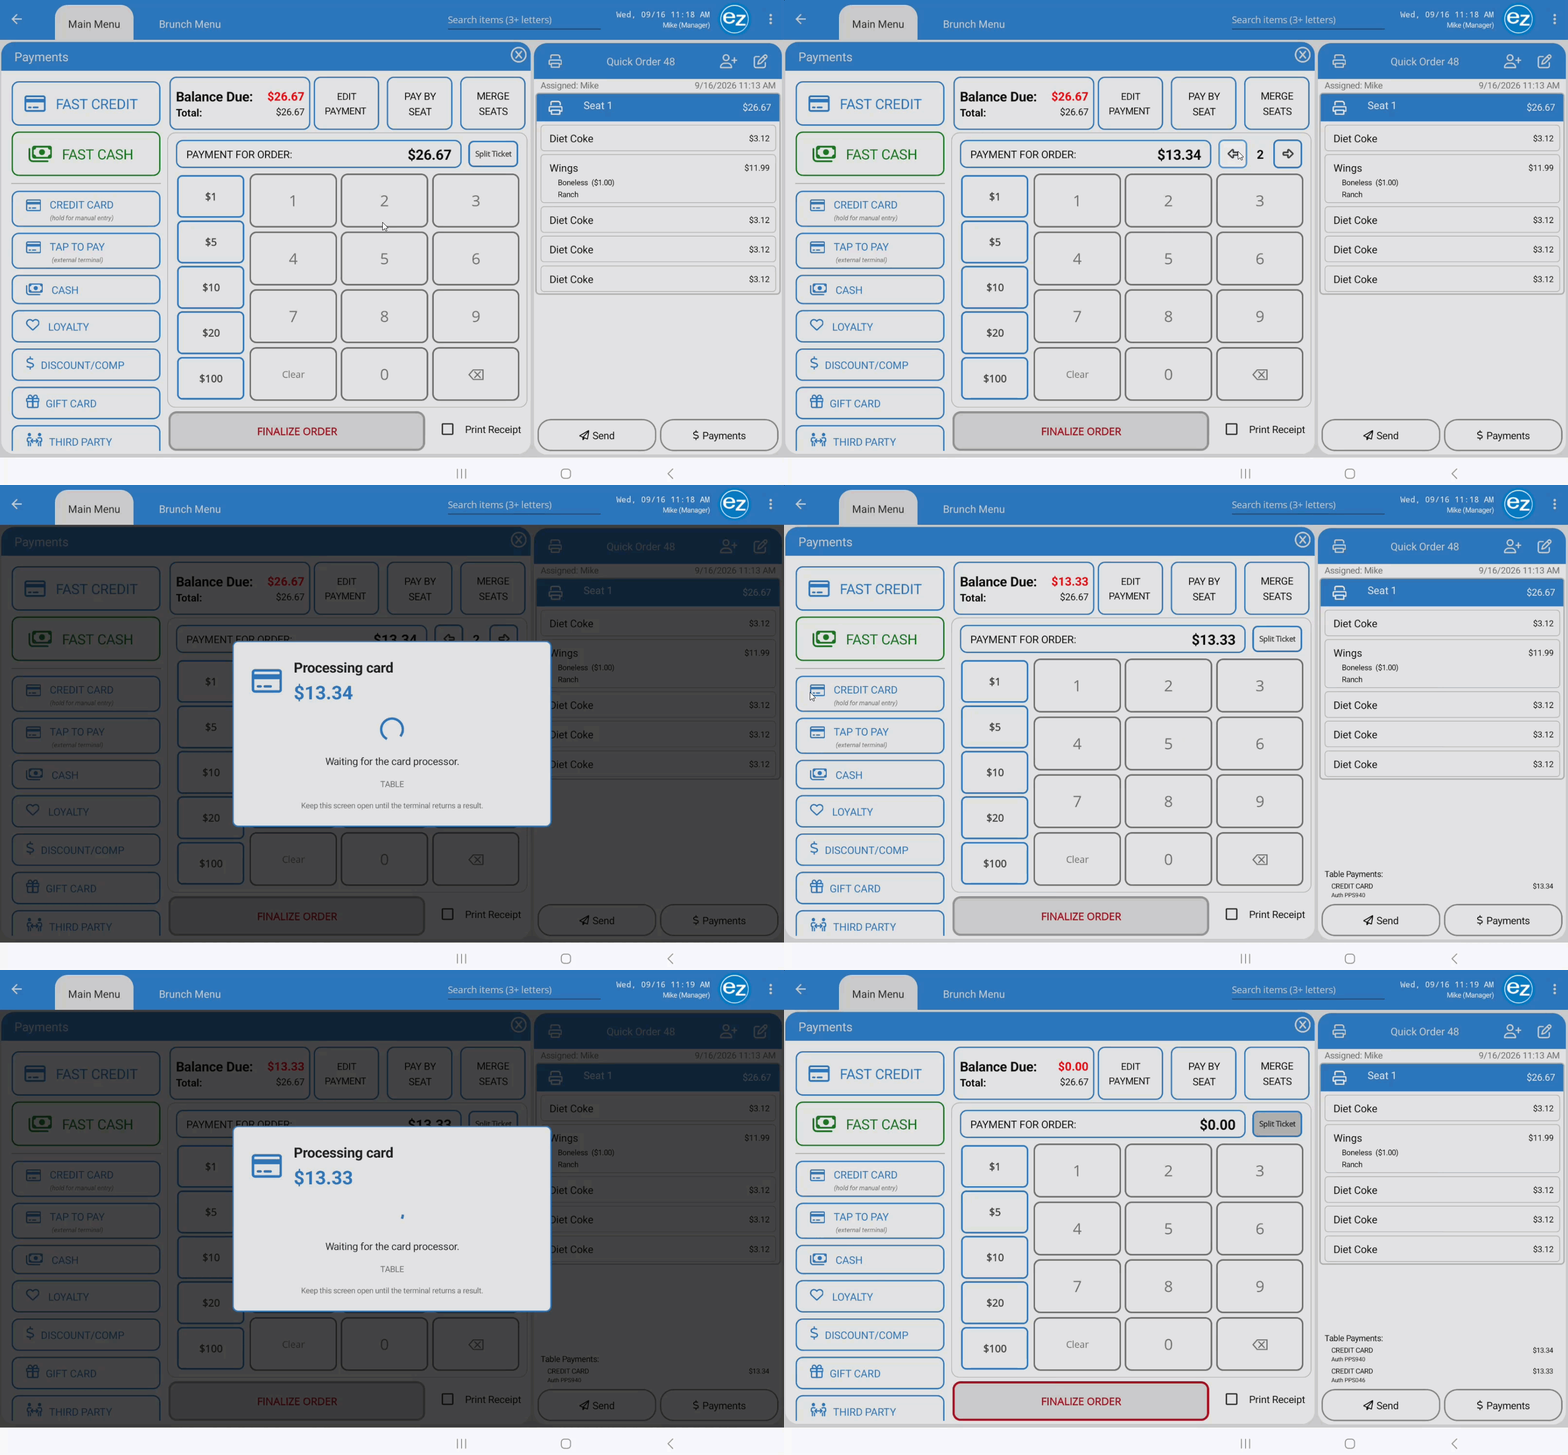
- Divide an order total evenly across multiple cash or credit card payments using the Split Ticket feature
- Select the Split Ticket tab on the payment screen
- Use the Left (<) and Right (>) arrows to increase or decrease the number of ways to split the order total
- The payment header updates automatically to display the calculated split amount per payment
- Select the desired payment type (Cash or Credit Card) to process the current split amount
- Repeat the payment process for each remaining split portion until the Balance Due reaches $0.00
Step 9: Equal Splitting An Item
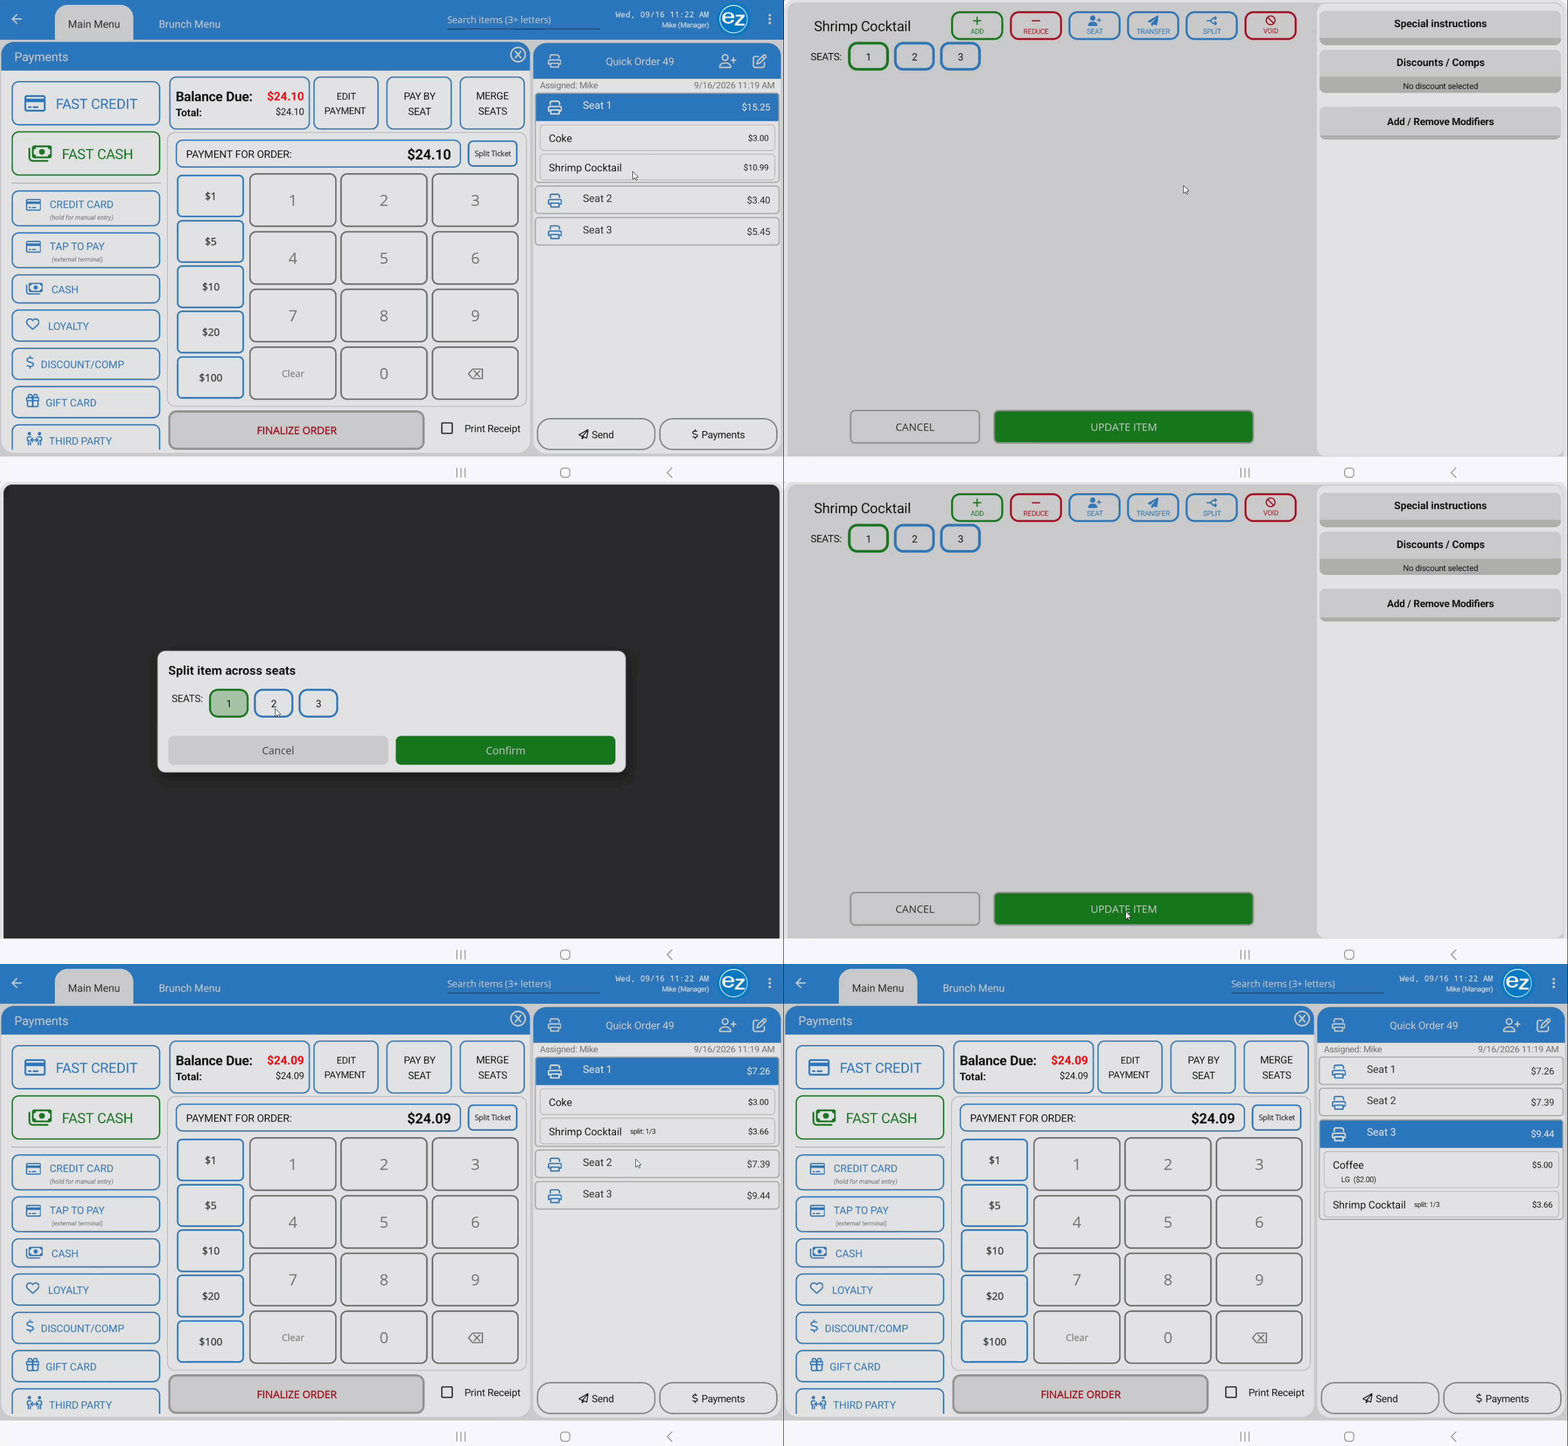
- Divide the cost of an individual menu item evenly across multiple seats on an order ticket
- Tap the target item on the order ticket to open the Item Modifications window
- Tap the Split icon (represented by divergent arrows)
- In the Split Item Seat window, select the target seats to divide the item between and tap Confirm
- The item distributes automatically across the selected seats, with each seat displaying its proportional split price and fractional share on the order ticket
- Undoing an Item split tap the Split icon on the split item
- Deselect the seats currently assigned to the split
- Tap Confirm
- The item's full original price restores to the primary seat, and the split entries are removed from all other seats
Step 10: Discounts & Comps
Configure discount rules, limits, and comp reasons codes in EZ Dine Studio. Refer to the Studio Discount Setup and Studio Comp Setup guides for details
- Applying discounts or comps requires appropriate employee security permissions configured on EZ Dine Studio
- Subtotal & Tax Calculation: Discounts apply strictly on the pre-tax subtotal. Taxes recalculate automatically based on the newly discounted balance
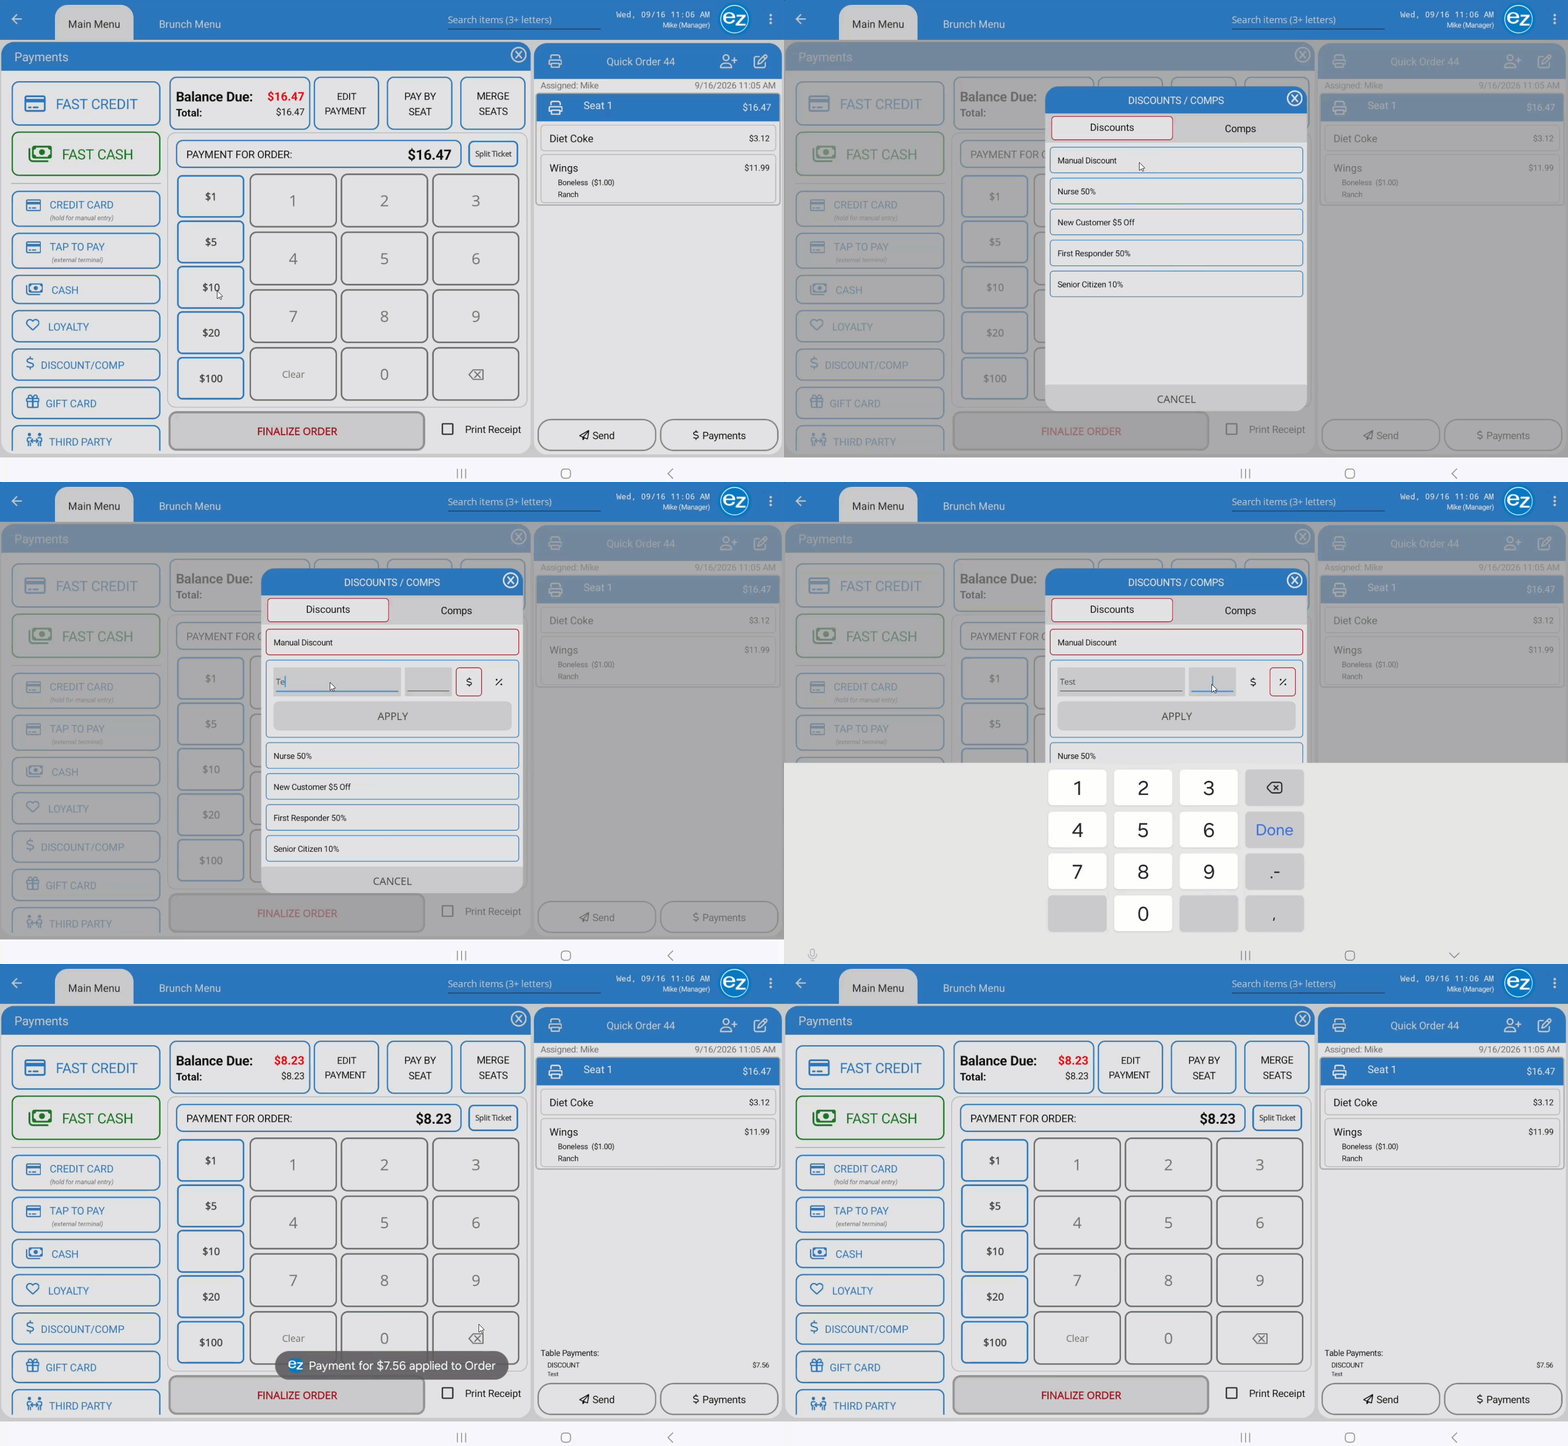
- Toggle Interface: Tap the Discount/Comps tab on the payment screen. Use the top toggle to switch between Discounts (left) and Comps (right). The selected toggle highlights in red
- Preset Discounts: Select any pre-configured Studio discount button to apply it directly to the order subtotal
- Manual Discounts: Select Manual Discount at the top of the discount selection list. Enter a Discount Name. Select the discount type: Percentage (%) or Dollar Amount ($). Input the value and tap Apply. The applied discount displays as a line item on the order ticket
- Select the Comps toggle (right side)
- Choose the appropriate comp reason from the list configured in Studio
- The selected comp applies to the order ticket and automatically deducts 100% of the order
- Seat-Level Discounts % Comps: Tap Pay By Seat to activate seat selection
- Select the target Seat Number, then open the Discounts/Comps tab
- Choose the desired discount or comp
- The discount/comp type, dollar amount, and corresponding seat number log on the order ticket, inside the Edit Payments window, and update the seat's remaining Balance Due
- Order-level and seat-level discounts cannot be applied simultaneously on the same transaction. Attempting to add both triggers a warning prompt requiring you to override or clear the existing discount first
Manual Discount
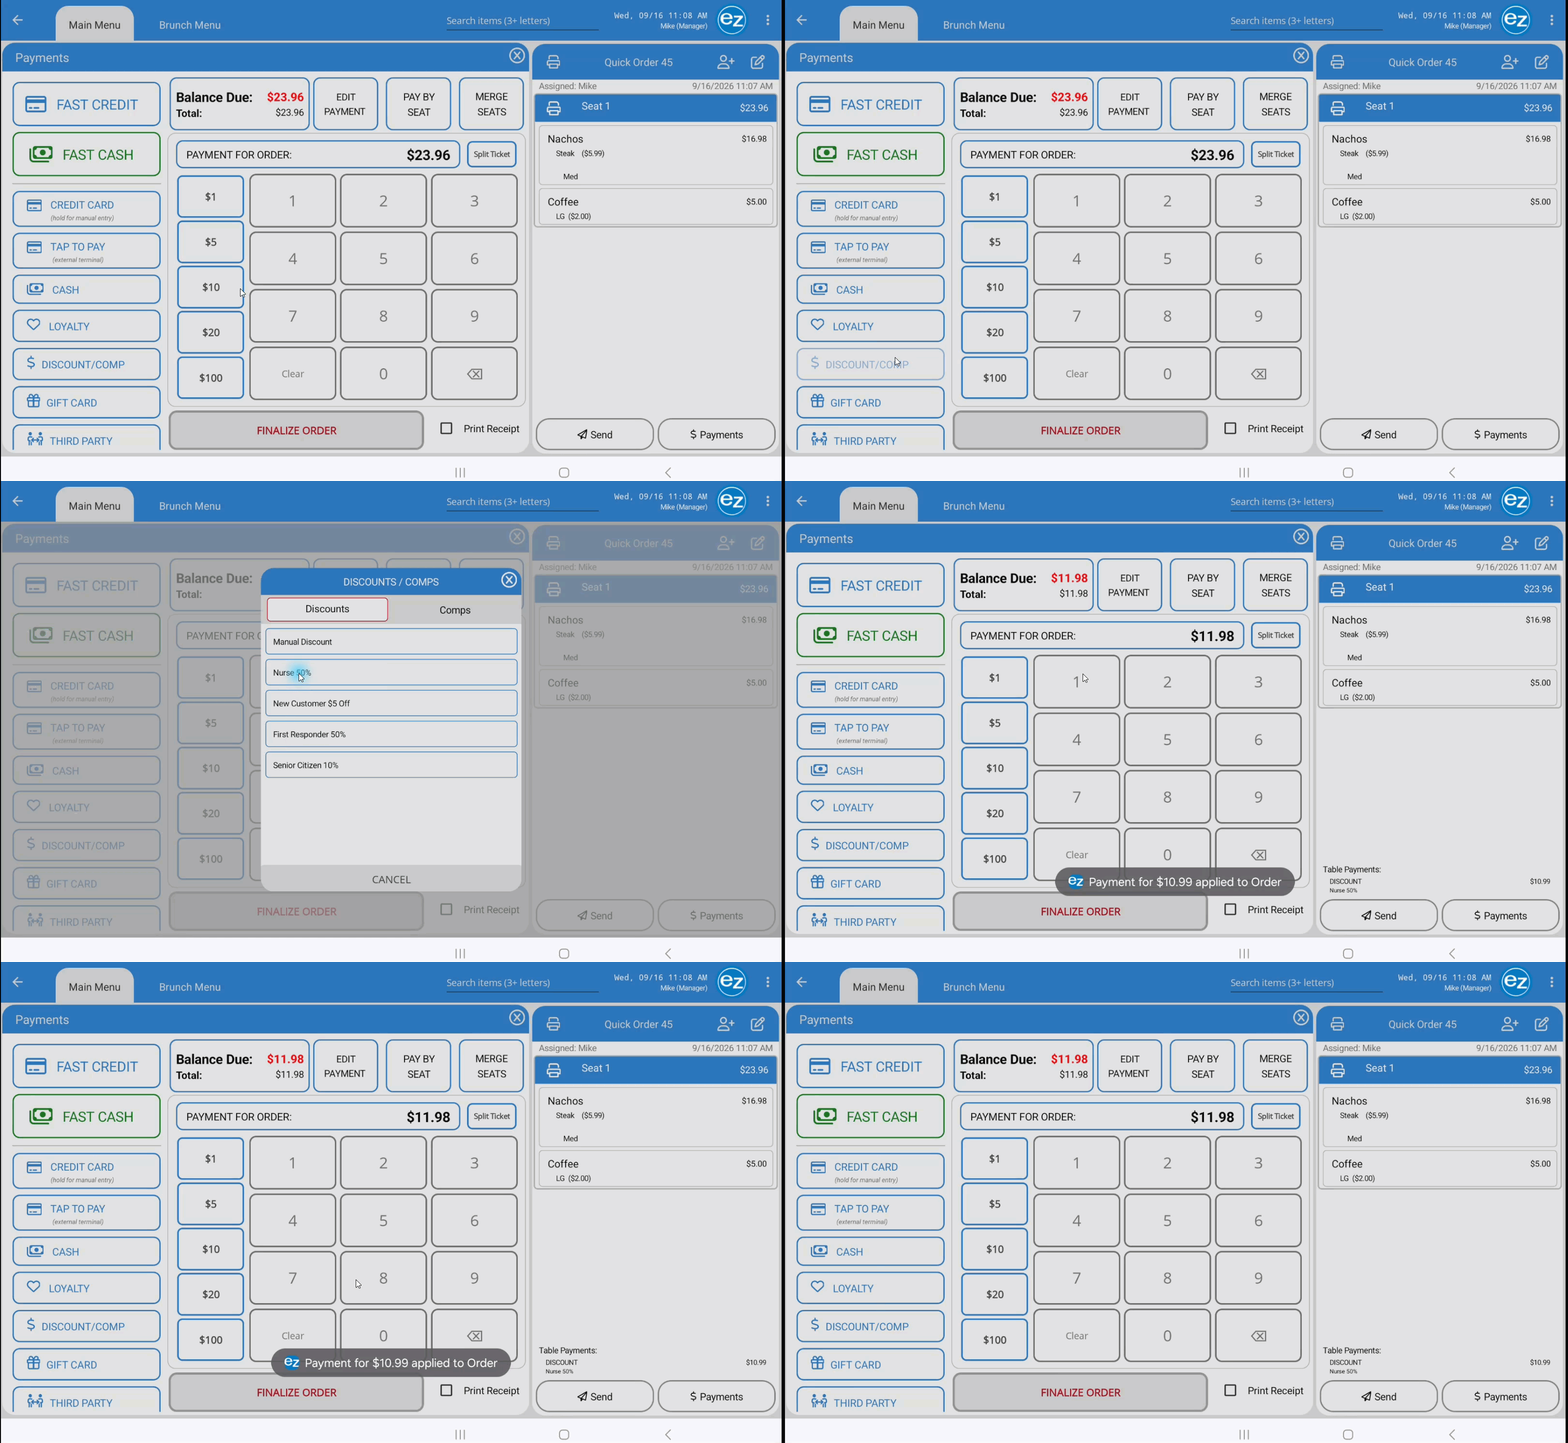
Pre-set Discount
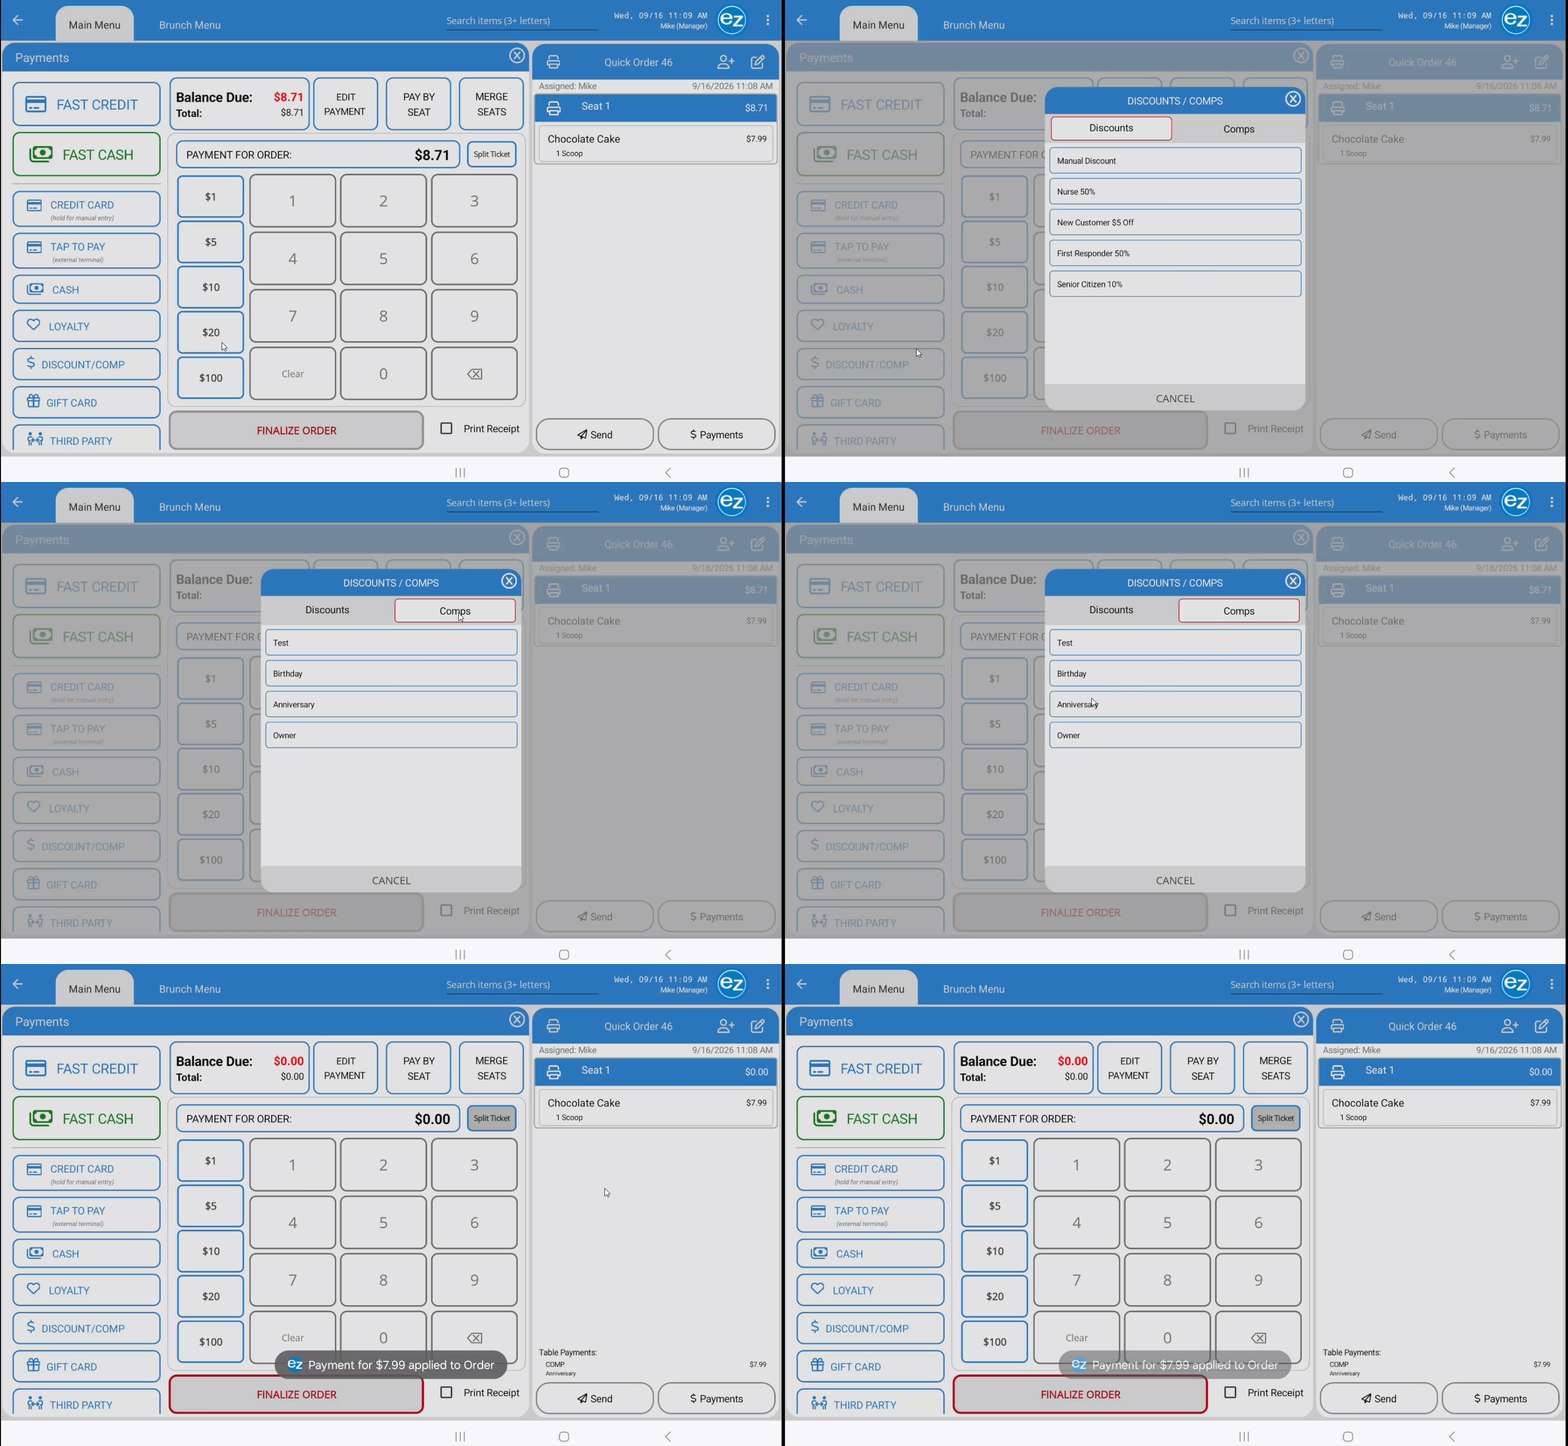
Comps
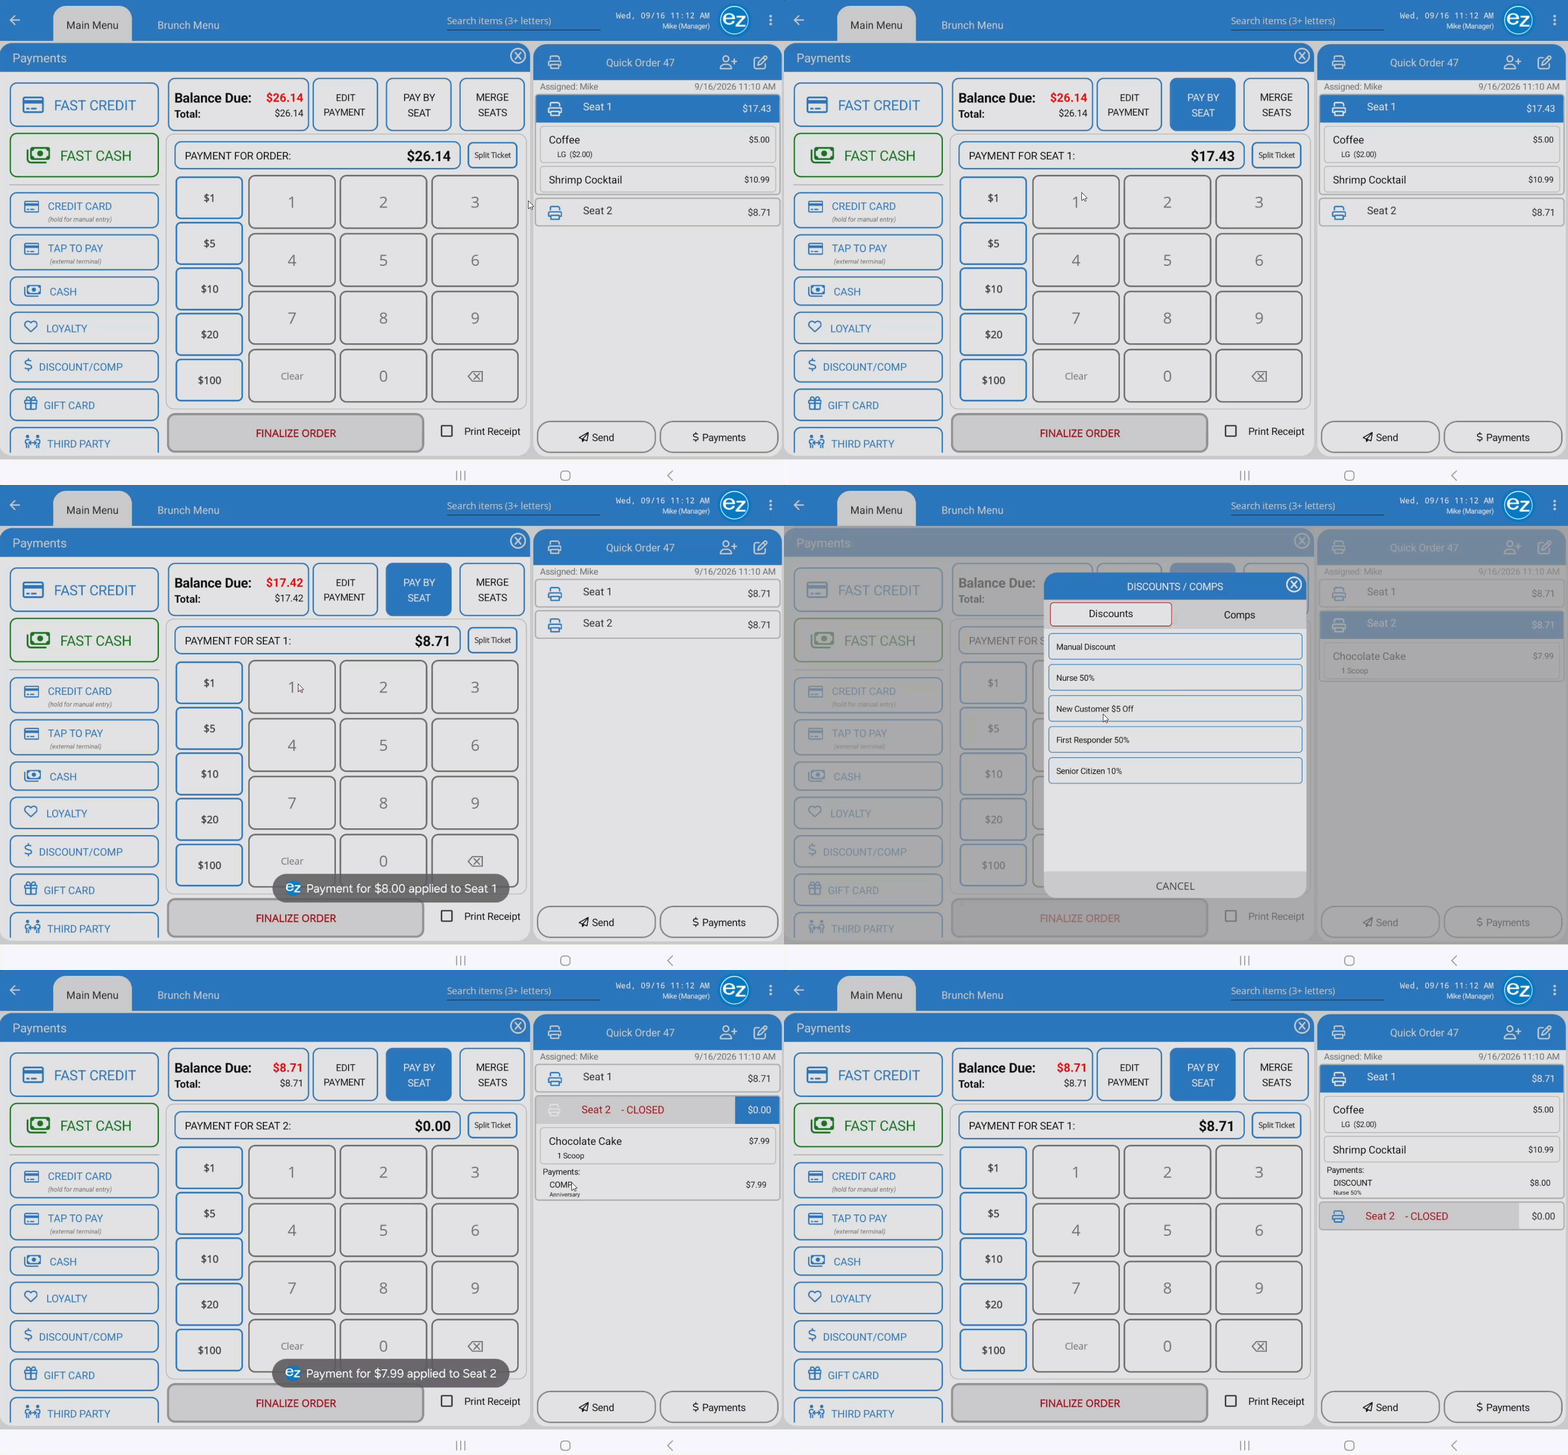
Seat Discount & Comp
Step 11: Third Party Payments
Third-party payment types must be configured in EZ Dine Studio before they can be used on the EZ Dine app. Refer to the Studio Third Party Payments setup guide for configuration details
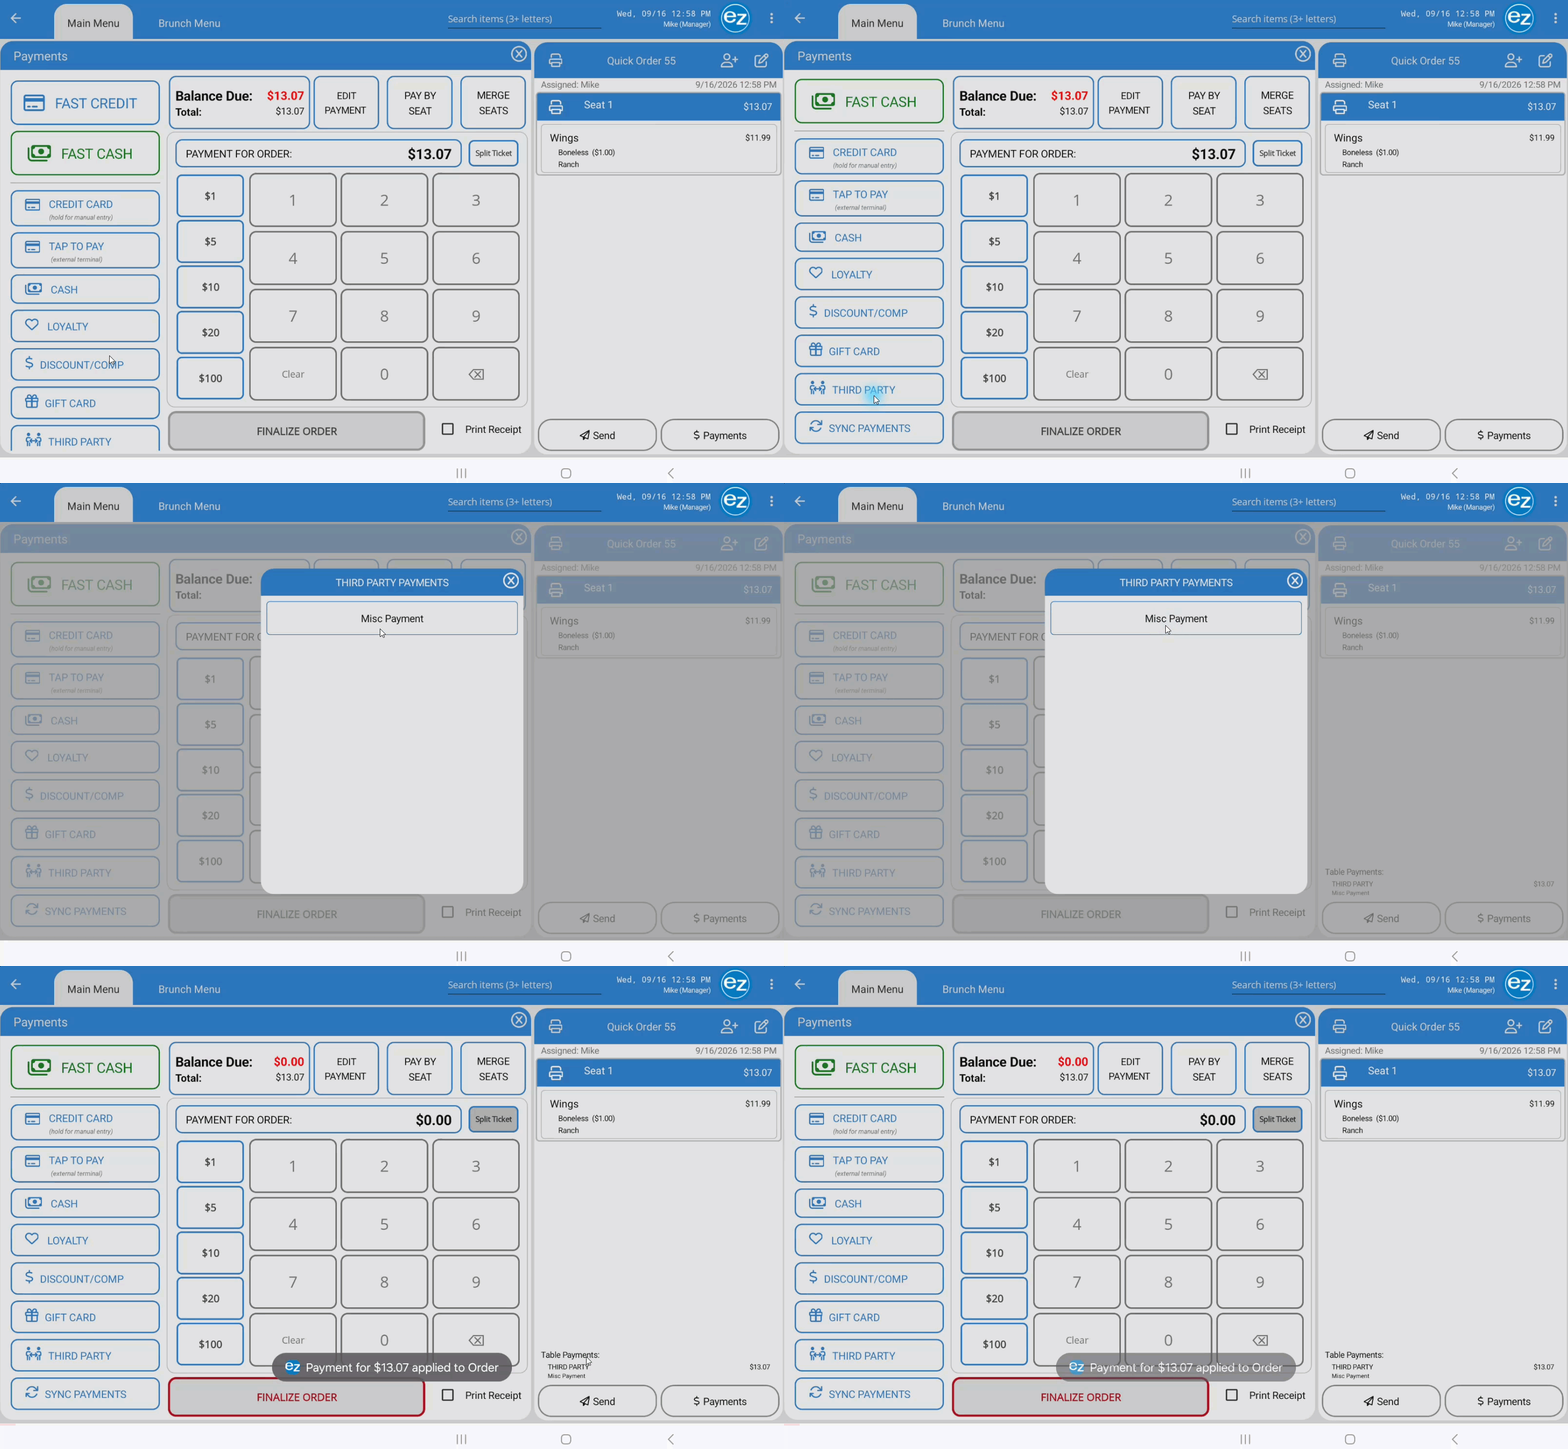
- Select the Third Party payment tab on the left side of the payments window
- The Third-Party payments window will open, displaying a list of all external payment types currently active and configured in EZ Dine Studio
- Tap the specific third-party type for the order
- The EZ Dine app will automatically apply the full active order balance total as the third-party payment amount
Step 12: Tax Exempt
Employees must have the Allow Tax Exempt Status permission enabled in EZ Dine Studio to apply or remove tax exemption on an order
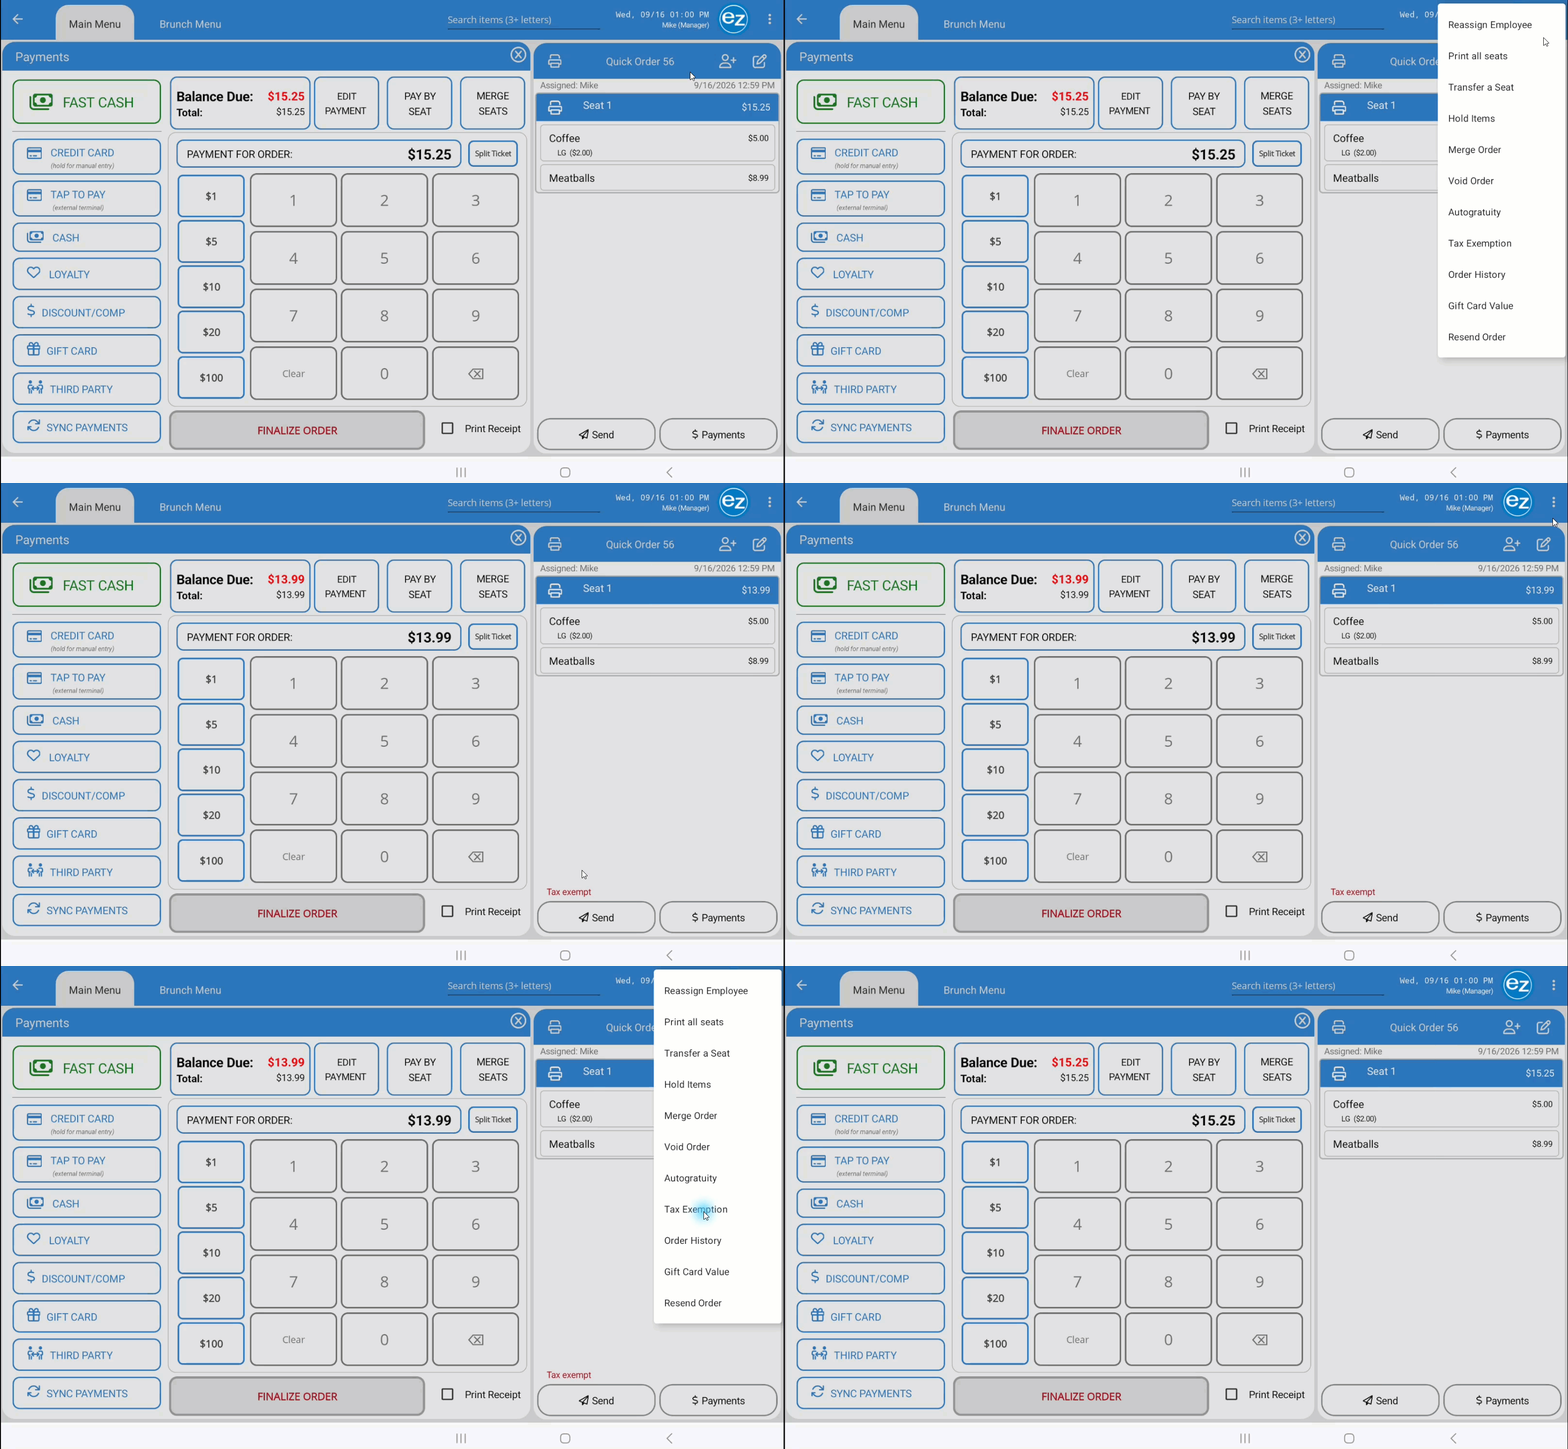
- Applying Exemption: Tap the Order Options Menu in the top-right corner of the screen and select Tax Exemption
- Visual Indicator: The status displays in red text at the bottom of the order ticket
- Tax Calculation: The EZ Dine app automatically removes all tax charges, updating the Balance Due and Order Total amounts
- Order-Level Scope: Tax exemption applies strictly to the entire order. Taxes cannot be removed on an individual seat by seat basis
- Receipt Display: Both customer and finalized receipts list the tax line item as $0.00
- Reporting: Tax-exempt sales log automatically on system financial reports under the Sales Total & Collected section
- Removing Exemption: To re-apply standard taxes, open the Order Options Menu and select Tax Exemption again to toggle the status off
Step 13: Auto-Gratuity
Configure auto-gratuity thresholds and percentages in EZ Dine Studio. Refer to the Studio Gratuity Settings guide for setup details. Removing auto-gratuity from an order requires the Remove Auto-Gratuity task permission
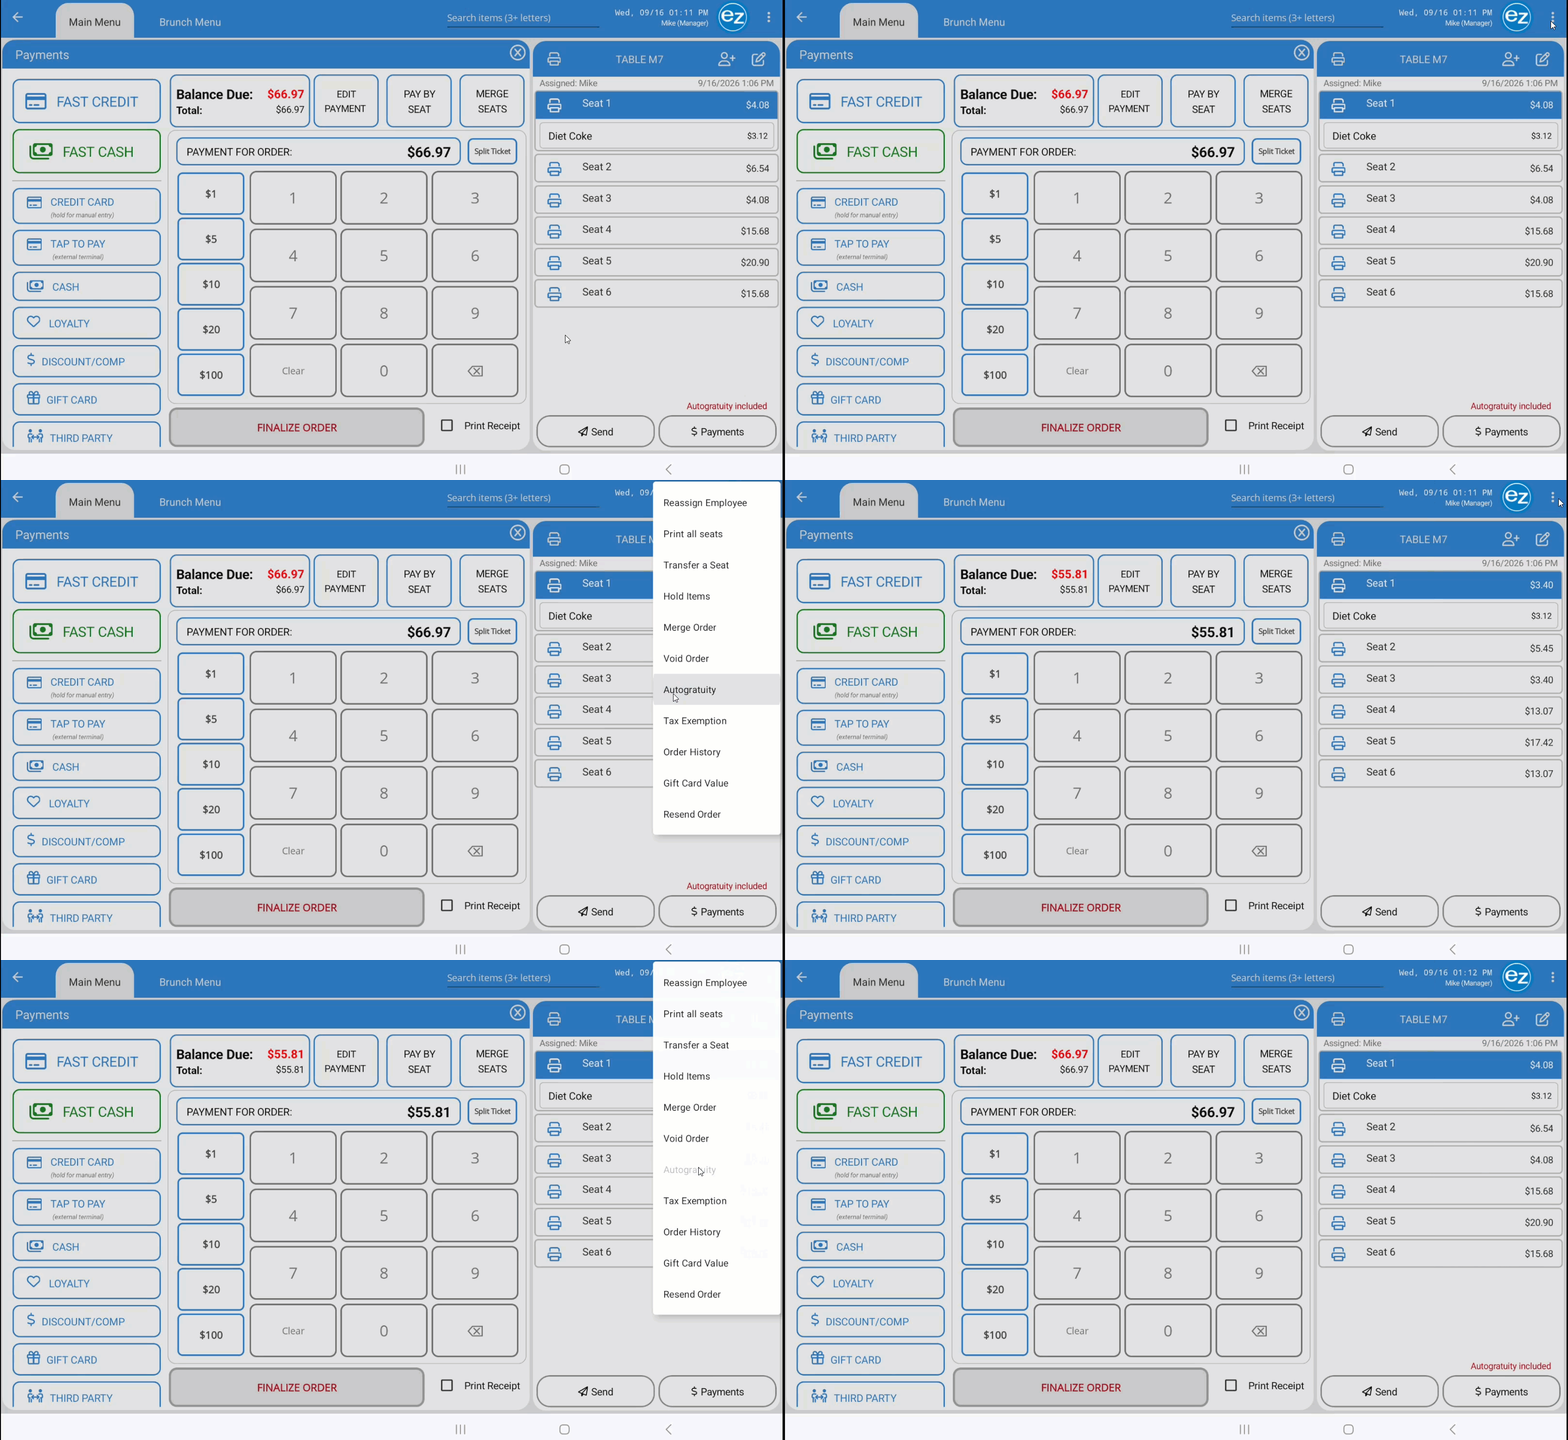
- Automatic Trigger: Auto-gratuity automatically applies to an order when the guest count meets or exceeds the threshold configured in EZ Dine Studio
- Calculation Basis: The auto-gratuity dollar amount is calculated on the grand total (subtotal + taxes)
- Visual Indicator: When active, the auto-gratuity status displays in red text at the bottom of the order ticket
- Manual Toggle: Tap the Order Options Menu in the top-right corner and select Autogratuity from the dropdown to manually apply or remove auto-gratuity on any order type or seat count
- Payment Totals: Auto-gratuity rolls directly into the seat and order balance total. All selected payment methods automatically include the auto-gratuity amount
- Receipts: Customer, Finalized, and Credit Card receipts display auto-gratuity as a separate, clearly defined line item
- Financial Reports: End-Shift, End-Day, and Studio financial reports categorize all collected auto-gratuity amounts under Service Charges
- Labor & Timesheet Reports: Studio labor reports (Timesheet Summary and Details views) include an Auto Gratuity column, calculating total gratuity earnings for each employee per shift
Step 14: Manual Credit Card Entry
- If a physical credit card cannot be read (swiped, dipped, or tapped), staff can manually key in the card details directly on the card reader
- Initiating Manual Entry: On the payments page, press and hold the Credit Card payment tab for several seconds. This activates the manual entry sequence on the credit card reader
- Card Reader Prompts: Follow the prompts on the card reader to enter the required card information. Credit Card Number. Expiration Date. 3-Digit Security Code
- Processing & Settlement: Once the card details are entered, the transactions follows the standard credit card authorization workflow, generating approval receipts and assigning an Auth ID to the order
Step 15: Credit Card Declines & Timeouts
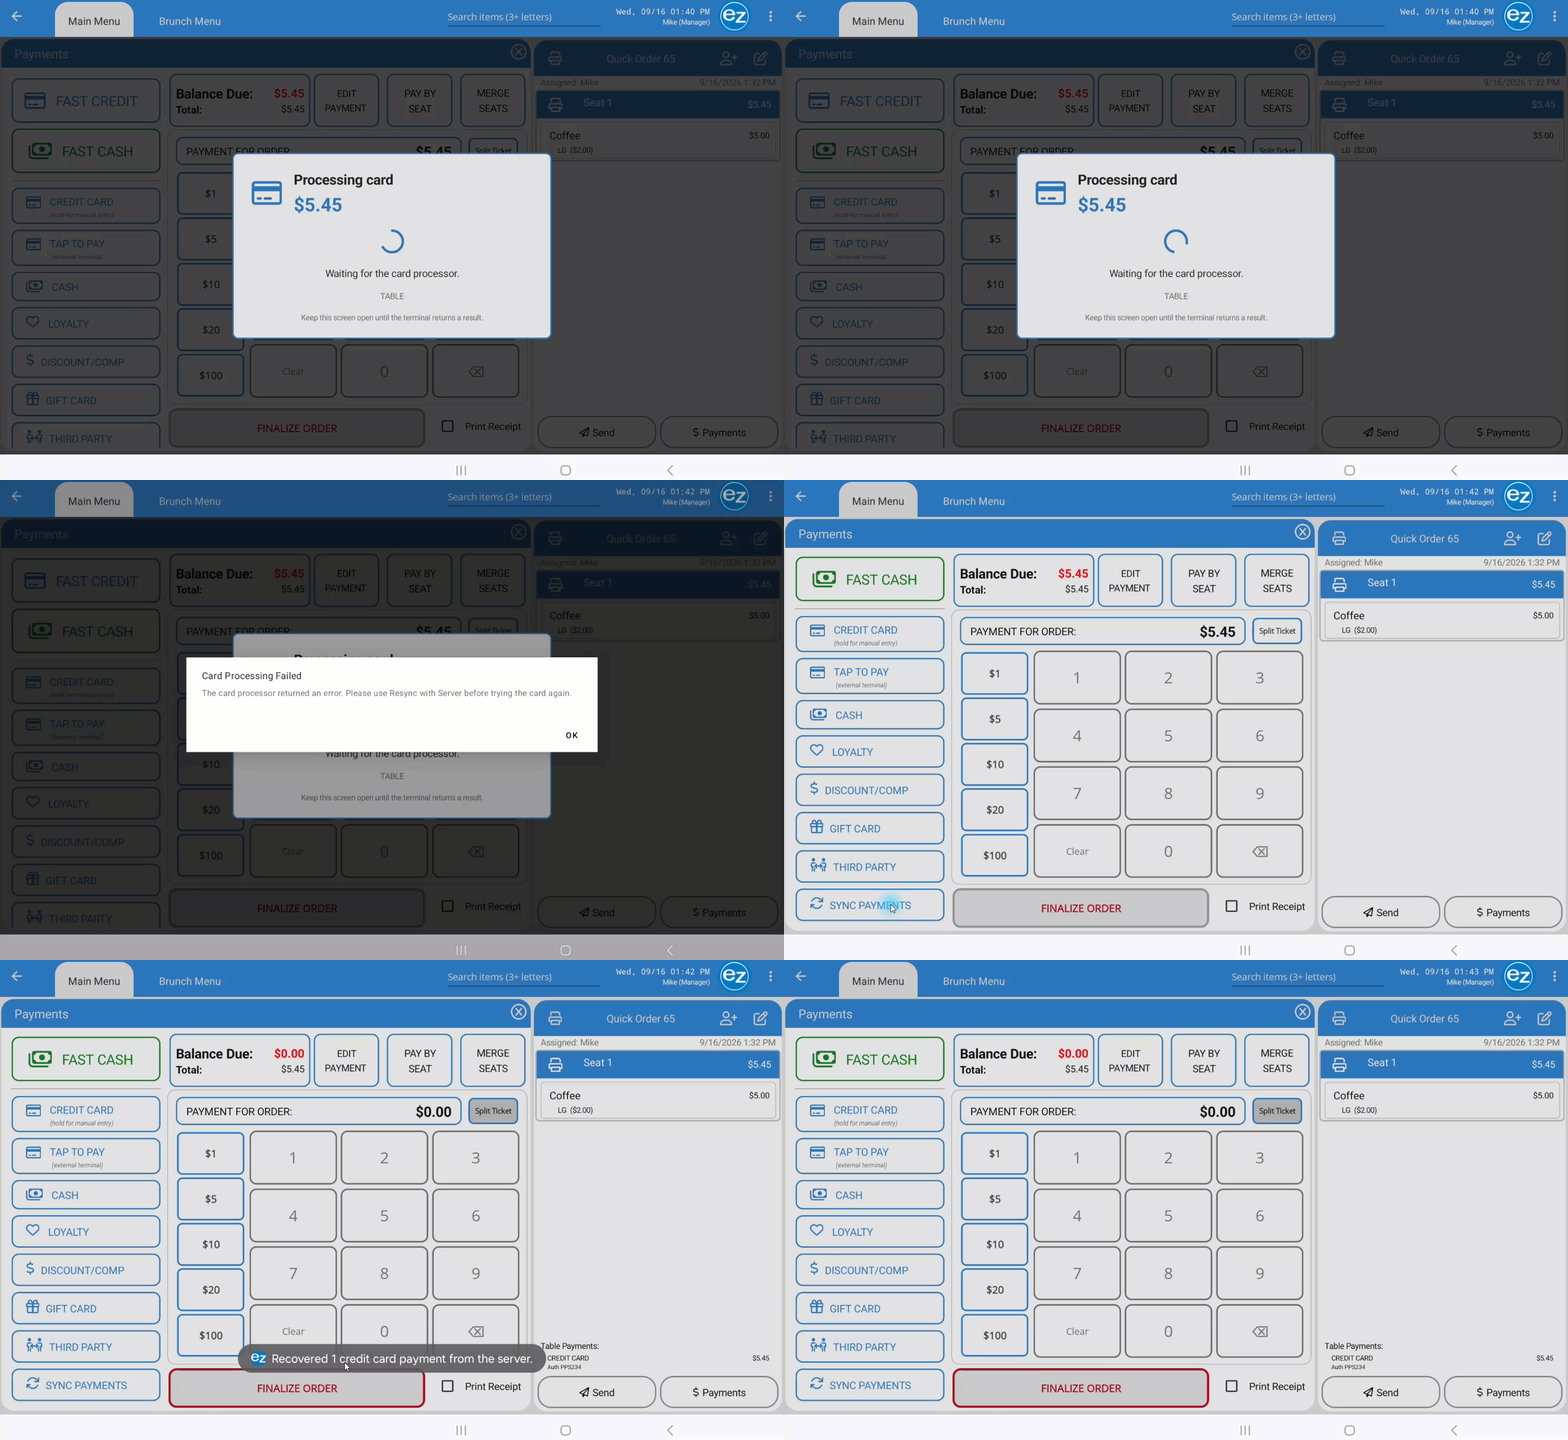
- Declines: When a credit card payment is rejected by the card processor, the EZ Dine app displays a 'Card Processing Failed" error message requiring staff to re-try or select a different payment method. Common causes include insufficient funds, expired cards, or issuer restrictions ("Do Not Honor")
- Connection Timeouts: Card readers operate with a pre-configured timeout window. If the transaction is not completed on the card reader before this window closes, the connection resets and the payment must be re-sent from the EZ Dine app
- In rare instances, a transaction may show as approved on the card reader but fail to display on the order due to a momentary network drop
- Payment Recovery: Scroll to the bottom of the left-side payment methods list and tap Sync Payments
- The EZ Dine app queries the processor for orphaned approvals
- Upon successful recovery, a confirmation banner displays. "1 payment was recovered and re-synced back to the order"
- The recovered credit card payment attaches to the order, updating the Balance Due to $0.00 so the transaction can be finalized
Additional Resources and Help!
Still have questions? Please contact us any time at support@ezsoftpos.com.
NOTE: If emailing, please include your business name in the subject line of the email
and provide your preferred contact information for the best response time.
Visit our help center Help Center for more guides and tutorials