TABLE OF CONTENTS
- Step 1: Cash
- Step 2: Fast Cash
- Step 3: Credit Card
- Step 4: Manual Credit Card
- Step 5: Fast Credit Card
- Step 6: Credit Card Declined
- Step 7: Credit Card Surcharges
- Step 8: Credit Card Timeout
- Step 9: Cash Discounting
- Step 10: Gift Cards
- Step 11: Order Discount and Comps
- Step 12: Seat Discount and Comps
- Step 13: Discount Restrictions
- Step 14: Third Party and Payments
- Step 15: Split Payments
- Step 16: Editing Payments
- Step 17: Tax Exempt
- Step 18: Remove Auto-Gratuity
- Additional Resources and Help!
Employee specific payment permissions will be needed to apply the different payment methods listed inside the EZ Dine app payment section
Step 1: Cash
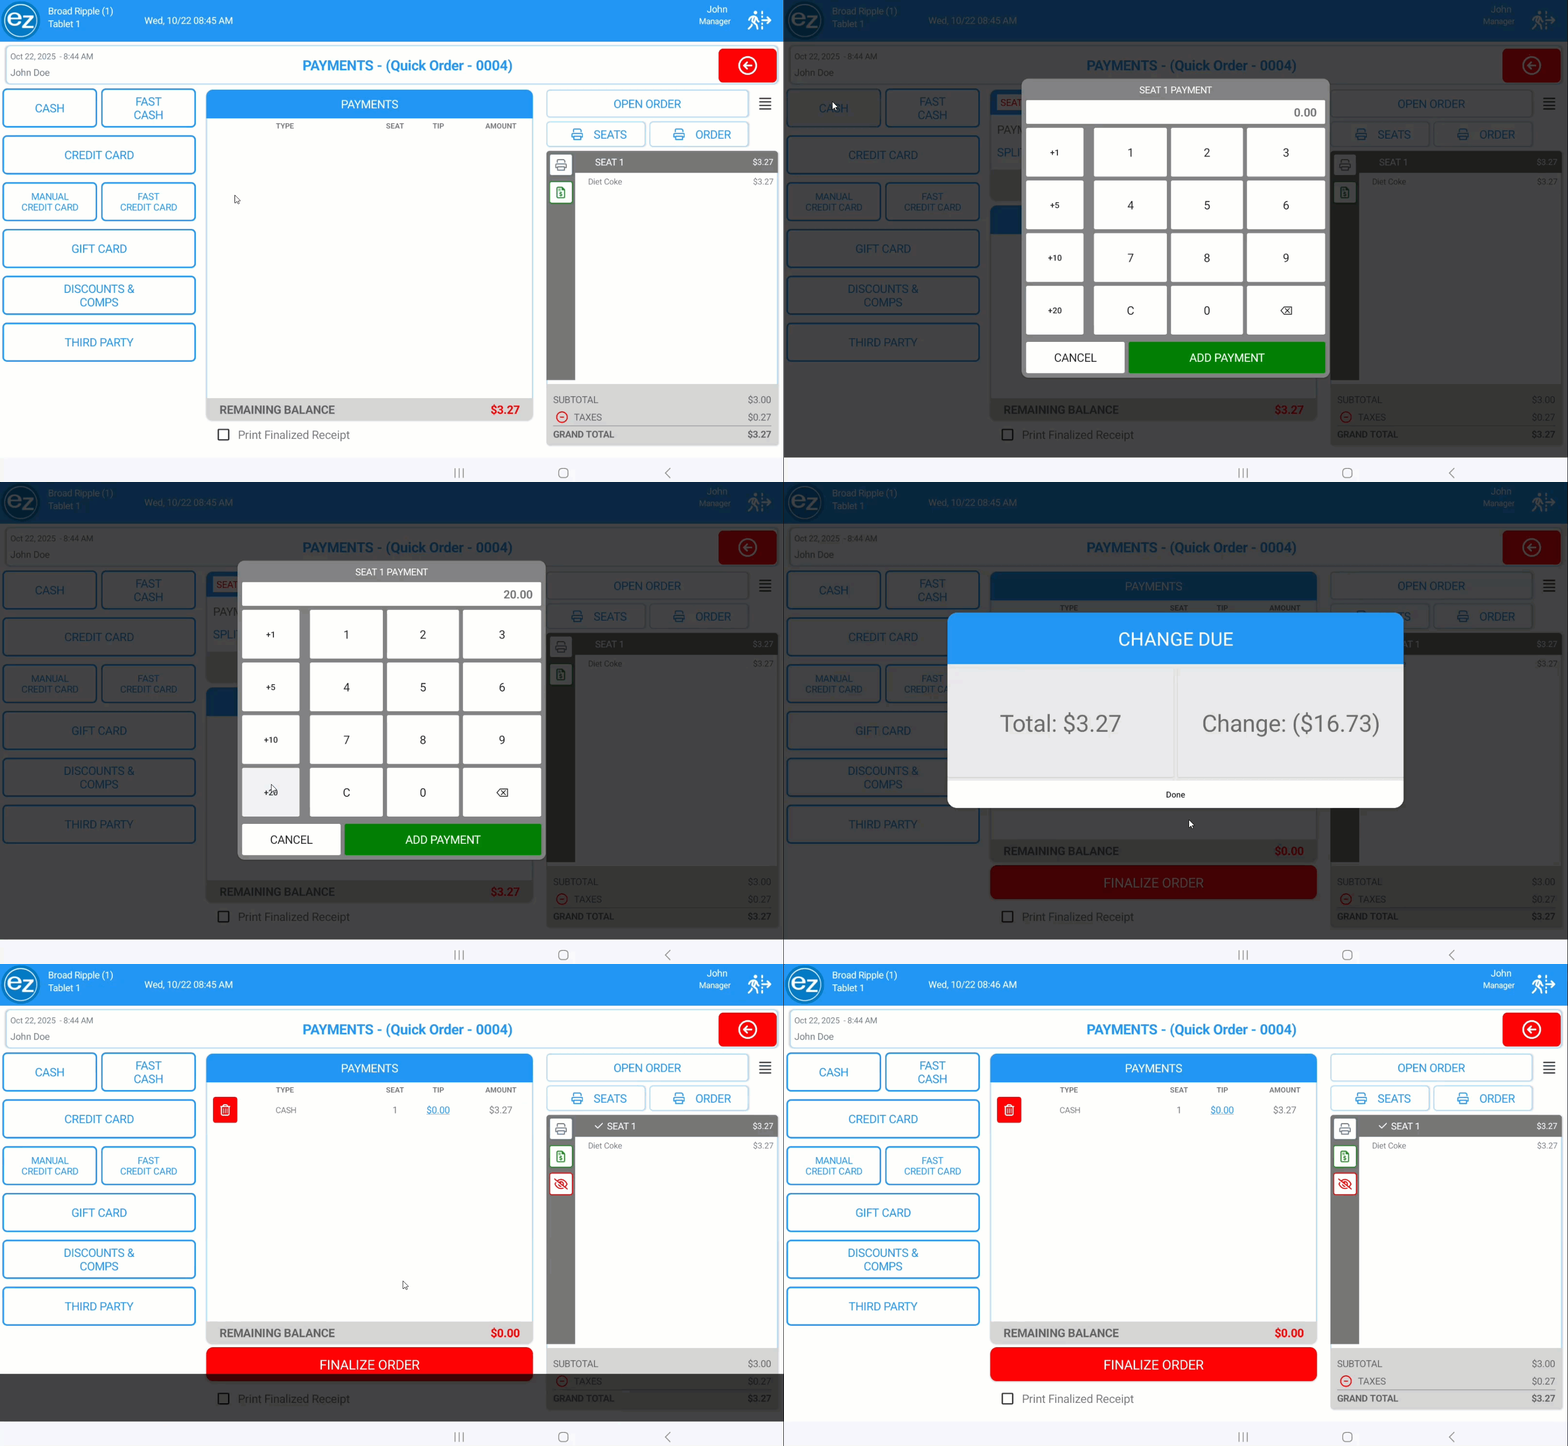
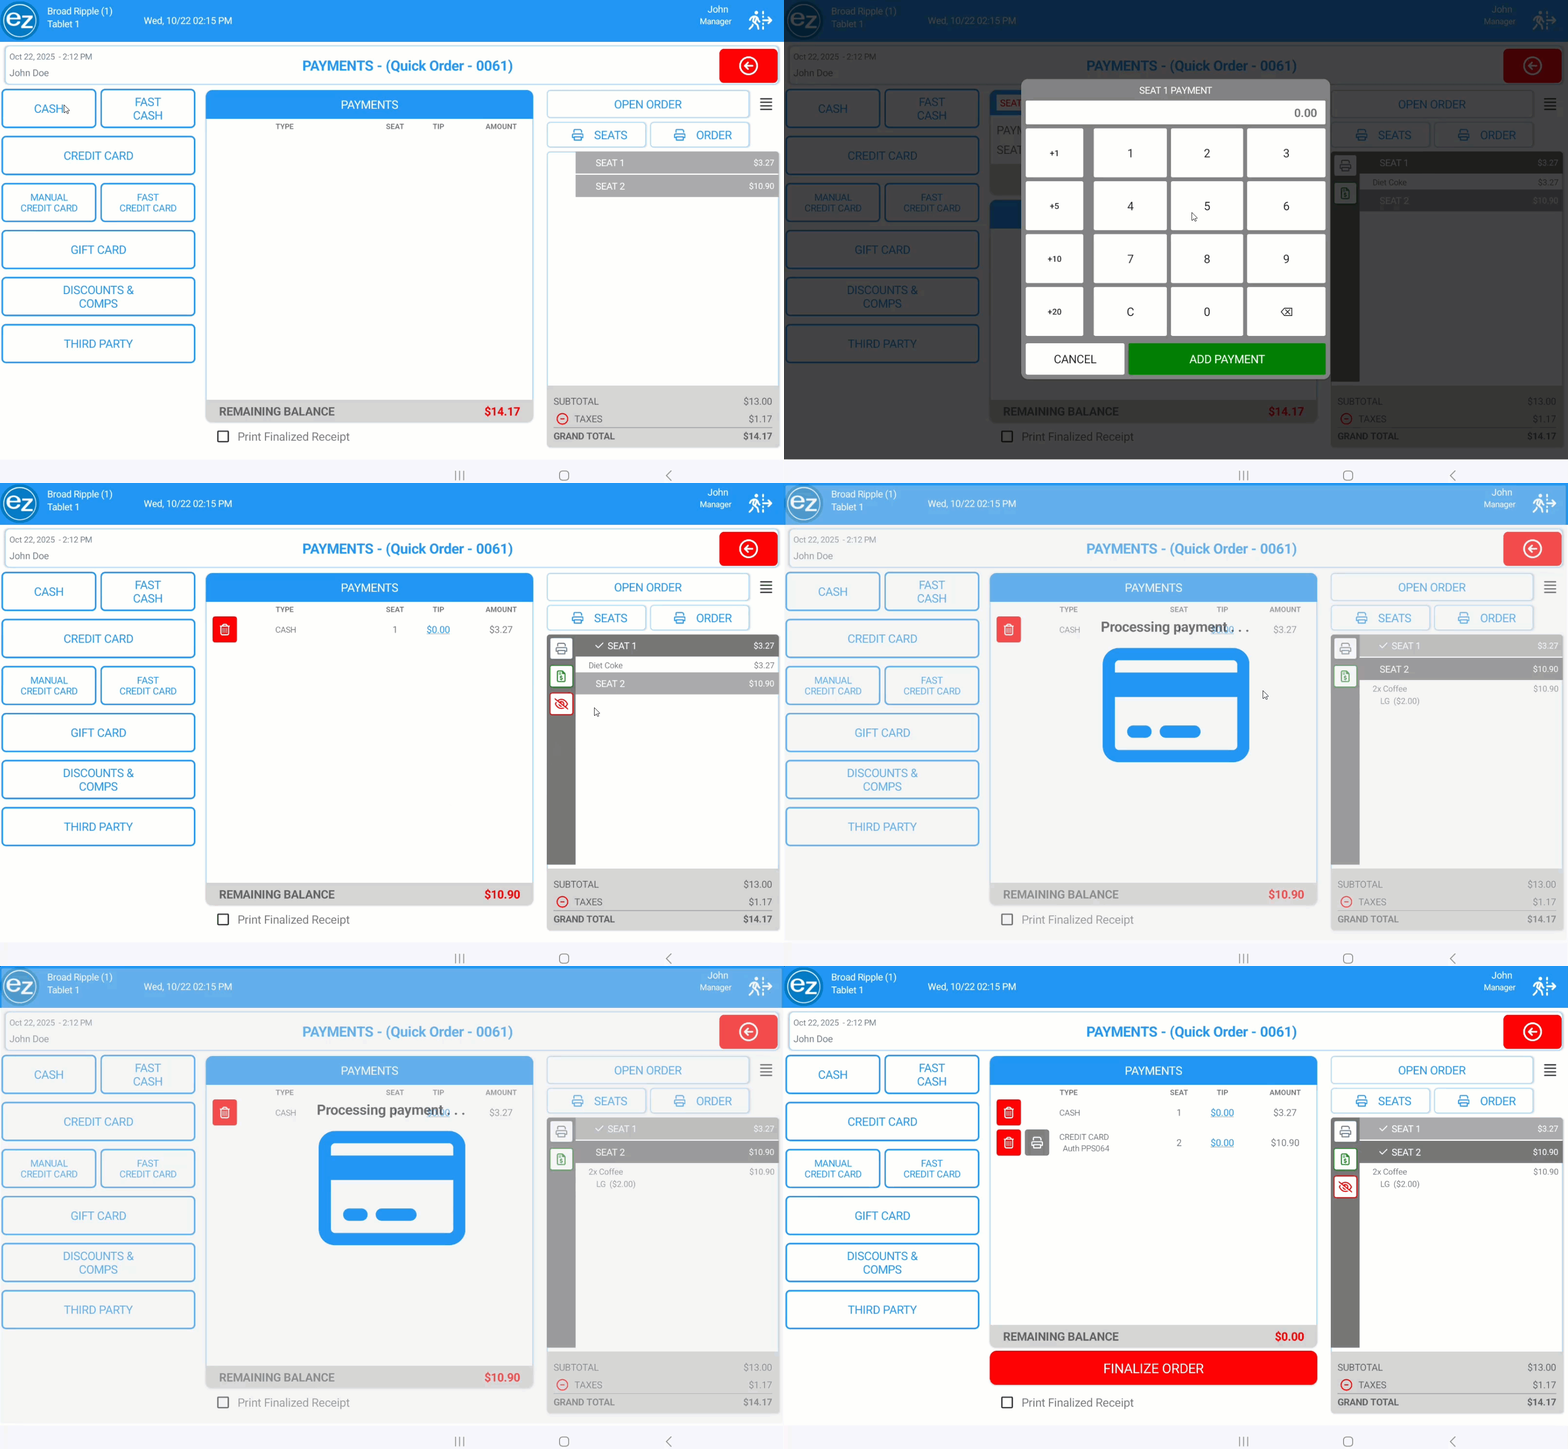
- The cash payment option will allow for custom cash payment amounts
- Press cash and the number pad window will be prompted automatically
- You can use the pre-set amounts listed on the left hand side. Or enter in any custom amount on the number pad
- Once the amount is entered tap the green add payment button. If a cash drawer is connected the drawer will open automatically once the payment is added
- For cash payments greater than the total the change due screen will be shown
- The change due will list the difference between the payment amount applied and the total. Select done on the change due and the cash payment will be added inside the payment window
- For applying the cash amount to the individual seat. Select cash and tap the seat number header. Or seat number header and cash. Either method will apply the cash amount directly to the individual seat
- The number pad window screen will be shown to enter in the cash amount. Once the cash payment is applied the seat number and cash amount will be listed inside the payment window
- The seat number header will now display a checkmark indicating the seat total has been paid in full
- To complete the order select the red finalize order button at the bottom of the page
- Once the order is finalized depending on the finalized receipt settings. A finalized receipt can be printed automatically, prompted, or turned off
Custom Cash
Seat Cash
Step 2: Fast Cash
- The fast cash option can be used for applying the exact cash amount for the entire order
- Once selected the entire order and all seats will be finalized automatically
- There will be an additional Studio store payment setting for hiding the fast cash payment selection. Hiding the fast cash payment tab can help prevent mistakes by removing the ability for accidental finalization of orders
- For details on hiding the fast cash payment selection please reference the Studio store settings article found here: Disable Fast Cash
- When fast cash is disabled the fast cash payment option will no longer be visible. The cash payment tab will become enlarged taking over the previous fast cash tab's position
Fast Cash
Hiding Fast Cash
Step 3: Credit Card
An active merchant processing account will be needed before any credit card payment type can be transacted. For details on configuring the merchant account store setting please reference the Studio article found here
Merchant Credit Card Settings
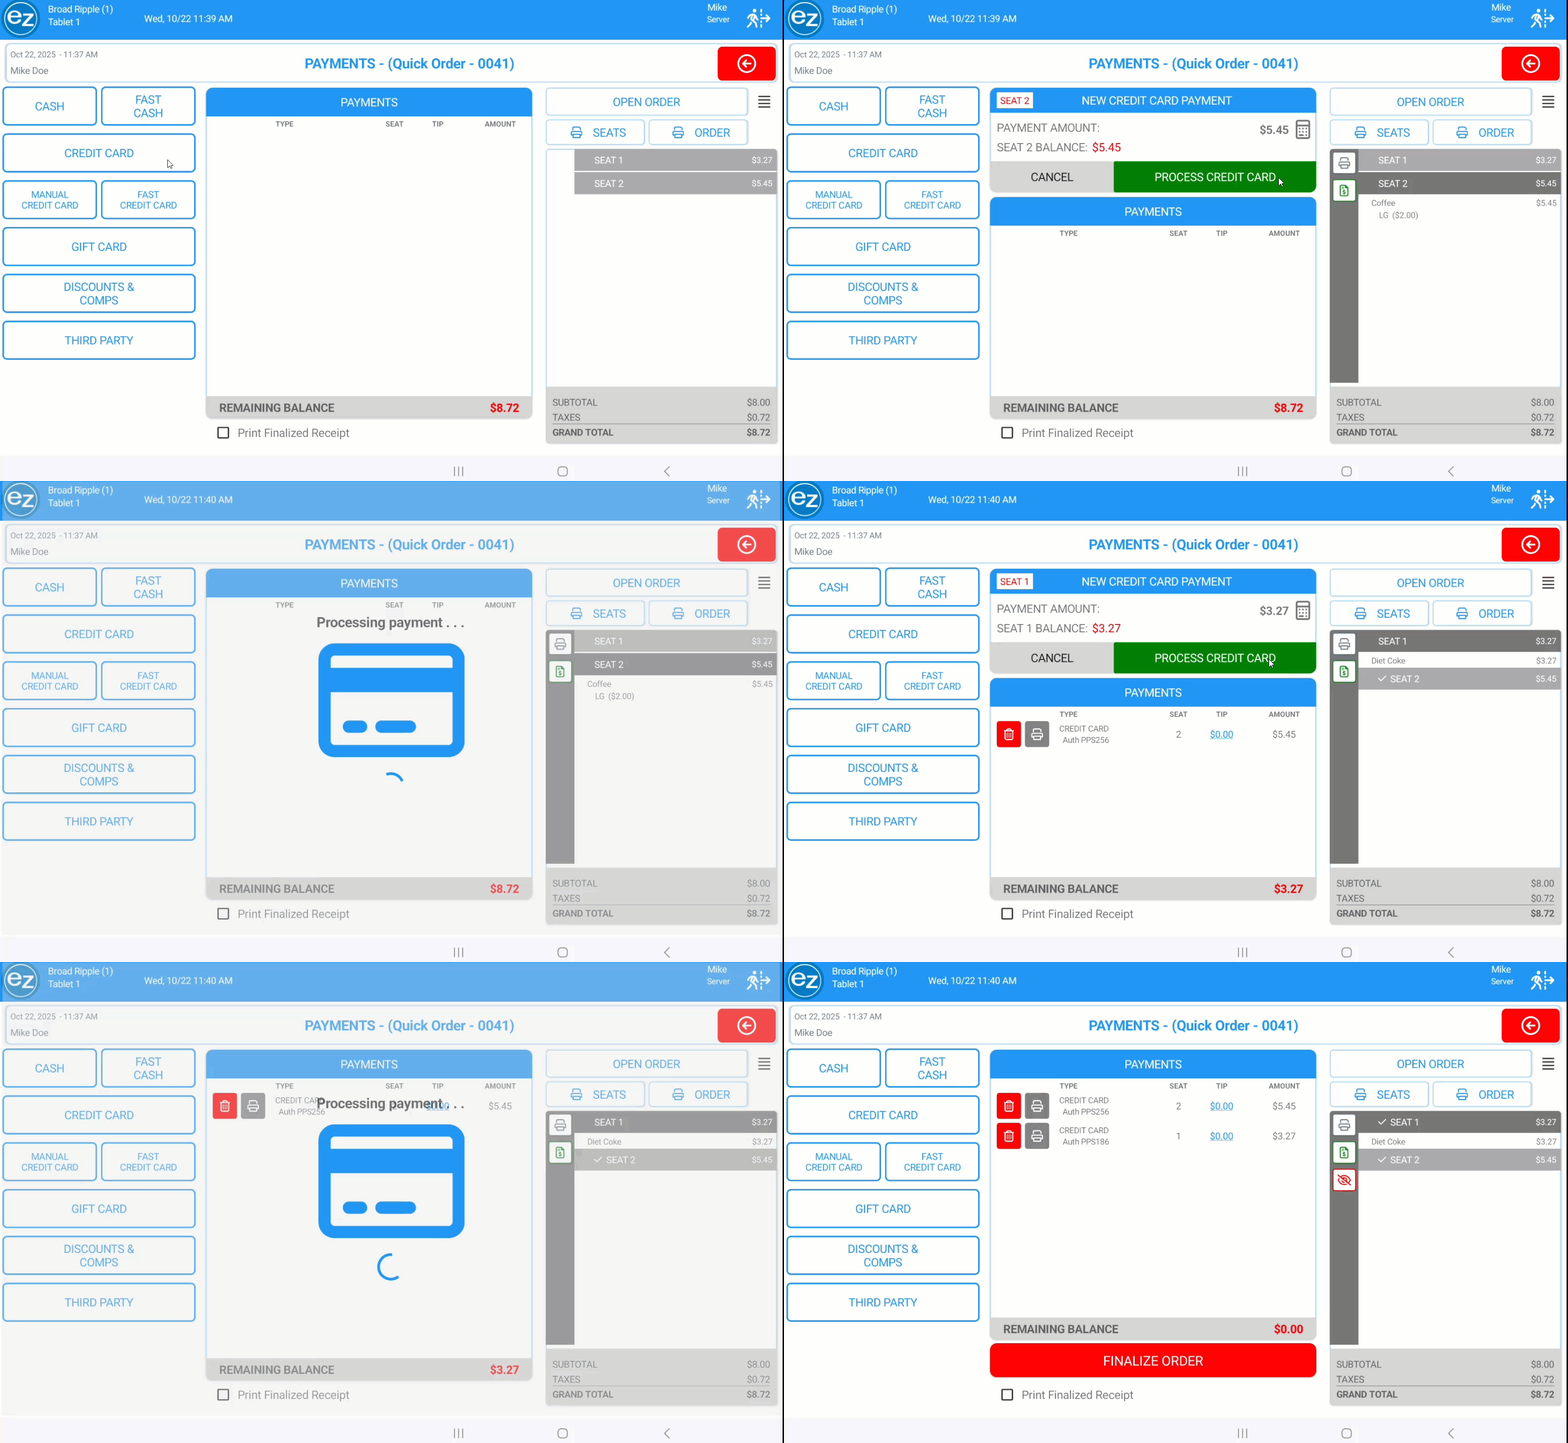
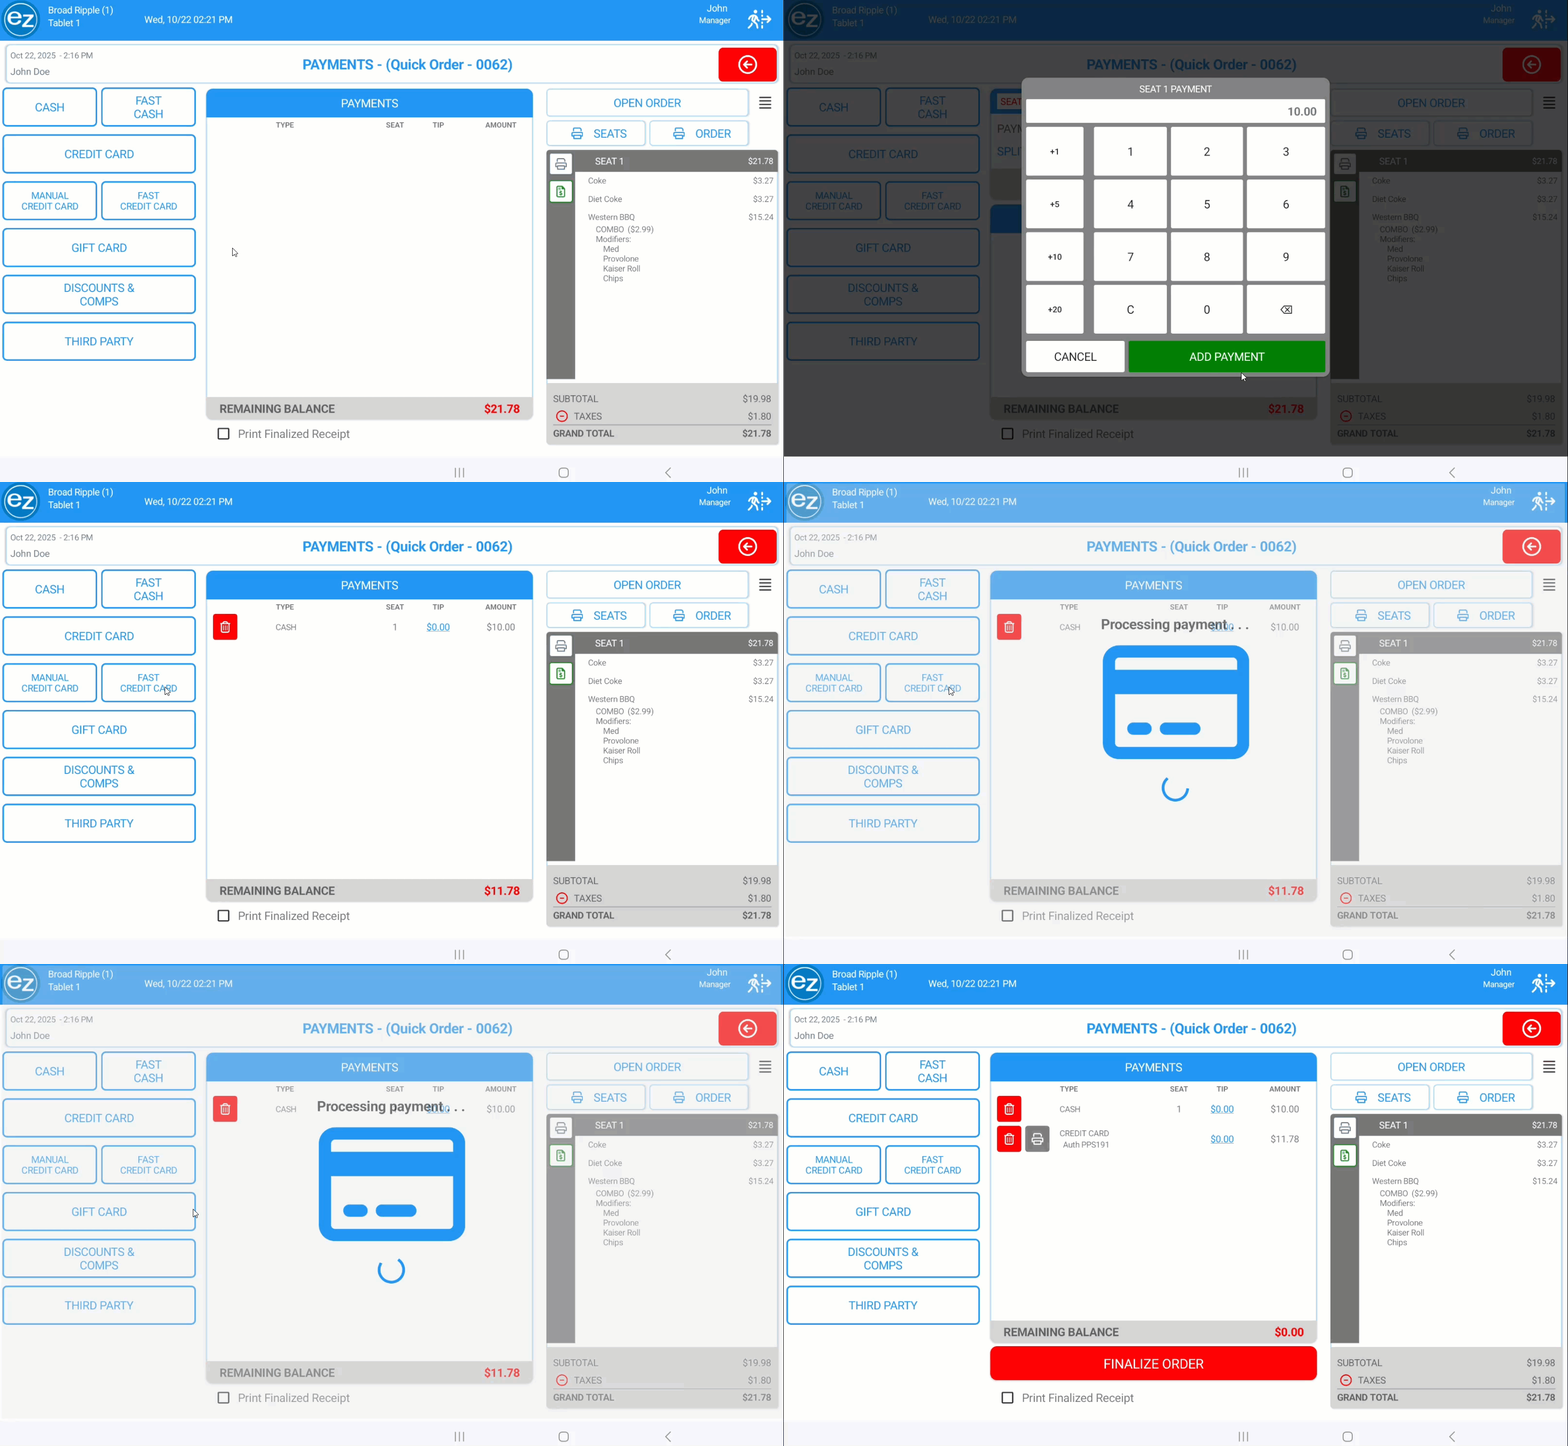
- Selecting the credit card payment tab will allow for custom credit card payment amounts. Similar to cash
- The new credit card payment window will be shown
- The remaining balance total will be listed as the default payment amount to process. You can select process credit card to send the current balance amount to process on the credit card reader. Pressing the calculator icon will give you an option to enter in a custom amount to charge
- You can use the pre-set amounts listed on the left hand side. Or enter in any custom amount on the number pad
- Once the amount is entered hit the green add payment button and the payment amount will be sent to the credit card reader for processing
- The processing credit card payment image will be displayed locking the payment page until the credit card has successfully processed
- Follow the prompts on the credit card reader to complete the payment
- When completed the credit card payment amount will be listed inside the middle payment section
- Depending on the Studio settings once the credit card payment is successful the credit card receipts will print automatically
- The credit card auth id number will be listed below the payment. The auth id can be used to link the individual credit card payment back to the credit card processors side. The auth id will be listed on all on all receipts for reference
- For applying the exact credit card amount to the individual seat press the seat number header
- The payment amount will then be updated to the seat total. Tap process credit and follow the prompts on the credit card reader to complete the payment
- The seat number header will now display a checkmark indicating the seat total has been paid in full
- To complete the order select the red finalize order button at the bottom of the page. The finalized order will change to processing payment indicating the payment and transaction information is being synced back to EZ Dine Studio
- Once the order is finalized you will be returned back to the menu and ordering sections
Credit Card
Custom Credit Card
Seat Credit Card
Step 4: Manual Credit Card
- Any instances where the physical card is unable to be ran at the store. The credit card can be manually entered on the credit card reader
- Same steps mentioned for credit card payments can be applied to the manual credit card option
- On the credit card reader you will follow the prompts for entering in the credit card number, expiration date, and three digit security code as required
Step 5: Fast Credit Card
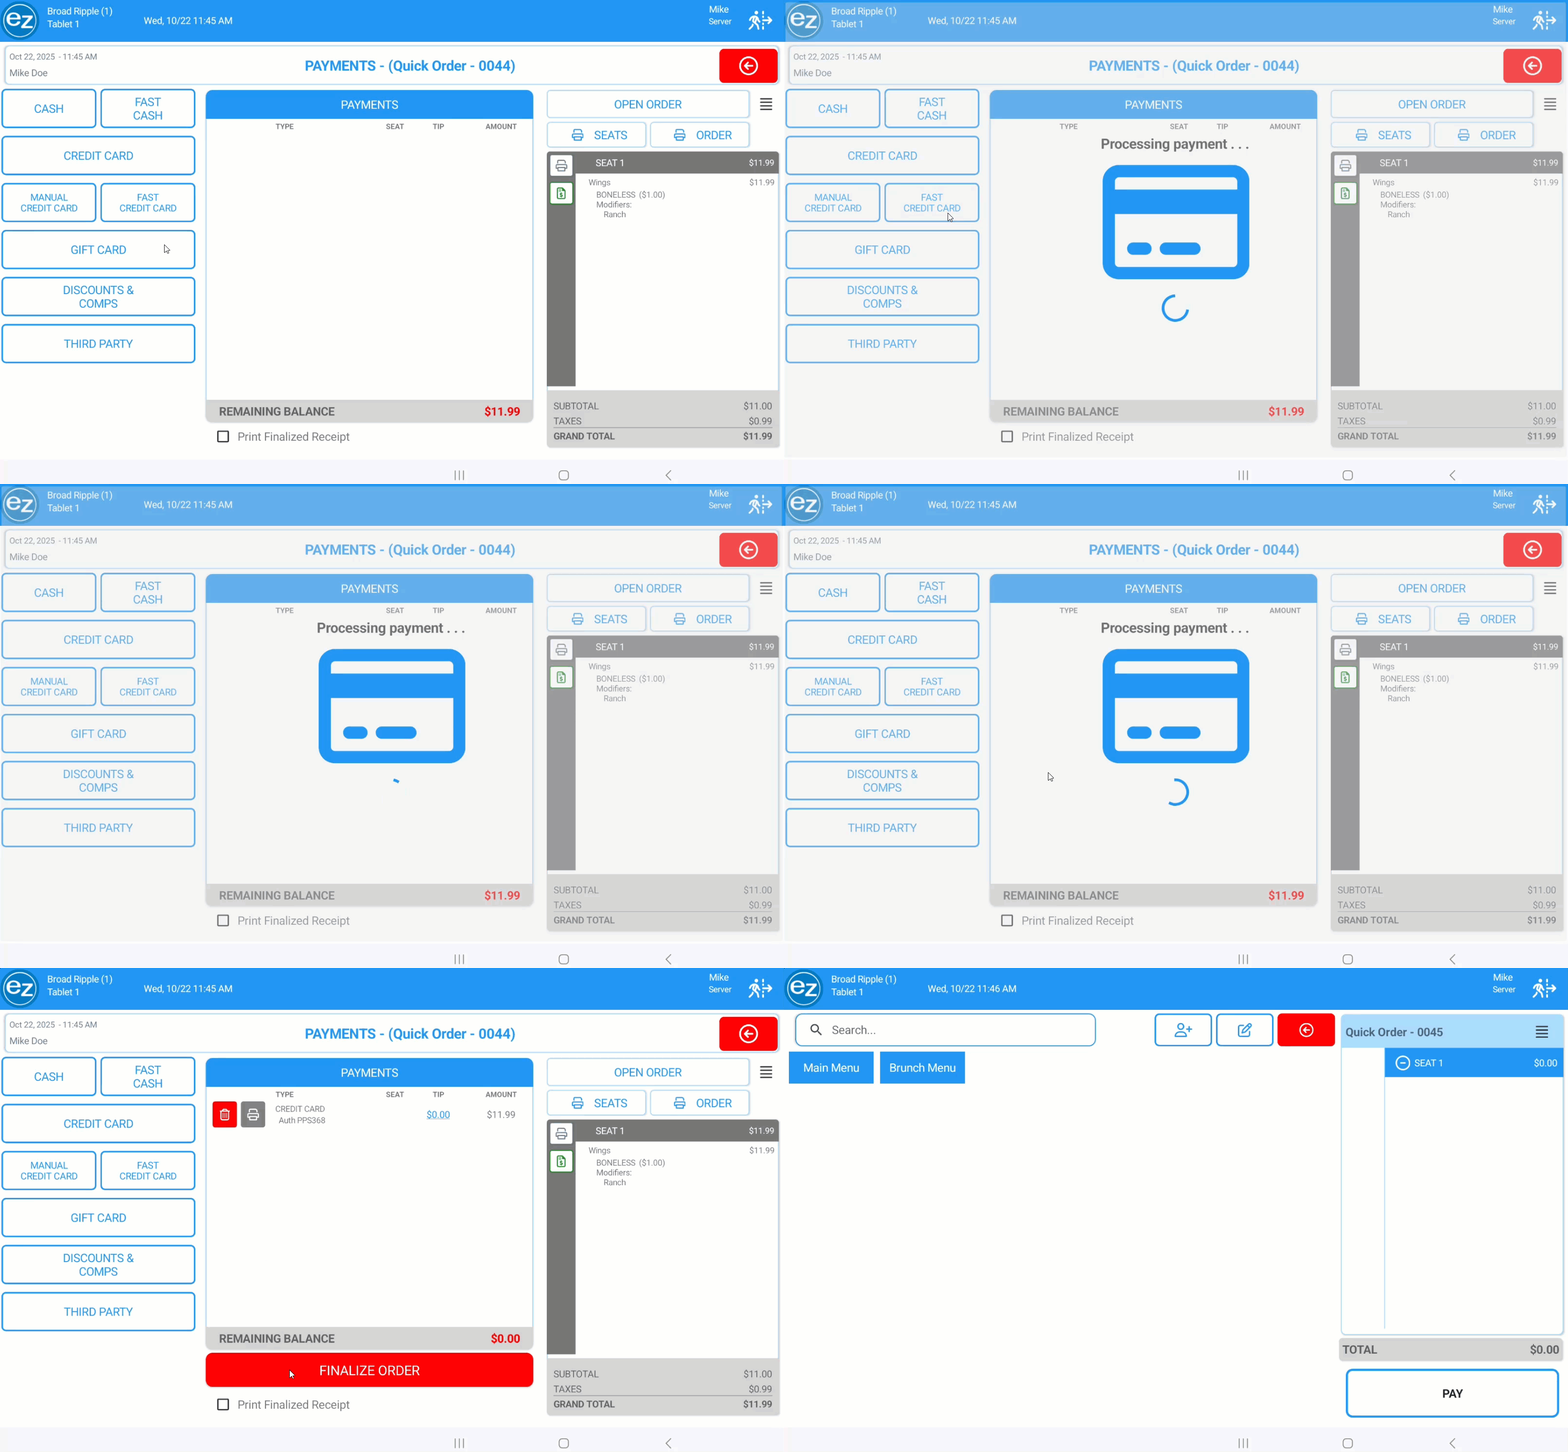
- Fast credit card can be used for applying the exact payment amount for the entire order
- Once the credit card has successfully processed and payment amount is displayed inside the payment section. You can finalize the order to complete the transaction
Step 6: Credit Card Declined
- When a credit card payment is declined on the card reader the EZ Dine app will display a Card Declined message on the top of the payment window
- There can be a number of reasons why a credit card is declined from insufficient funds, expired, and do not honor as a few common examples
Step 7: Credit Card Surcharges
For detailed instructions on setting up the credit card processing surcharge program please reference the Studio article found here
Credit Card Surcharges
- Implementing the credit card processing surcharge program means any credit card payment type selected will apply the surcharge percentage amount configured on Studio automatically
- The credit card surcharge percentage amount will be based on the order grand total(subtotal + taxes)
- Inside the payment page the credit card surcharge amount will not be factored into the order grand total or the credit card payment amount displayed
- Printing the customer receipt will list the credit card surcharge program name, amount, and the grand total amount with and without the credit card surcharge
- Once the credit card payment type is selected the credit card reader total payment amount will include the credit card surcharge
- The credit card and finalized receipts will print listing the credit card surcharge program name, amount, and the total amount charged to the credit card
Step 8: Credit Card Timeout
- The credit card reader will have a predefined timeout for processing credit card payments before the connection window closes
- In rare instances when the payment is approved on the card reader but not displayed on the order. You will have the option to trigger a resync of the payment back to the order
- Close the bad gateway timeout response message from the payment window
- Navigate out of the order and then back into the order. This will trigger the resync of the missing payment
- The credit card payment will now be listed inside the payment window and attached to the order
Step 9: Cash Discounting
- When using cash discounting you will have two totals listed on the payment page and receipts
- Grand Total would be the total paying via credit card or any alternative payment method besides cash
- Cash Total would be the total paying via cash
- The difference between the totals will be the cash discount percentage amount entered on Studio
- The cash discount amount will be based on the order grand total(subtotal + taxes)
- Cash should be the only payment method applied in order to use the cash total. With exceptions only w discounts
- Any split payments with other payment types will always use the grand total and not cash total
- Once the payment method is applied the remaining and cash balances will update accordingly
- The remaining balance will be based on the grand total and cash balance from the cash total
- Enter fast cash or a custom cash payment. The remaining balance will update to 0.00 indicating the balances are covered
Step 10: Gift Cards
Please reference the EZ Dine article here for steps on redeeming gift card payments
Step 11: Order Discount and Comps
For detailed instructions on discounts and comps setup please reference the Studio articles found here
Studio Discount Setup

Studio Comp Setup
Discount amounts will be applied based on the pre-tax order subtotal
Taxes will be recalculated using the new discounted amount total
Employee permissions will be required when applying discounts and comps
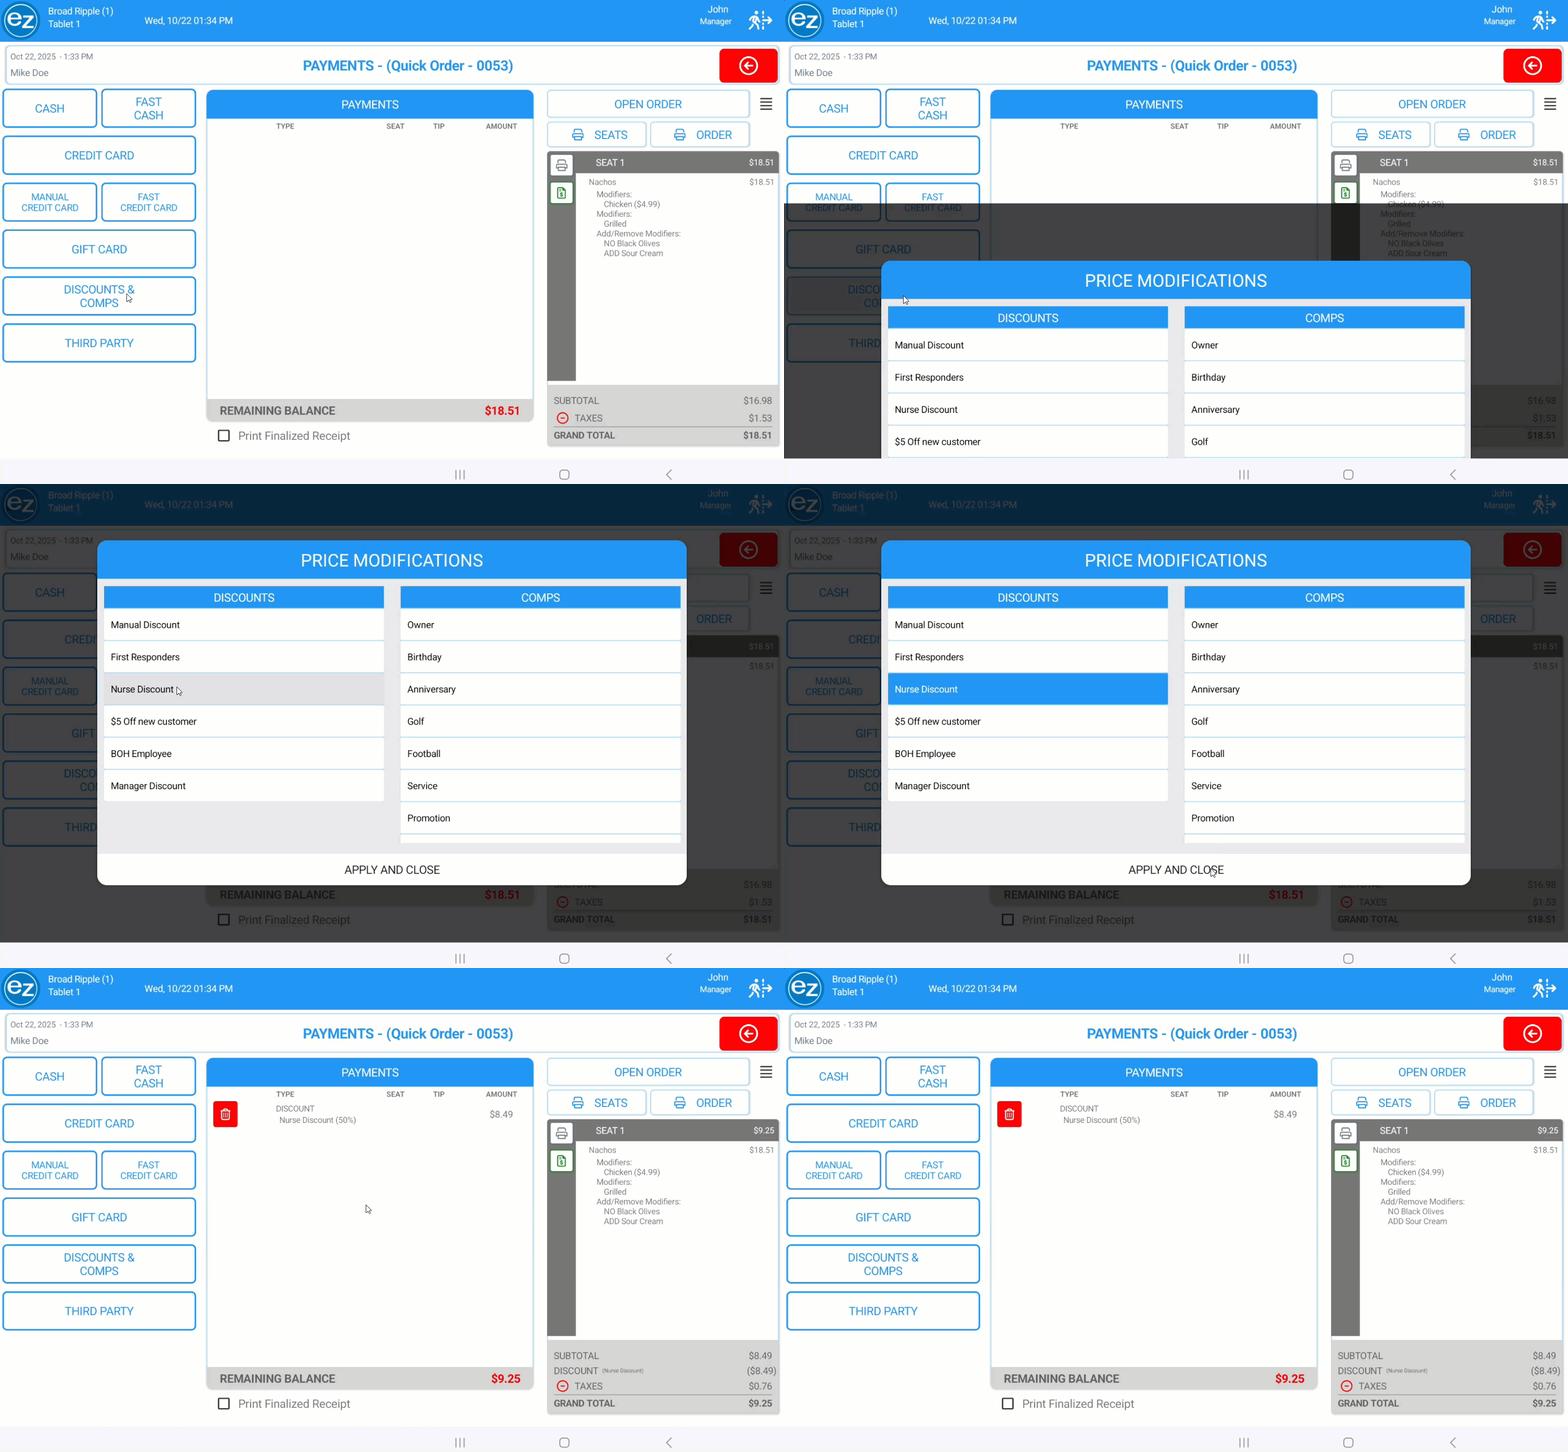
- Selecting the discount and comps tab option will display manual and pre-set discount on the left side and comps on the right
- The manual discount option will be listed by default at the top. When selected the manual discount window will be displayed
- Enter the name and the percentage or dollar amount of the discount to be used. The manual discount name will be updated to the discount name entered. Press apply and close and the discount will now be listed inside the payments section and below the seats subtotal
- Pre-set discounts will be the discount types configured on Studio. Select the discount name and apply and close
- Discount amounts will be based on the order pre-tax subtotal
- For applying a comp select the comp reason type pre configured on Studio and tap apply and close
- The comp will now be listed inside the payments section and below the seats subtotal
- Comps will always deduct 100% of the order total
Manual Discount
Preset Discounts
Comps
Step 12: Seat Discount and Comps
- The same permissions and settings used for order discounts and comps will be applied to seat discounts and comps
- Tap the seat number header to expand the seat details view. You will have seat editing options displayed on the left hand side of the order ticket
- Press the green dollar icon and this will prompt the price modification window by the seat. The discount and comps selections will be shown
- Once selected the discount and comp type, amount, and seat number will be listed inside the order payment window
- Remaining balance due by the seat and order will be updated reflecting the discount and comp amounts that were applied
Step 13: Discount Restrictions
- Order and seat discounts will be prevented from being entered simultaneously per transaction
- A discount warning message will be displayed indicating to remove the applied discount before being allowed to continue and add the new discount type
Step 14: Third Party and Payments
For detailed instructions on creating third party payments please reference the Studio article found here
Studio Third Party Payments Setup
- Select third party and the payment types created on Studio will be shown inside the third party payment window
- Once the type is selected the order balance total will be used as the third party payment amount
- If a reference number is required enter the number inside the reference number field
- When finished hit the green add payment tab and the third party payment type will be added inside the payments section
Step 15: Split Payments
- Splitting payment amounts can be done a few different ways from the payment page
- Adding separate seats to the order will allow for the ability to apply separate payments by the seat
- Select the payment method and tap the seat number header. Or seat number header and then payment method to apply the seat total amount. Enter the cash amount on the number pad and press add payment for cash. For credit card select process credit card and that exact seat balance amount will be used for payment
- If the wrong payment method was selected simply press cancel and that will close the payment option and allow for a different payment method to be used
- The credit card and cash options will have the ability to enter custom payment amounts. Details provided in steps one and three. The amounts entered will be applied to the remaining balance of the order
- Equal splitting an order with credit card or cash can be done by using the blue split ticket option for the payment type selected
- The split ticket option will then list the number of ways being split and the payment amount total related to the split quantity. Use the left and right arrows to increase or decrease the split quantity amount. Once the split amount is correct simply process the payment and that split amount will be used
Seat Payments
Custom Payments
Equal Split Payment
Step 16: Editing Payments
- Once a payment method is applied you will have the following options to edit the payment
- For adding or editing a tip select the tip dollar amount listed underneath the tip column. By default this will be listed as $0.00 value
- The edit tip number pad will be displayed. Default tip percentages will listed on the left or you can manually enter in the amount. Select accept and the tip amount will now be applied to the payment
- Reprinting the credit card receipts can be done by selecting the print icon next to the credit card payment
- The red trash can icon will void the payment. For credit cards voiding the payment will prompt to confirm the void and then print a voided payment receipt
Step 17: Tax Exempt
Removing taxes from an order will require the Studio permission allow tax exempt status turned on for the employee task
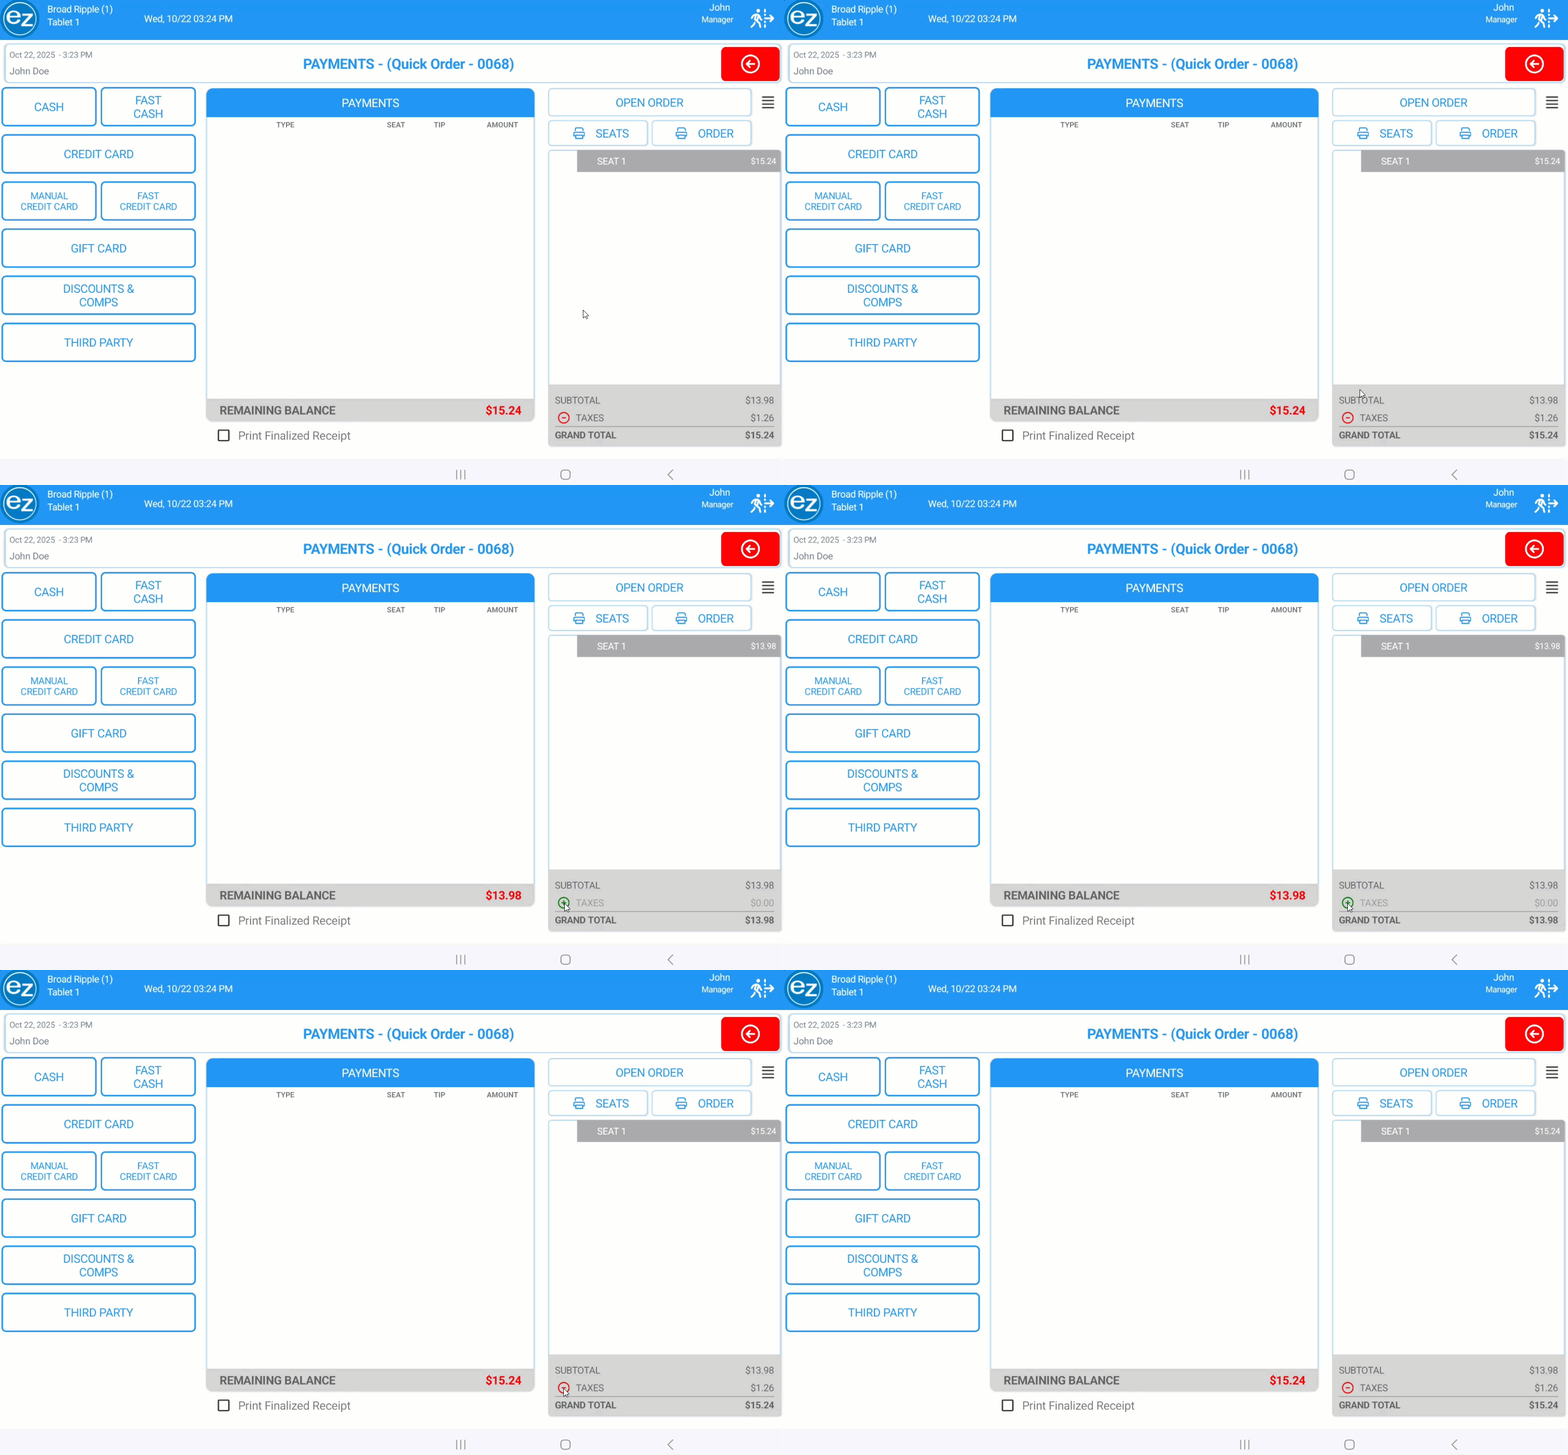
- Employees with tax exempt status permission will see a red minus icon displayed adjacent to the taxes line
- When selected the tax amount will be removed from the order and grand totals. The remaining balance will be updated excluding the tax
- Taxes will be removed from the entire order. Taxes cannot be removed per individual seat totals
- Printing the customer and finalized receipts will list the tax line as 0.00
- Tax exempt sales totals will be listed on the system financial report inside the sales total & collected section
- Adding taxes back to the order can be done by tapping the green plus icon
Step 18: Remove Auto-Gratuity
Removing auto-gratuity from an order will require the Studio permission remove auto-gratuity turned on for the employee task
- Employees with remove auto-gratuity permission will see a red minus icon displayed adjacent to the auto-gratuity line
- When selected the auto-gratuity amount will be removed from the order total
- Re-Adding the auto-gratuity back to the order can be done by tapping the green plus icon
Additional Resources and Help!
Still have questions? Please contact us any time at support@ezsoftpos.com.
NOTE: If emailing, please include your business name in the subject line of the email
and provide your preferred contact information for the best response time.
Visit our help center Help Center for more guides and tutorials

