
TABLE OF CONTENTS
- Step 1: Accessing Manager Utilities
- Step 2: Printer Setup & Cash Drawer Configuration
- Step 3: Assigning Credit Card Readers
- Step 4: Retrieving Card Reader HSN & Wi-Fi Setup
- Step 5: Tab Layout Customization
- Step 6: Quick Order Workflow Settings
- Step 7: Generating Reports
- Step 8: Idle Screen Timeout
- Step 9: Cloud & Order Sync Utilities
- Step 10: Handheld Customer Tip Screen
- Step 11: Item Availability & 86ing
- Step 12: Offline Mode
- Step 13: Loyalty & Gift Card Balance Lookup
- Step 14: System Diagnostics & Error Logging
- Step 15: Dark Mode
- Additional Resources and Help!
Step 1: Accessing Manager Utilities
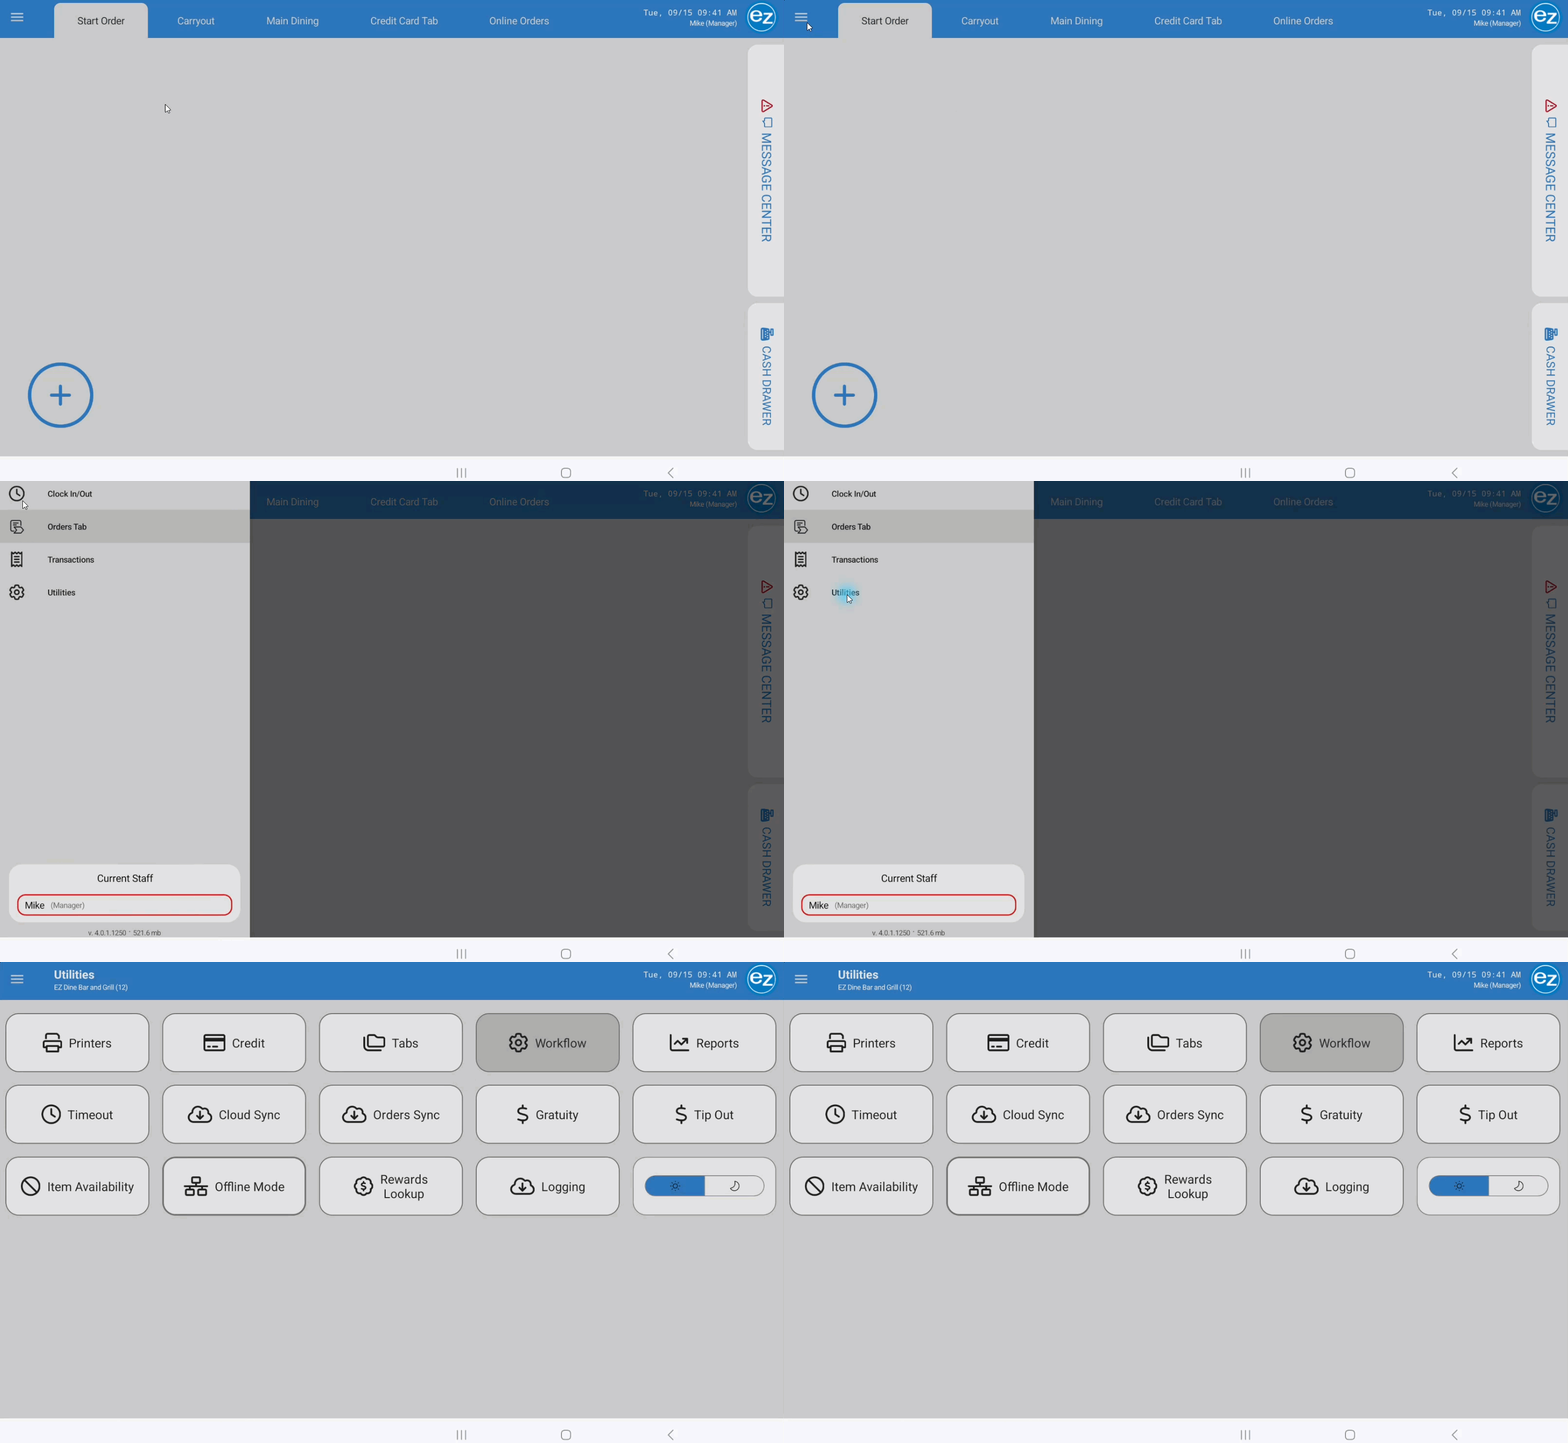
- Tap the top-left Settings Menu icon from the ordering screen to open the side panel. Access requires an employee account with manager level permissions
- Select Utilities to open the manager utilities page
Step 2: Printer Setup & Cash Drawer Configuration
Refer to the EZ Dine Studio article for managing Store Devices
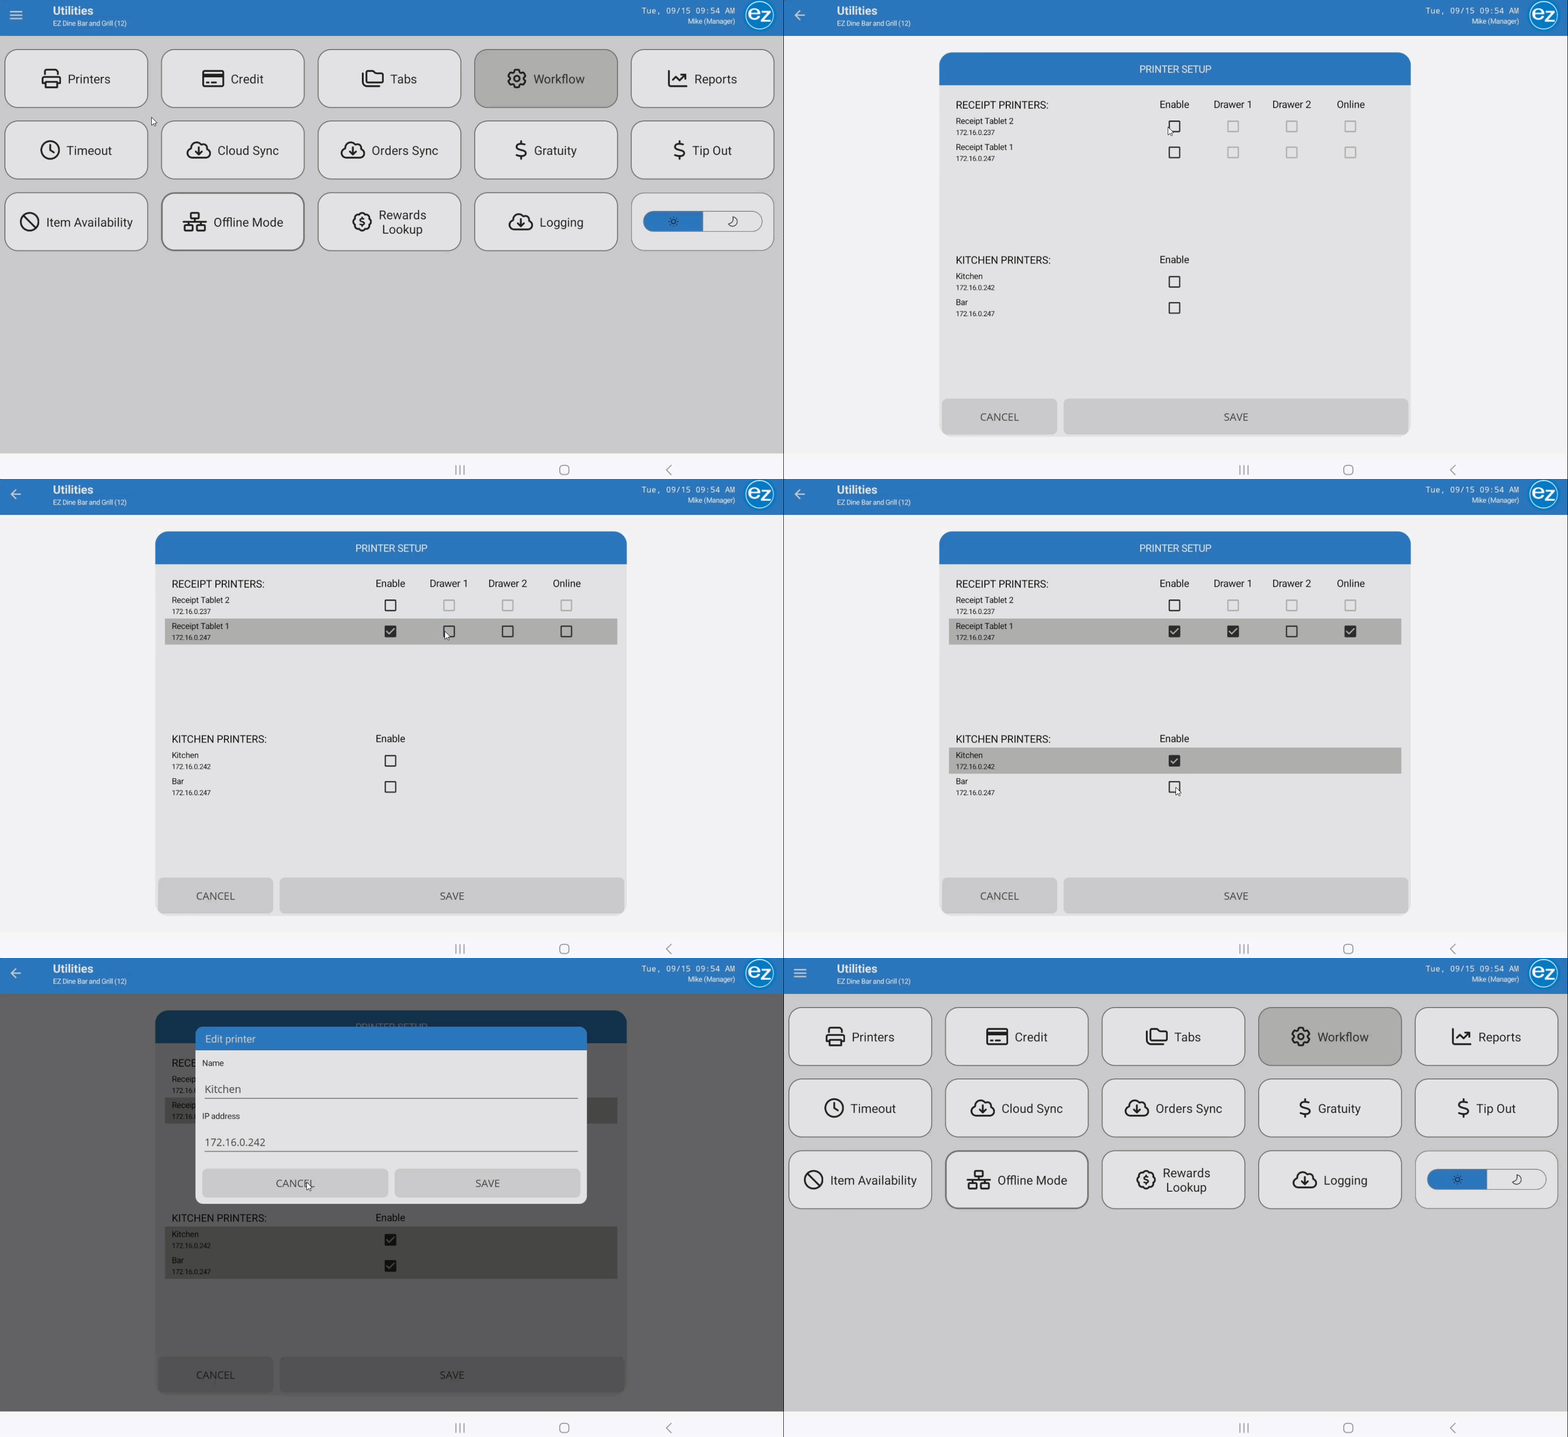
- Navigate to Manager Utilities>Printers to manage device specific printer assignments and cash drawers
- Printer Layout: Configured Receipt Printers display in the top section; Kitchen Printers display in the bottom section
- Editing Printers: The assigned IP address displays directly below each printer name. Tap any printer entry to open the Edit Printer window to modify its display name or IP address
- Enabling Printers: Check the Enable box next to each printer assigned to the device. Active printers highlight with a grey background and display a checkmark. Note: Only once receipt printer can be enabled per individual device
- Cash Drawer Assignment: Select Drawer 1 or Drawer 2 (if using a dual drawer splitter cable). Cash drawer controls only activate when a receipt printer is enabled on the device
- Online Order Receipts: Check Online Order to automatically print receipts when online orders sync. (If two devices share a single receipt printer, enable this setting on both devices)
- Save Configuration: Tap Save Settings to apply changes
Step 3: Assigning Credit Card Readers
Card readers pair to the EZ Dine app using the device Hardware Serial Number (HSN) listed directly on the card reader
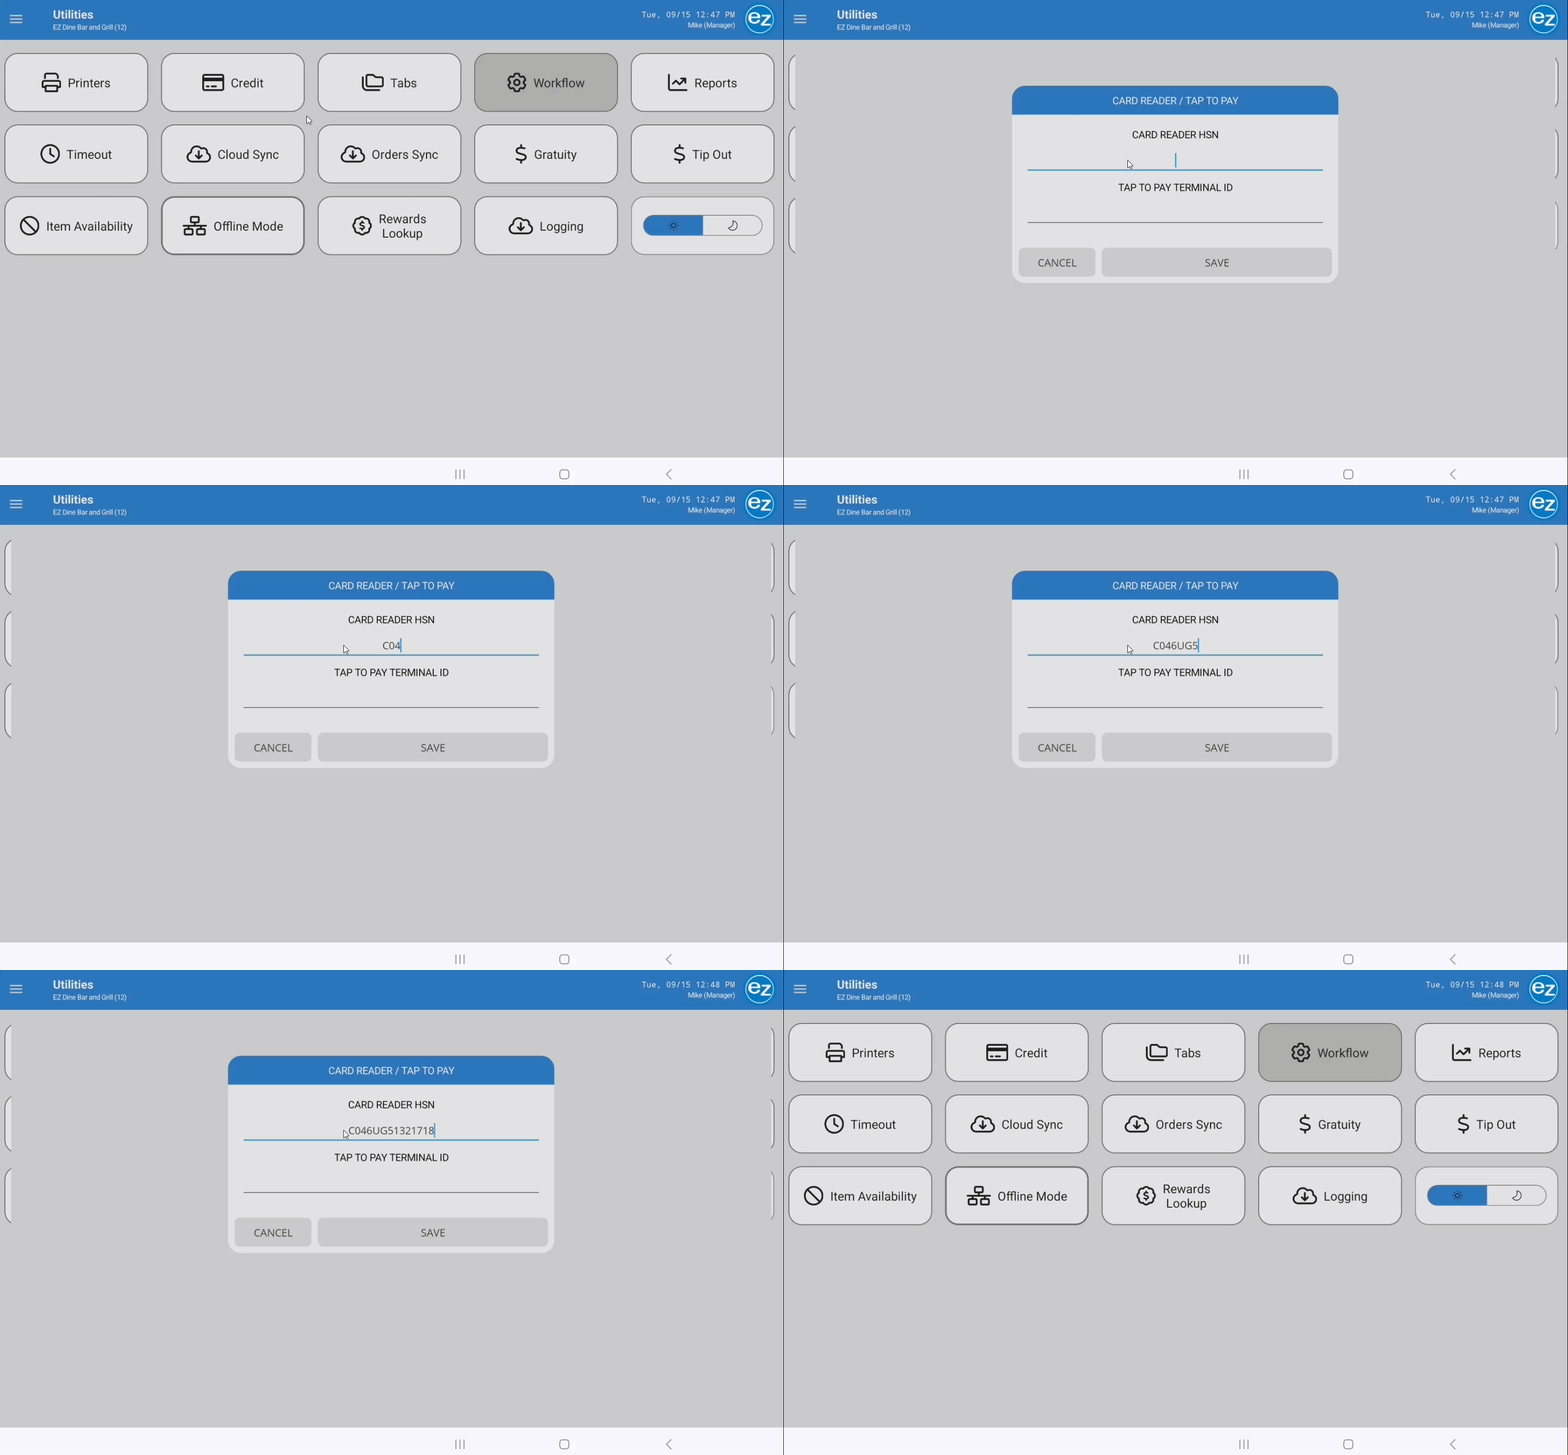
- Navigate to Manager Utilities>Credit Card
- Enter the card reader's HSN exactly as displayed, using ALL CAPS for letters
- Once validated, Tap Save to complete pairing
Step 4: Retrieving Card Reader HSN & Wi-Fi Setup
Distinguish carefully between zeroes (0, oval shape) and the letter O (circle shape) when typing HSN numbers
- Clover Flex/Clover Mini(Wireless): On the CardPointe home screen, tap all four corners simultaneously to enter the Welcome screen, then select Admin Panel to view the HSN, (To return to the home processing screen, tap Back>Customer Mode>OK)
- Ingenico Lane 3600 (Hardwired): The 24-digit HSN displays across the top of the CardPointe home screen
- Ingenico Link/2500 (Wireless): The 24-digit HSN displays at the top of the home screen
- Configuring Wi-Fi if the screen displays Disconnected, press F on the keypad and enter password CCMerchant ,then press the green Enter button
- Press F2 (or F3 on Link/2500) to highlight Configuration>Wi-Fi>Scan for Networks
- Select posezdine and press Enter
- Select Home>Enter and type the network Wi-Fi password using the directional function keys (F1=Left, F2=Down, F3=UP, F4=Right)
- Press Enter, then press the red X button repeatedly until you return to the home screen. The status will update to Connected
- Reboot/Power OFF: Press and hold the Yellow Clear and Number keys simultaneously. (Powers off when disconnected from power; reboots when plugged in)
Step 5: Tab Layout Customization
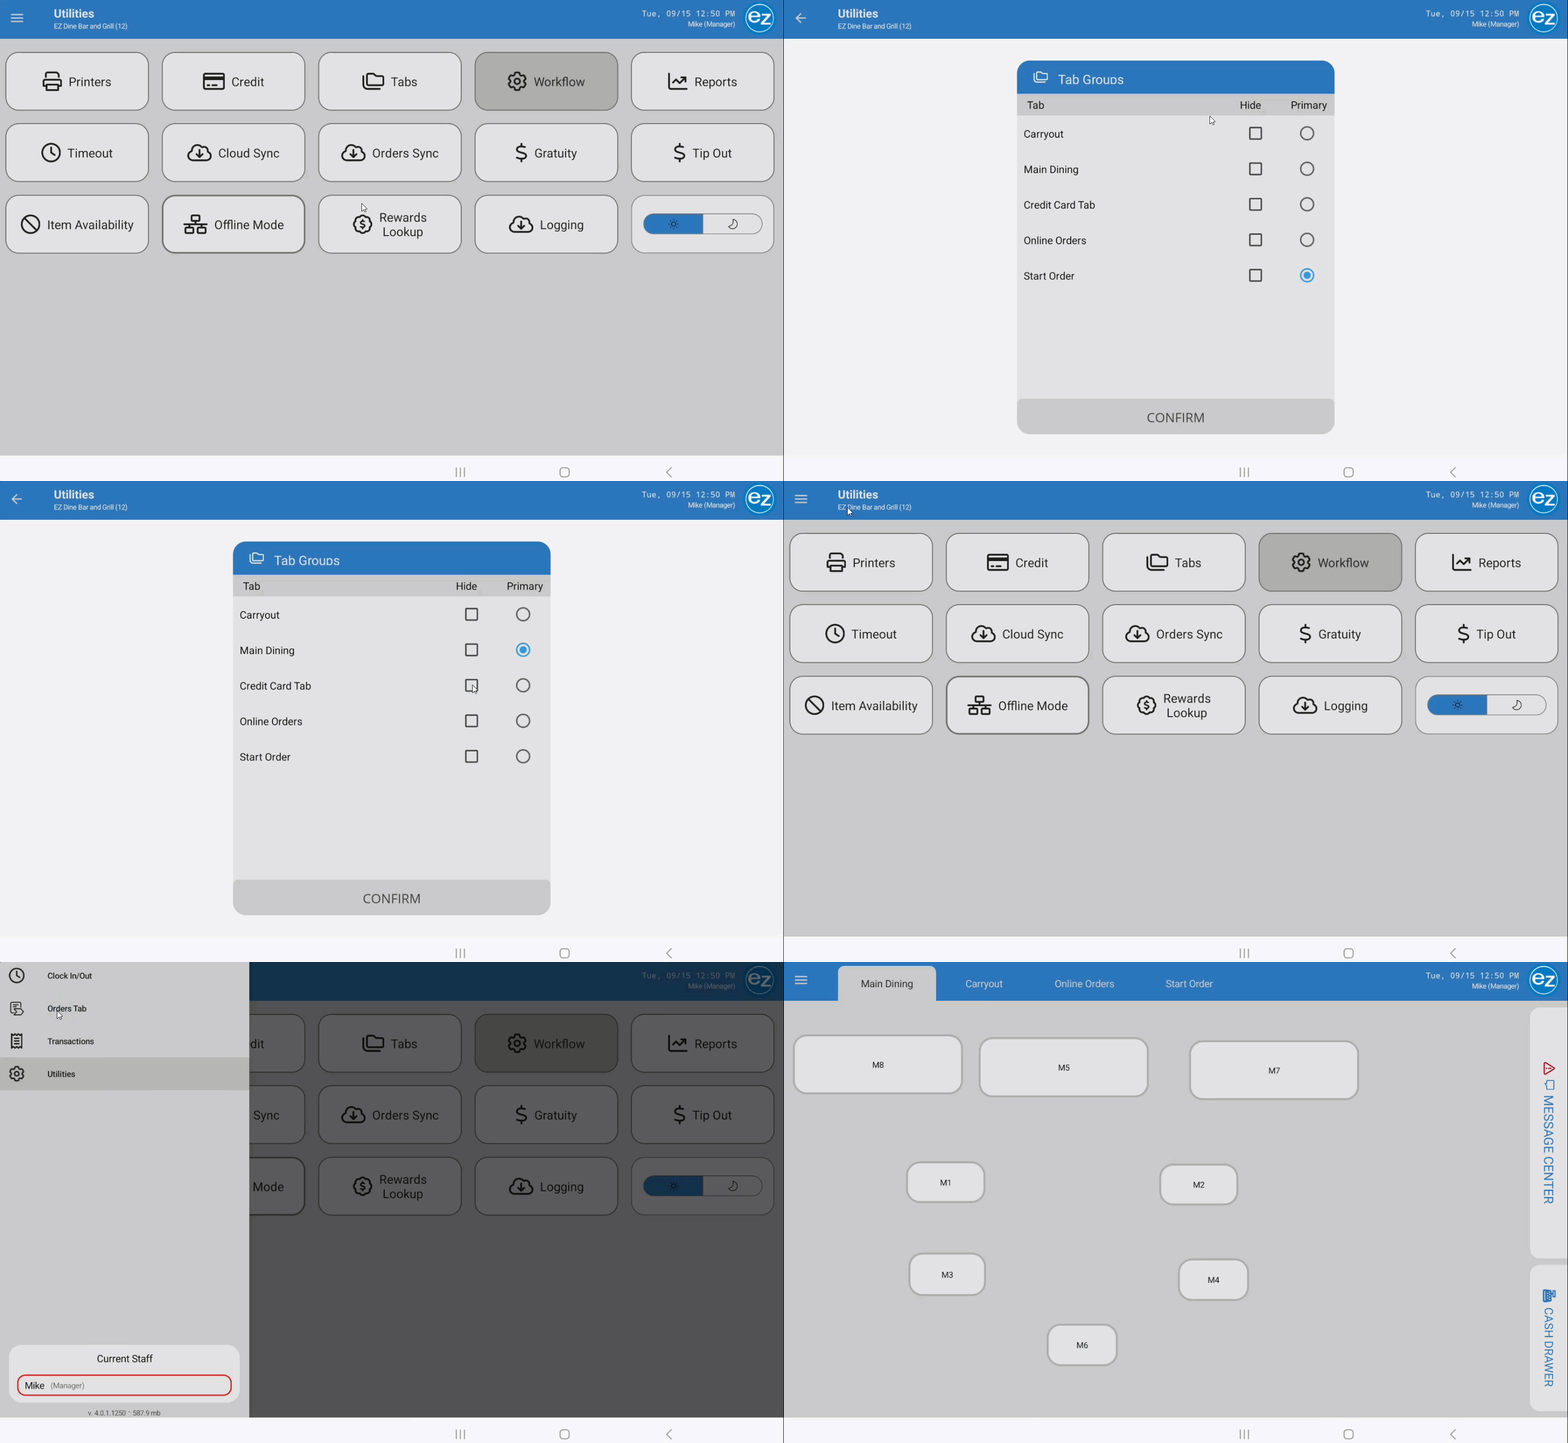
- Customize which ordering tabs display on individual devices
- Navigate to Tabs
- Set one tab as the Primary Tab (the default screen upon opening Orders)
- Move unwanted tabs to the Hide column to streamline the interface
- Tap Confirm to save
Step 6: Quick Order Workflow Settings
- Toggle Show Send Button for Quick Orders ON to replace the single checkout button with separate Send and Pay options
- Send dispatches items to kitchen prep stations and returns to the main ordering screen
- Pay dispatches any unset items and opens the payment screen immediately
Step 7: Generating Reports
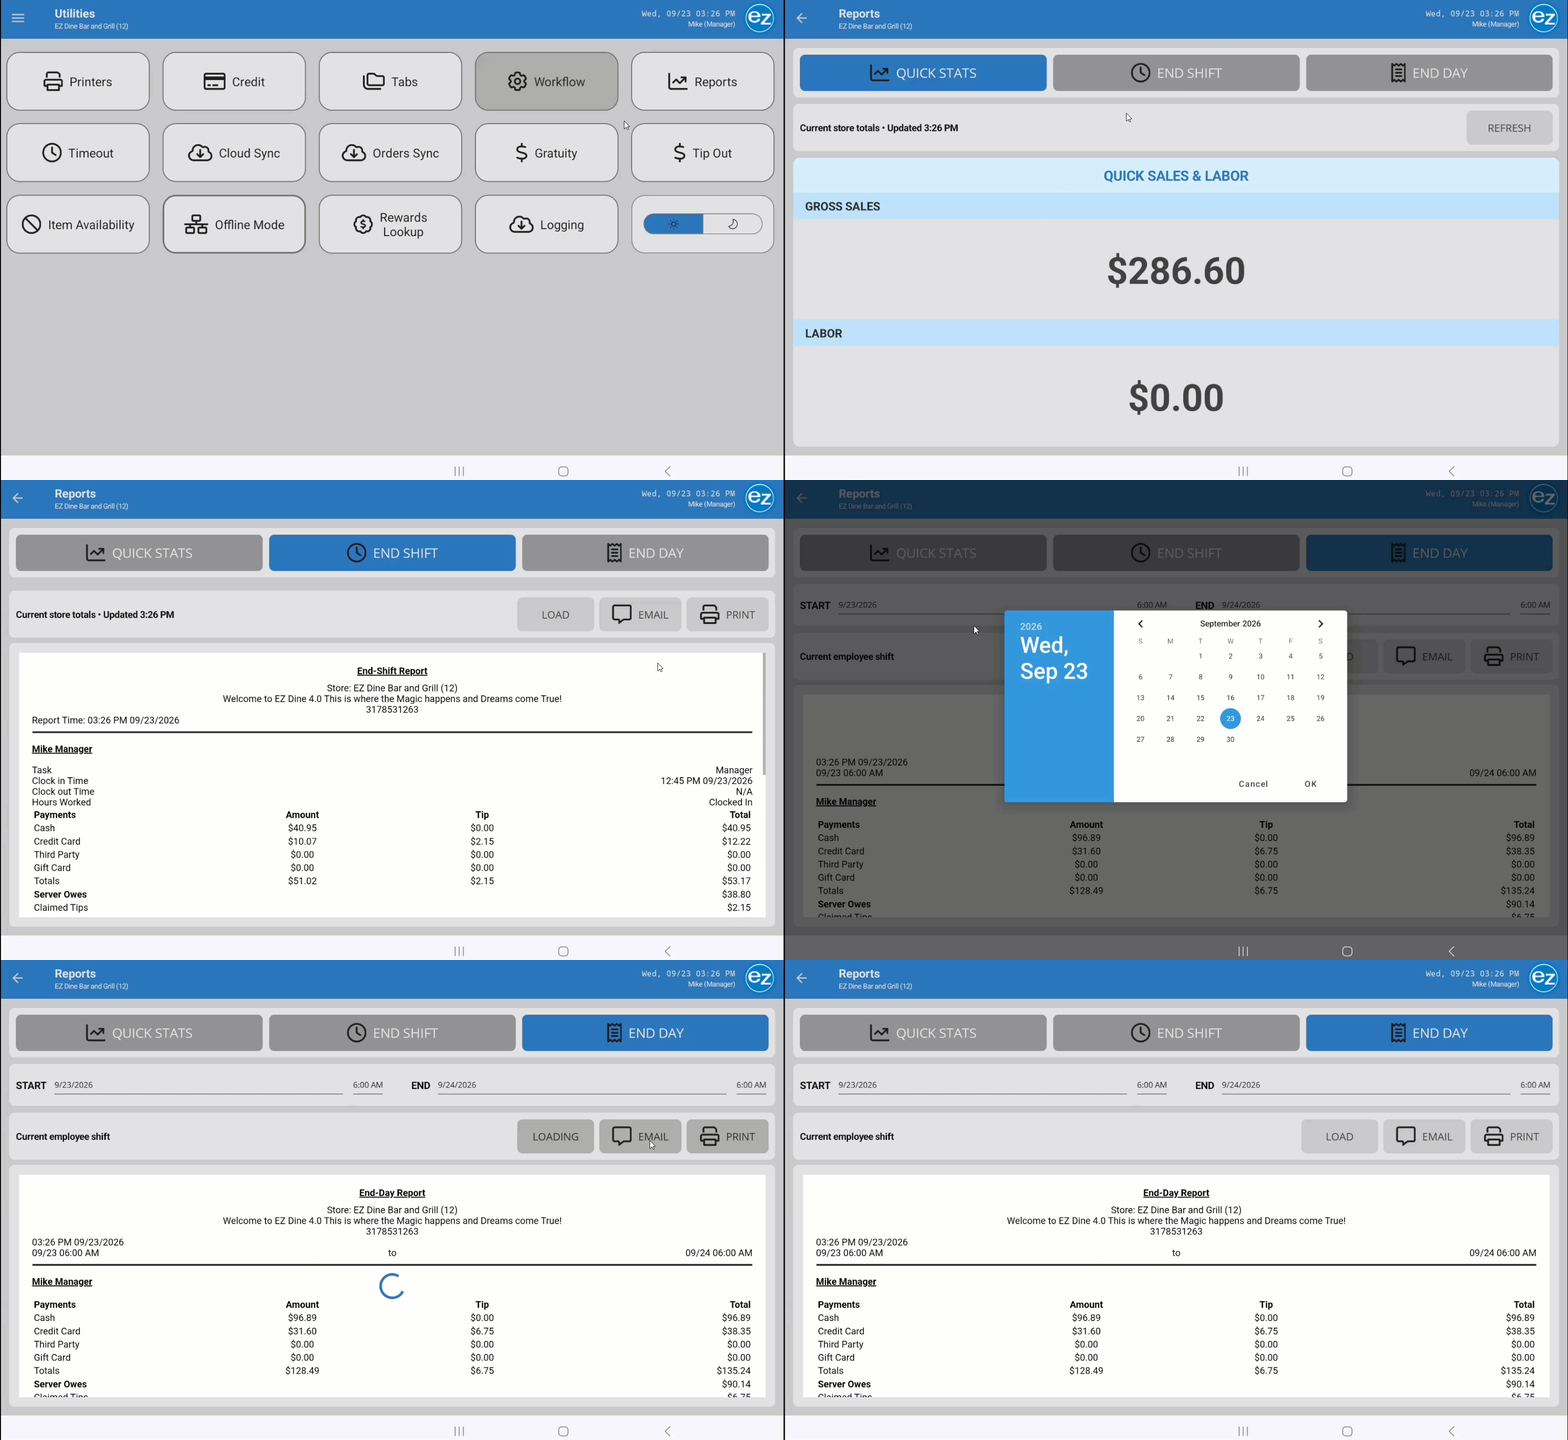
Access requires End-Shift or End-Day report permissions configured in EZ Dine Studio. (Reports can be viewed, emailed, or printed directly from the EZ Dine app). Emails assigned inside the store settings report email section is where the reports will be sent to
- Quick Stats displays live gross sales and labor figures. Tap Refresh to update data
- End-Shift Report summarizes individual employees sales, clock-in/out times, and gratuities. Auto-prints upon clock-out from employees with active sales
- End-Day Report provides a storewide financial overview (default for the current day). Set custom start and end date ranges as needed
Step 8: Idle Screen Timeout
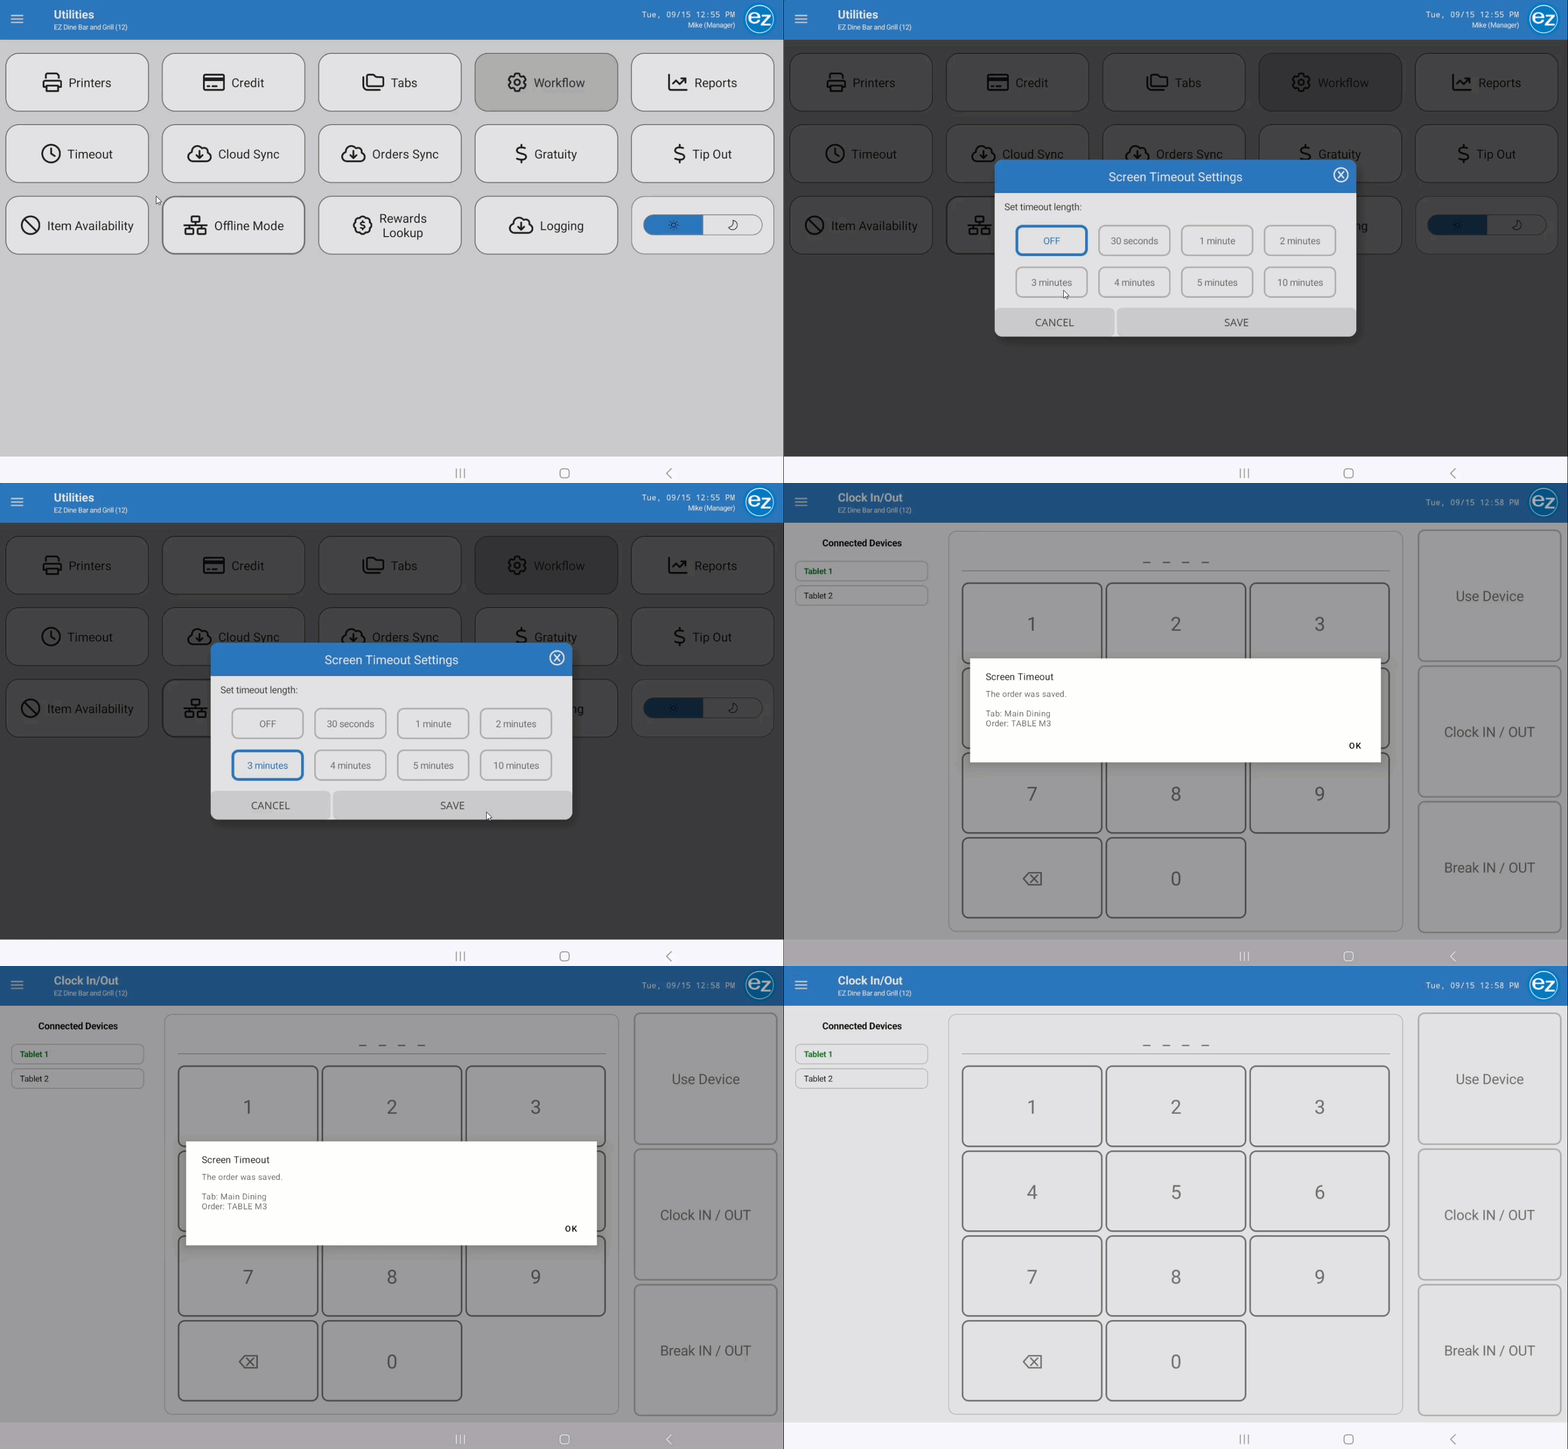
- Set an automatic inactivity timer to log out idle devices and return to the login screen
- Select a duration from the Timeout section and save. (If an order is left open when timing out, saved order notice displays on the login screen)
Step 9: Cloud & Order Sync Utilities
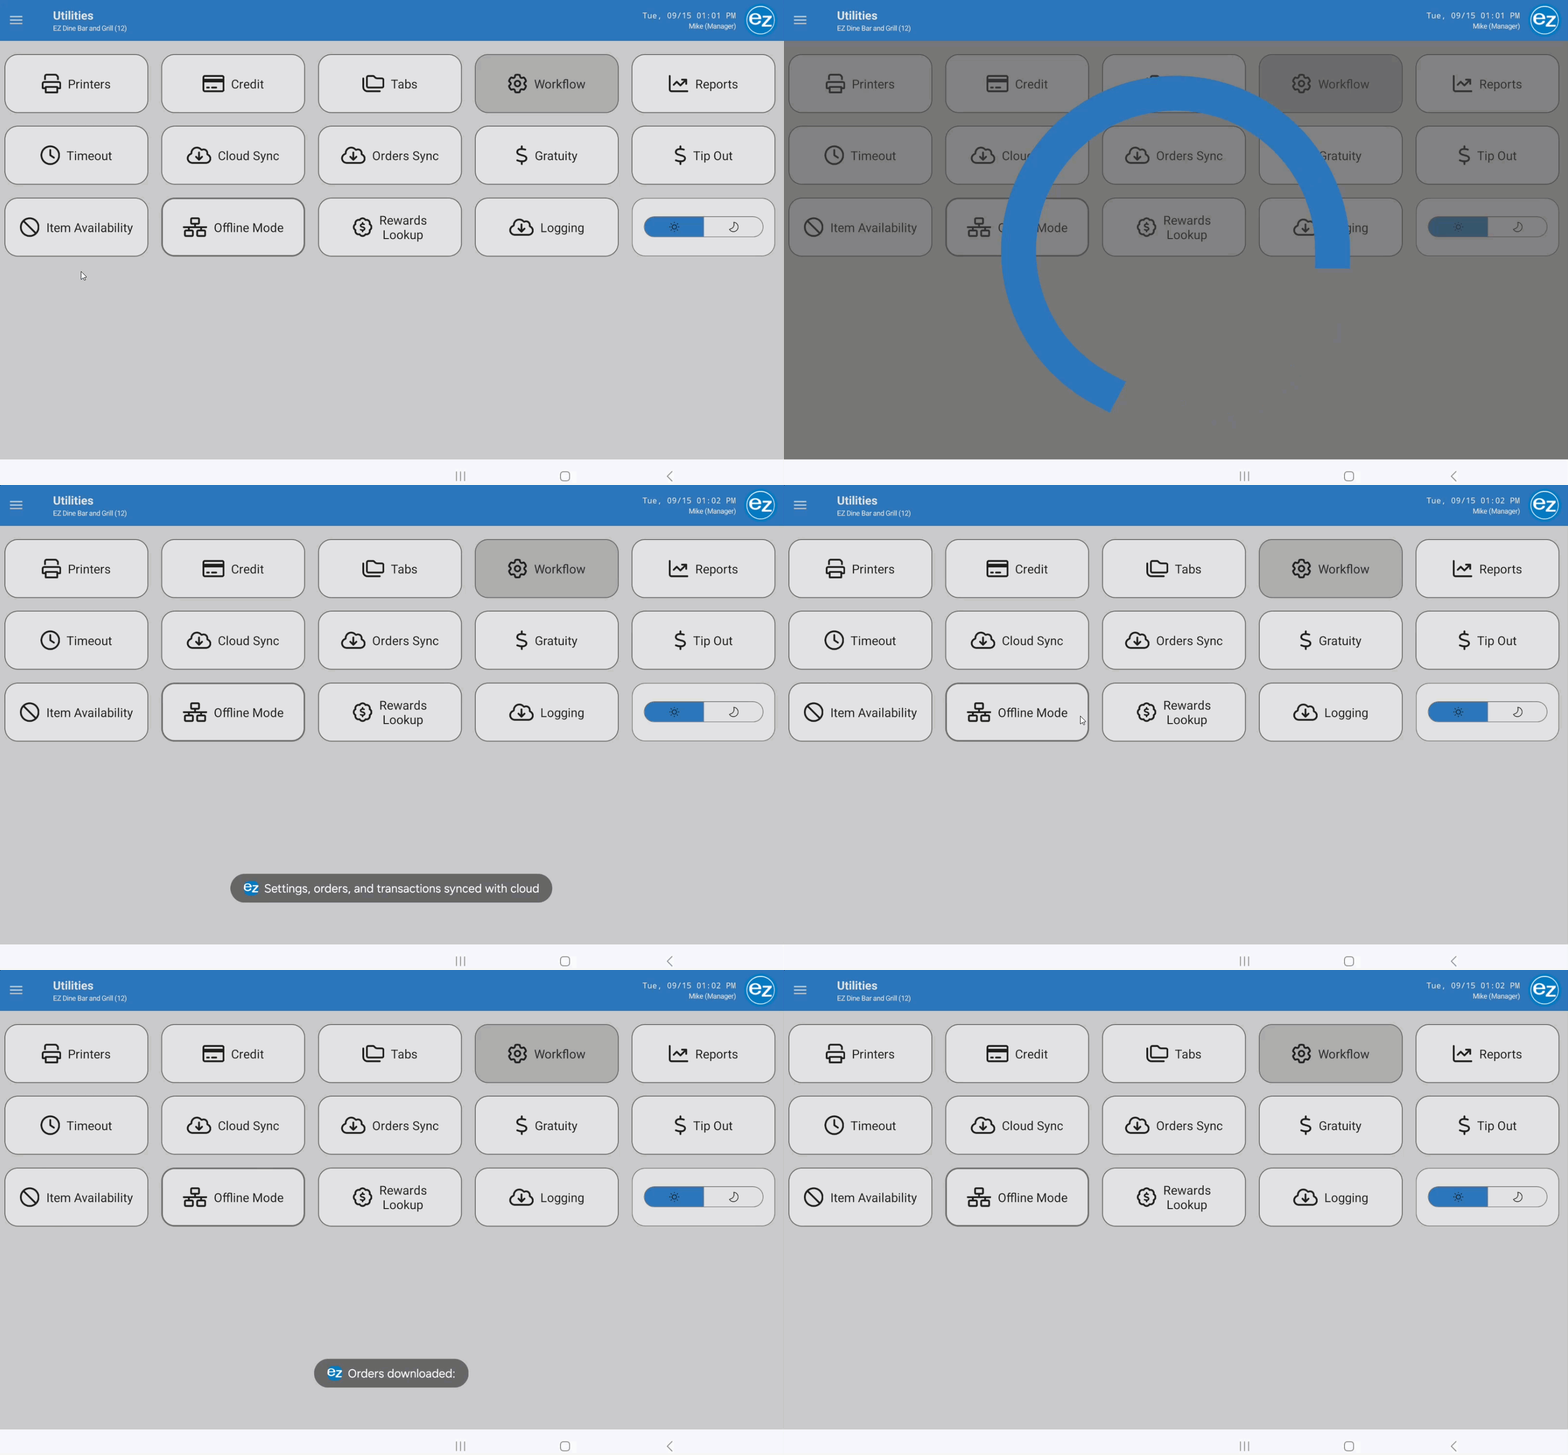
- Cloud Sync: Select Cloud Sync to manually force sync local settings, active orders, and transaction data with Studio servers
- Orders Sync: Select Orders Sync to re-download all open orders for the current business day if an order fails to display or open correctly
- When the Sync is completed messages will be displayed confirming sync and orders were downloaded
Step 10: Handheld Customer Tip Screen
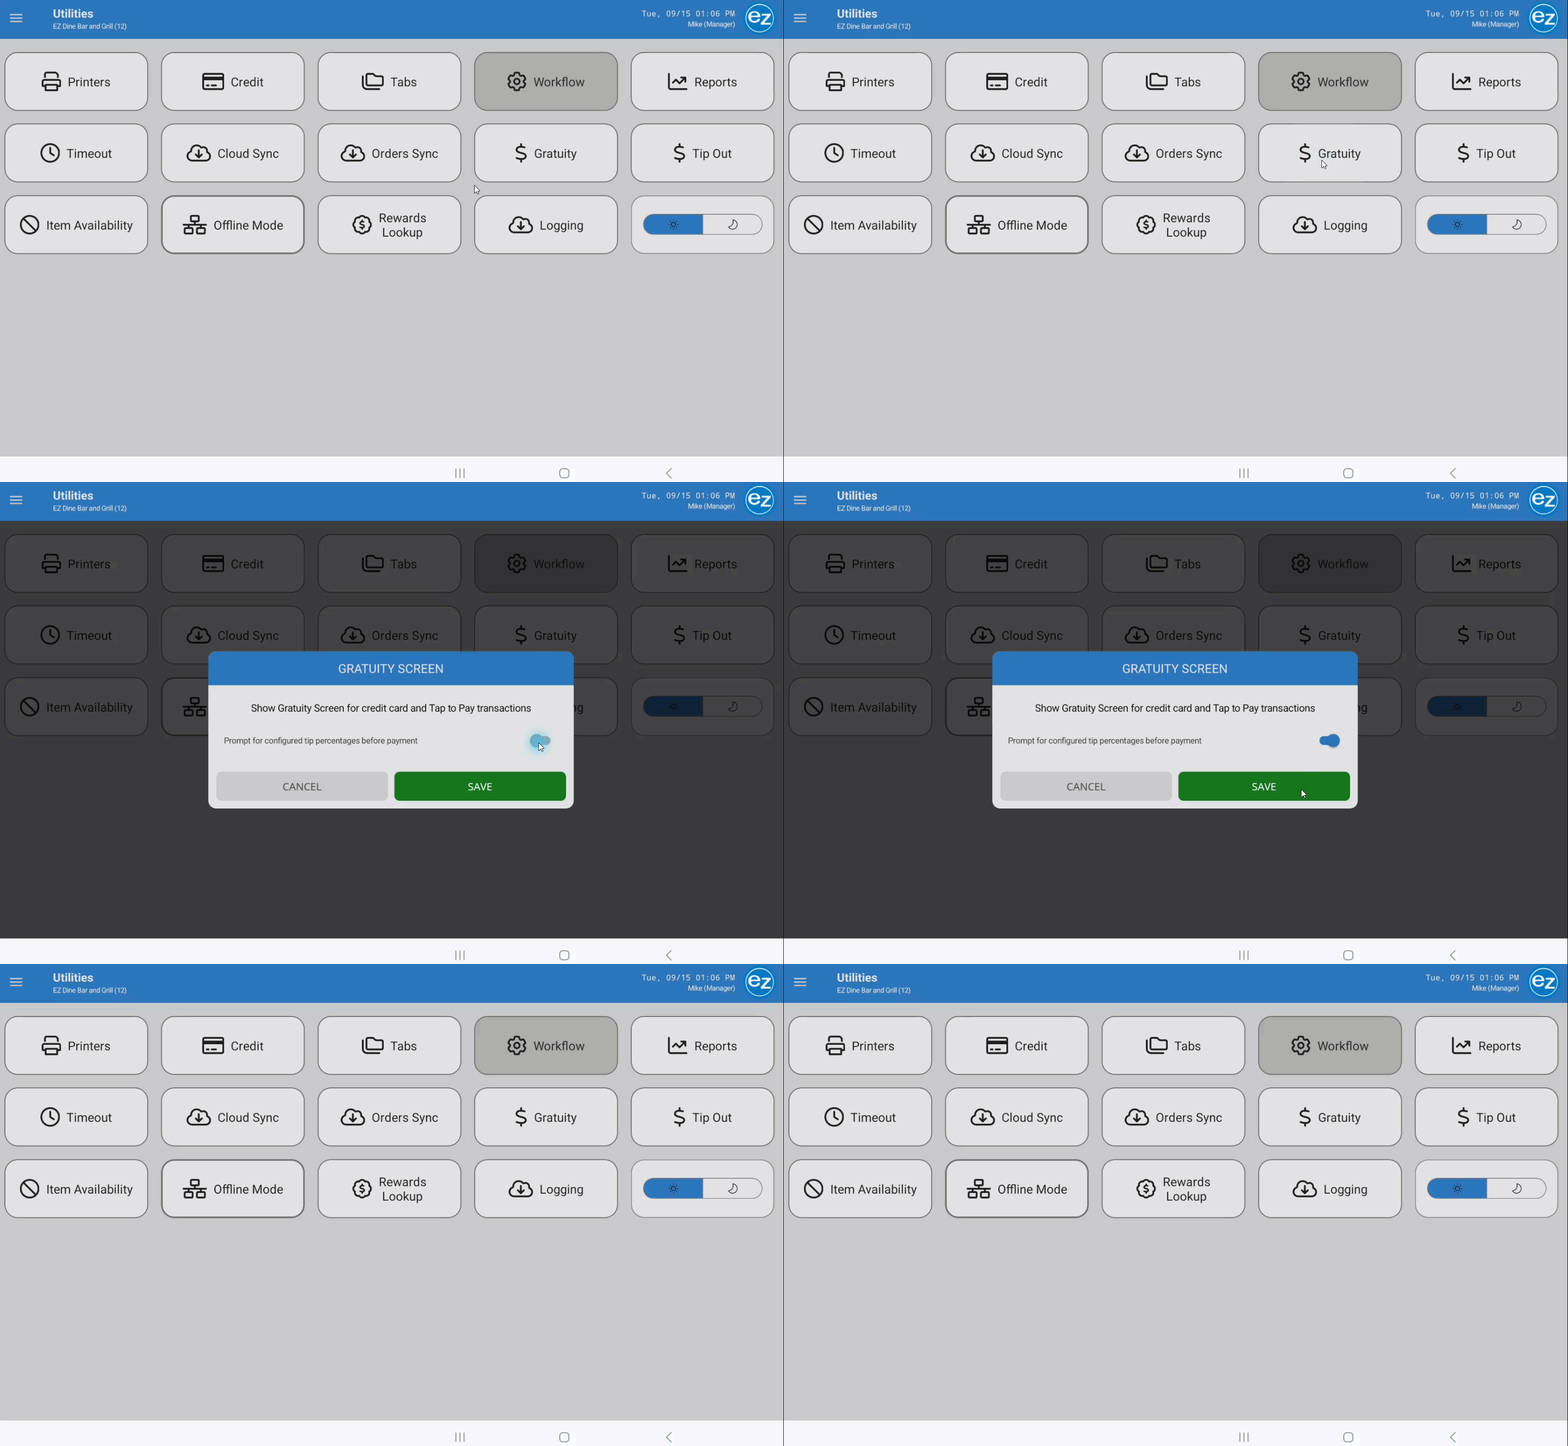
- When using the Tap to Pay integration you will have the option to turn on a customer facing tip prompt screen
- Toggle Gratuity ON to automatically prompt customers with a tip entry screen (using Studio gratuity percentage presets) following handheld credit card transactions
- Tap Show Page to preview the gratuity prompt layout
Step 11: Item Availability
- Manage menu item availability and real time inventory counts using the Item Availability section
- Marking Items Unavailable: Search for or locate the menu item in Item Availability and toggle Item Unavailable to ON
- Menu Display: An unavailable item displays with a strikethrough on the order menu screen and cannot be selected for active orders
- Setting Inventory Counts: Enter a starting inventory quantity into the Count field for a specific item
- Automatic Deduction: Each order containing the item automatically deducts 1 from the remaining count
- Automatic Availability: When the inventory count reaches 0, the EZ Dine app automatically disables the item on the menu
- Message Center Broadcasting: Toggle Display low item counts in messages to ON to publish live, real-time inventory count updates to the device Message Center for staff visibility
- Re-enabling unavailable items: Locate the disabled item in Item Availability
- Toggle the item back to Available (OFF)
- Tap Clear to remote the 0 count restriction and restore full availability on the ordering menu
- 86ing Menu Items search or locate an item in the Item Availability and toggle Item Unavailable ON. The item displays with a strikethrough on the ordering menu and cannot be selected
- Item Countdowns enter a starting inventory count in the Count field. Each sent order deducts 1 from the count. Upon reaching 0, the item automatically 86s and disables on the menu
- Toggle Display low item counts in messages ON to publish live item counts to the device Message Center
- For re-enabling the item toggle back on the item to available and Tap Clear to remove the count of 0
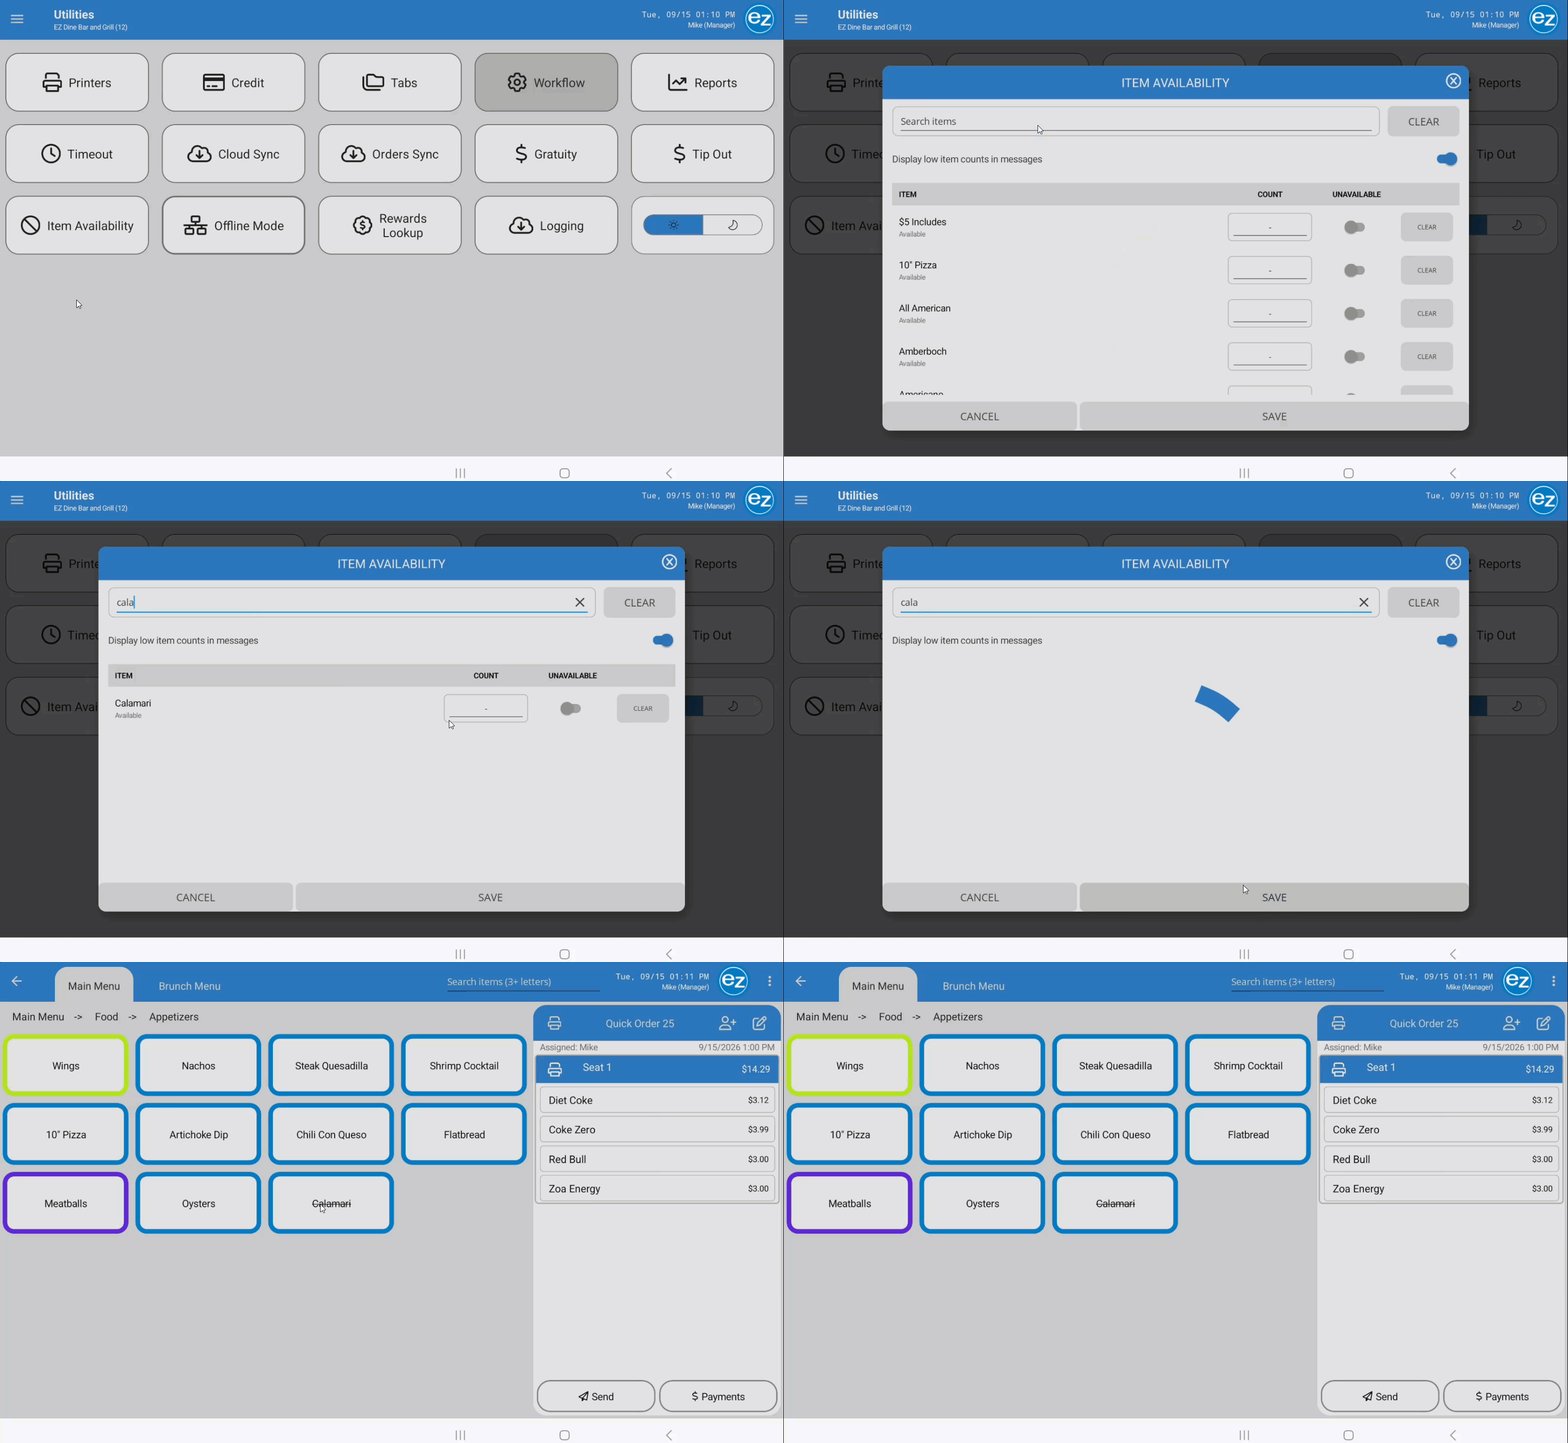
Item Availability
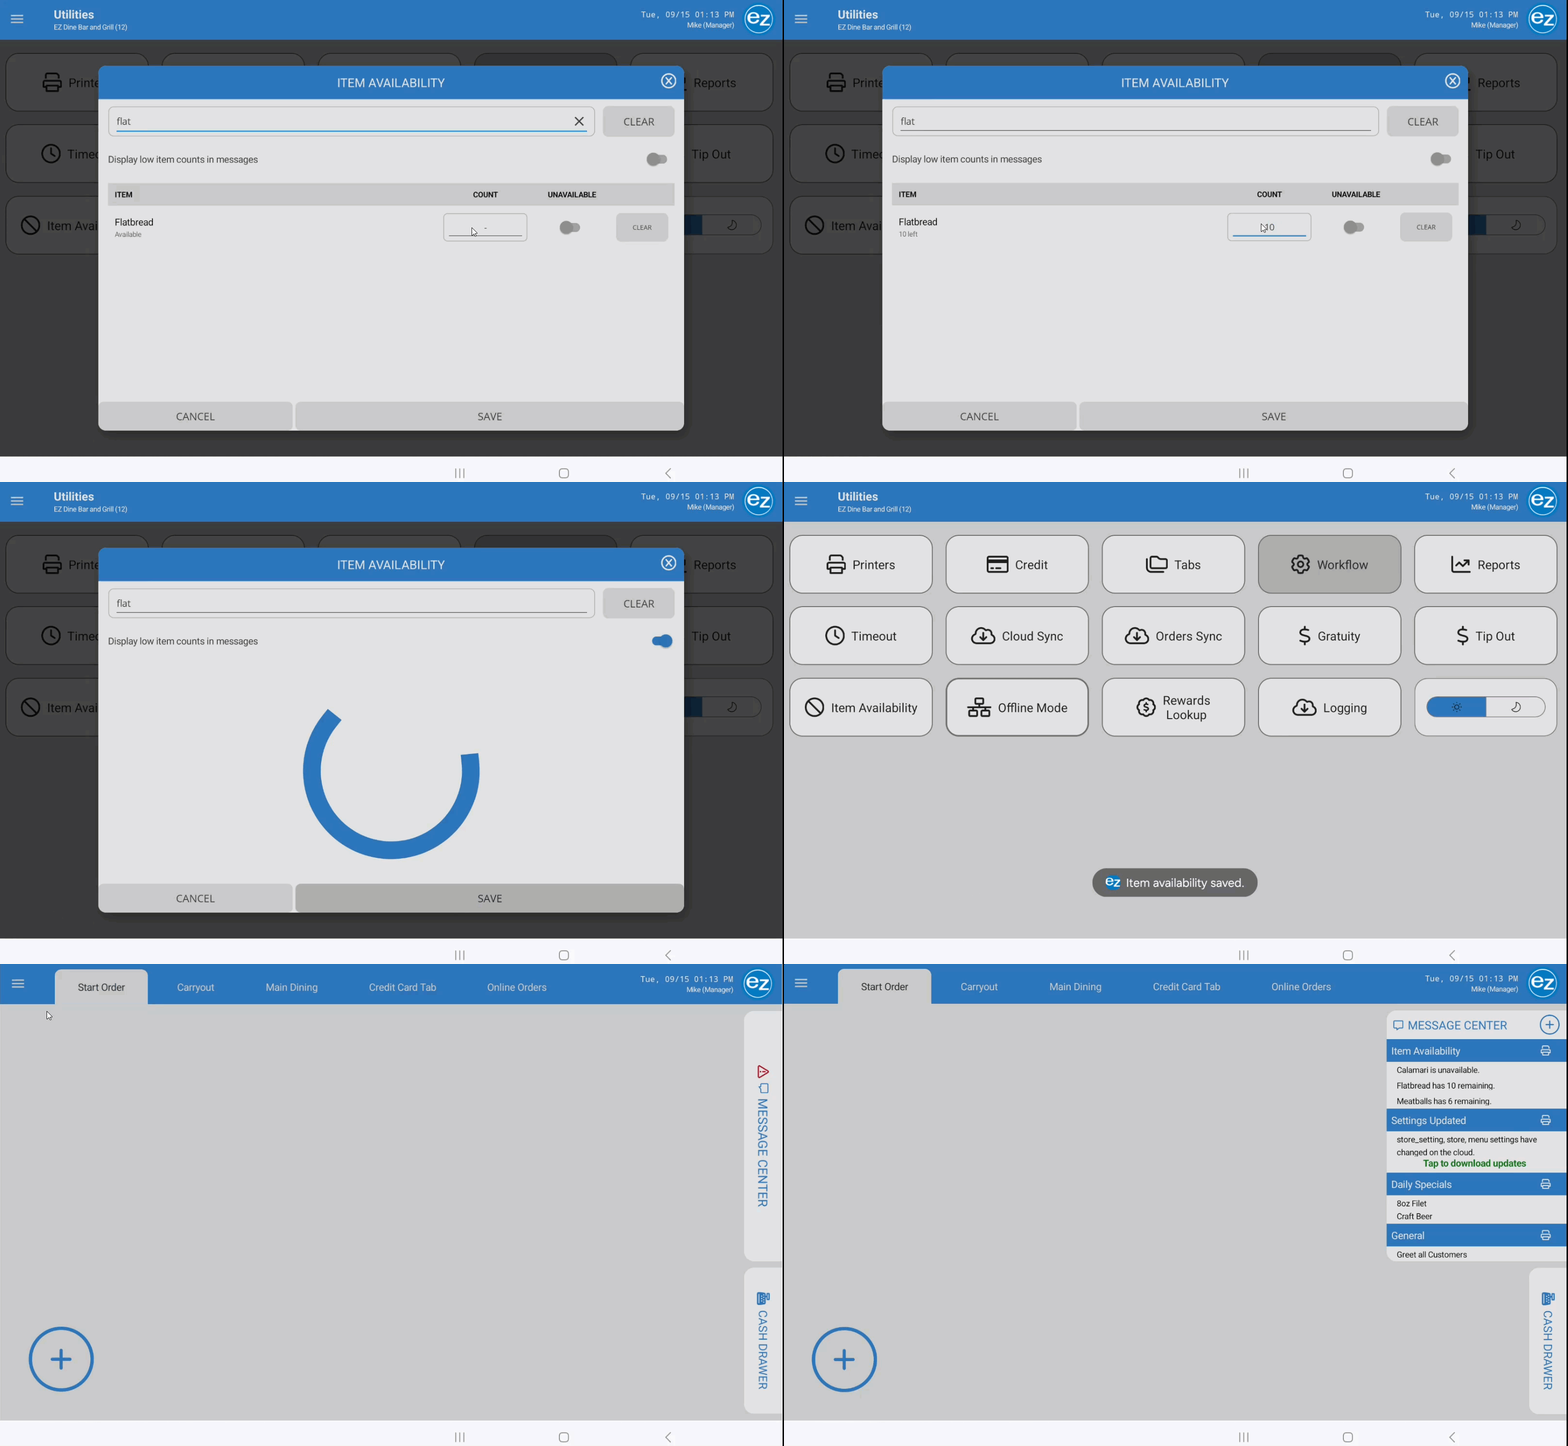
Item counts
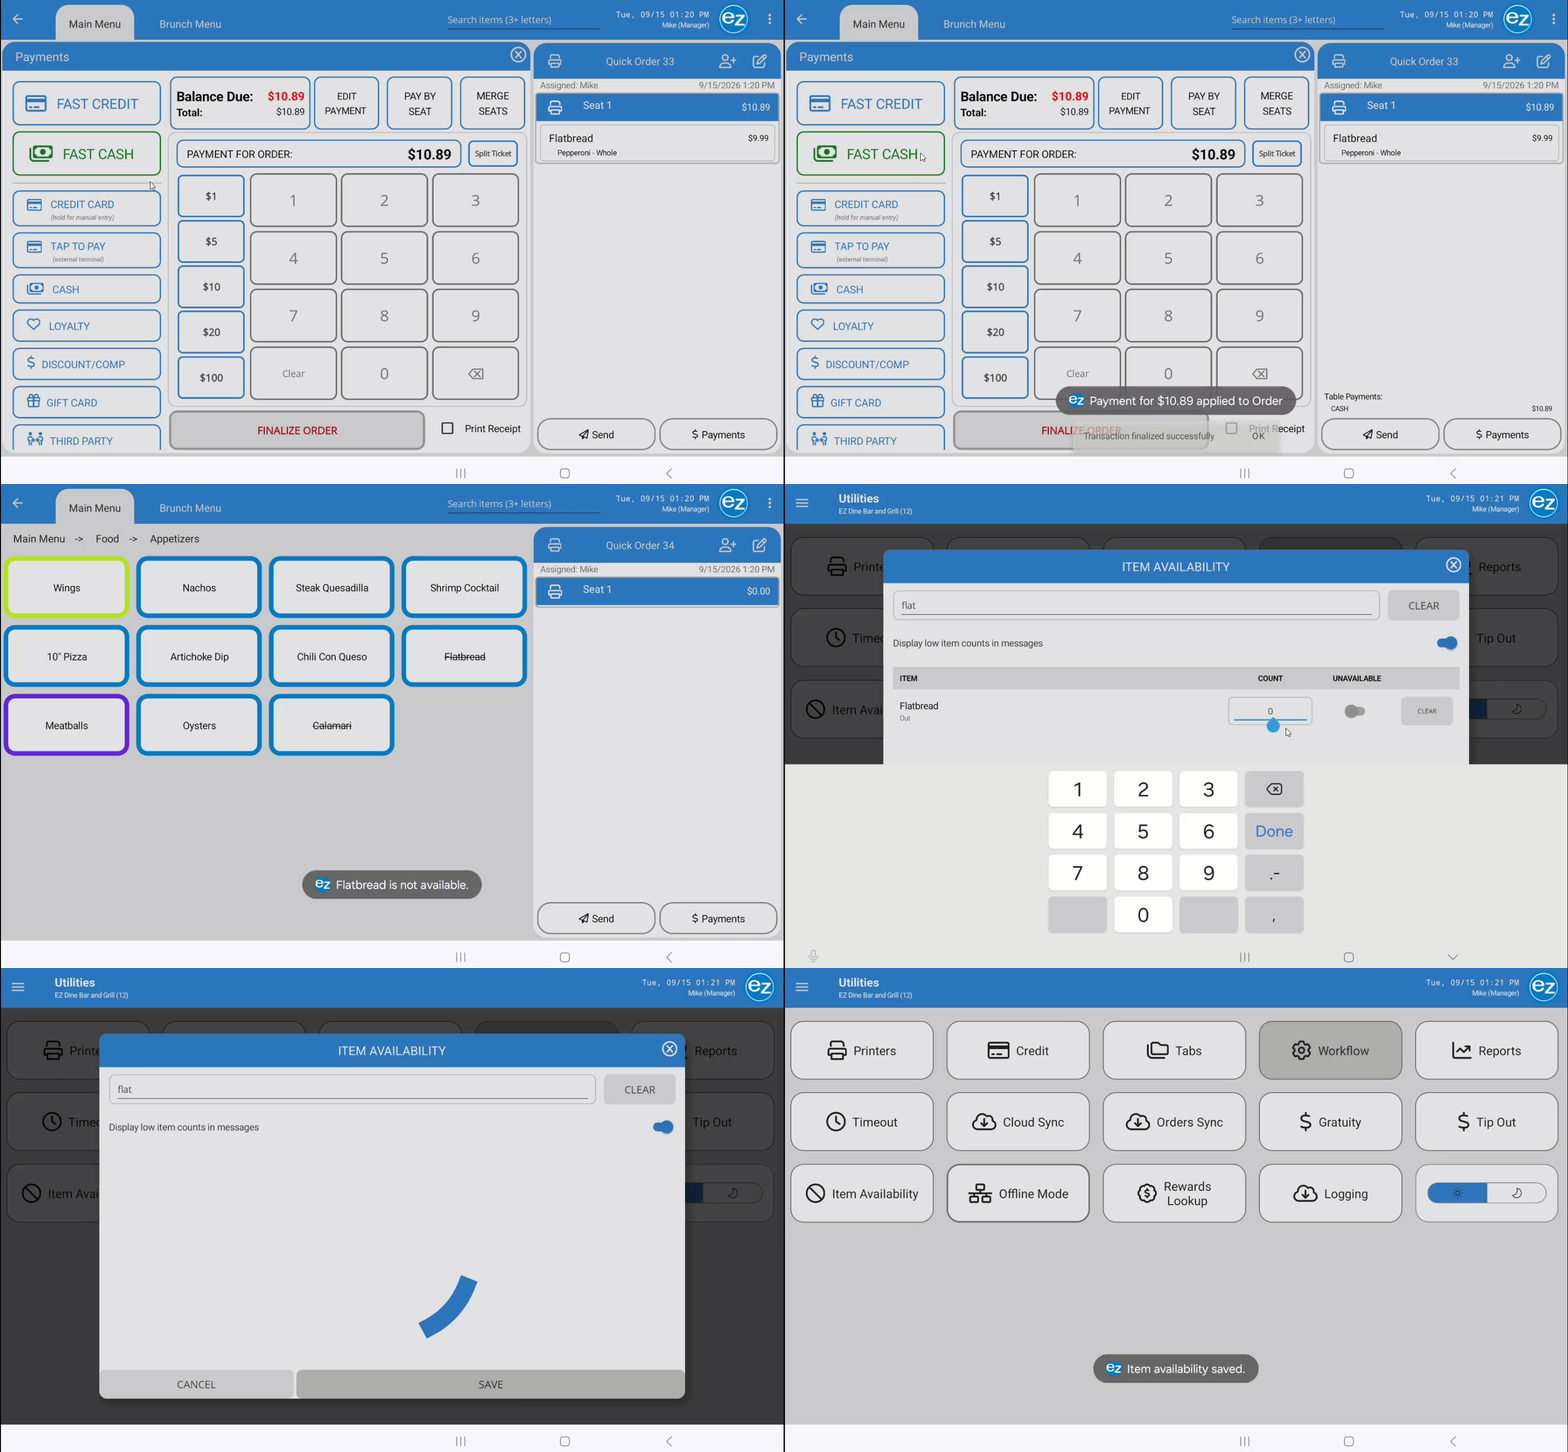
Re-enable Item
Step 12: Offline Mode
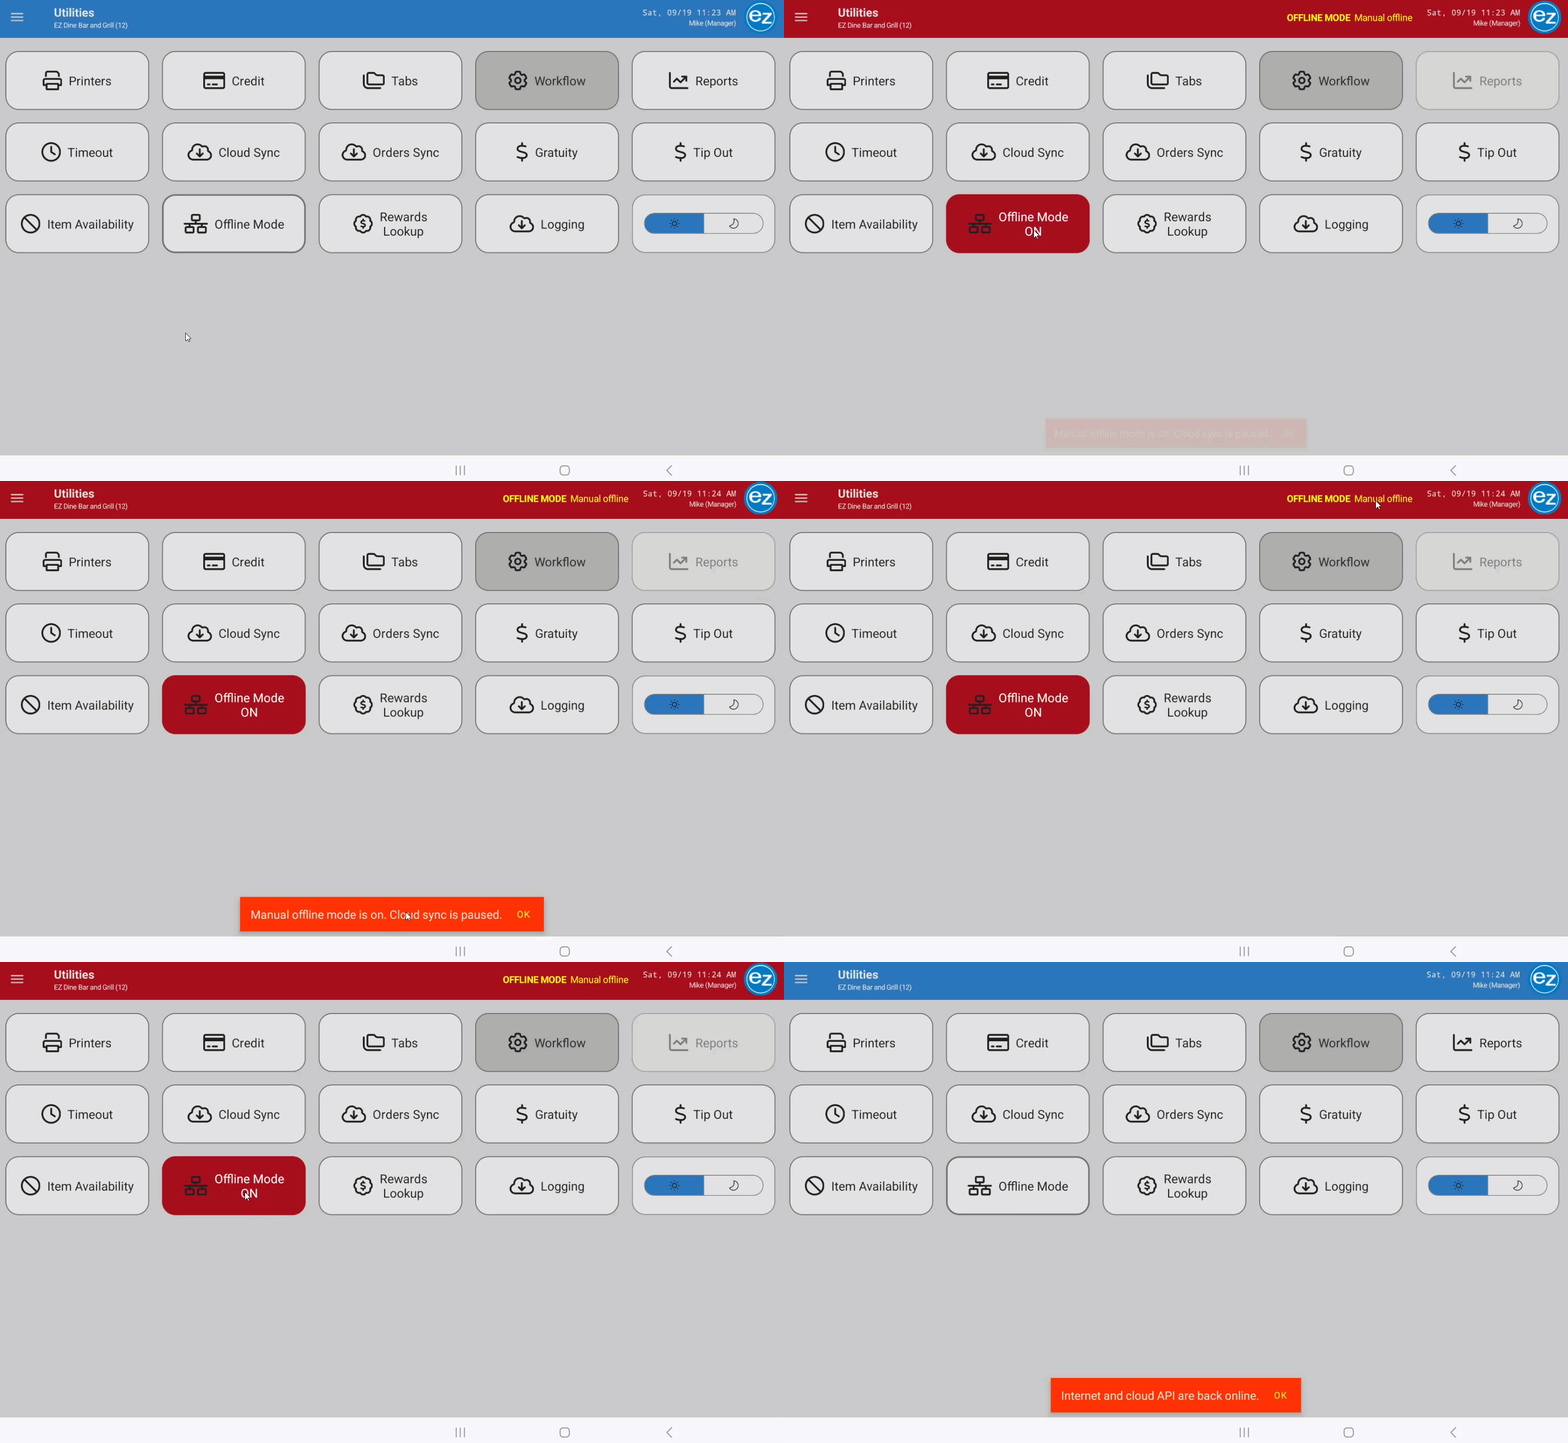
- Select Offline Mode to manually initialize store devices for offline ordering processing during local internet outages
- Manual Offline Mode trigger will be listed on the top header banner
- For details on operating offline please reference the Offline Mode guide for details
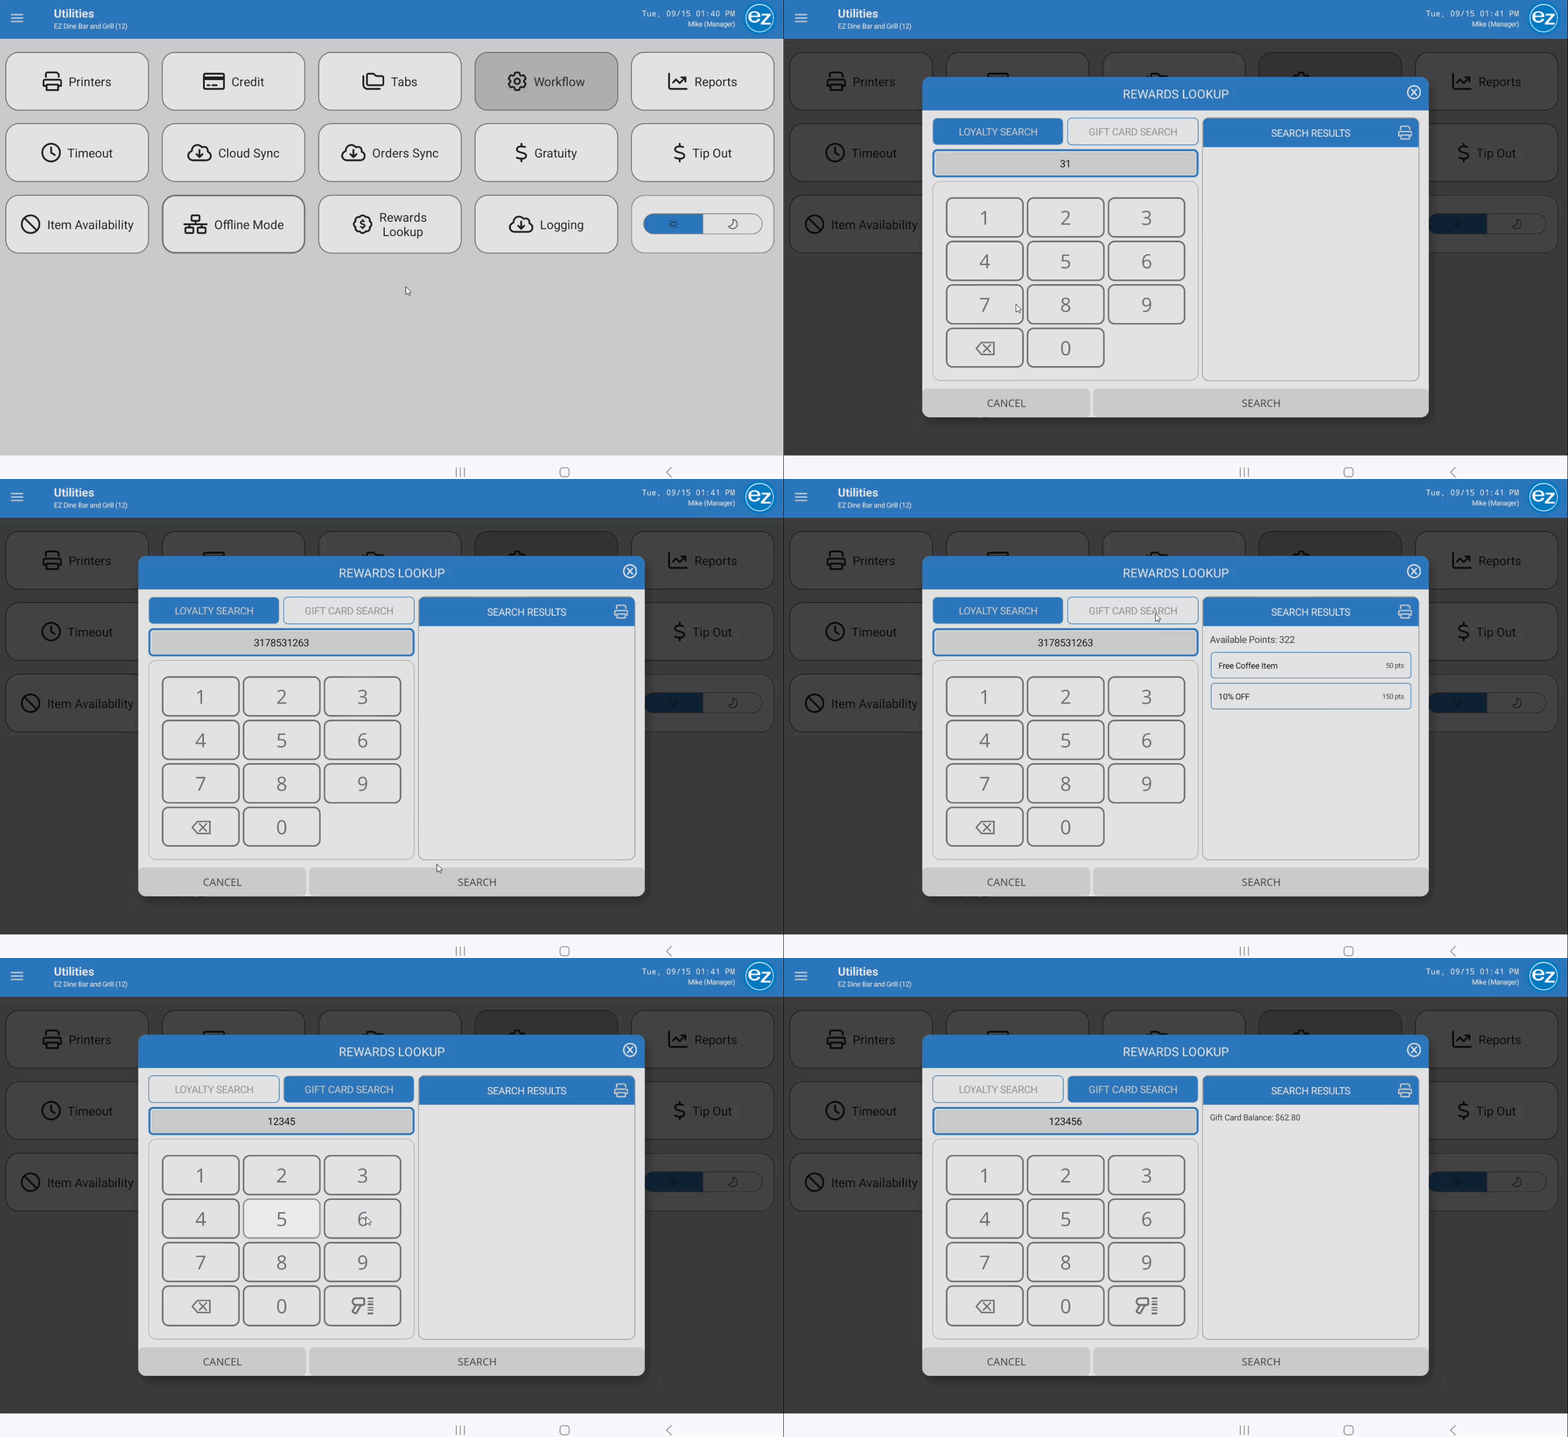
Step 13: Loyalty & Gift Card Balance Lookup
- Navigate to Rewards Lookup and select Loyalty Search or Gift Card Search
- Type the account number or scan the gift card barcode using a USB scanner
- Tap Search to view available points or dollar balances
- Tap Print inside the results window to issue a physical balance receipt
Step 14: System Diagnostics & Error Logging
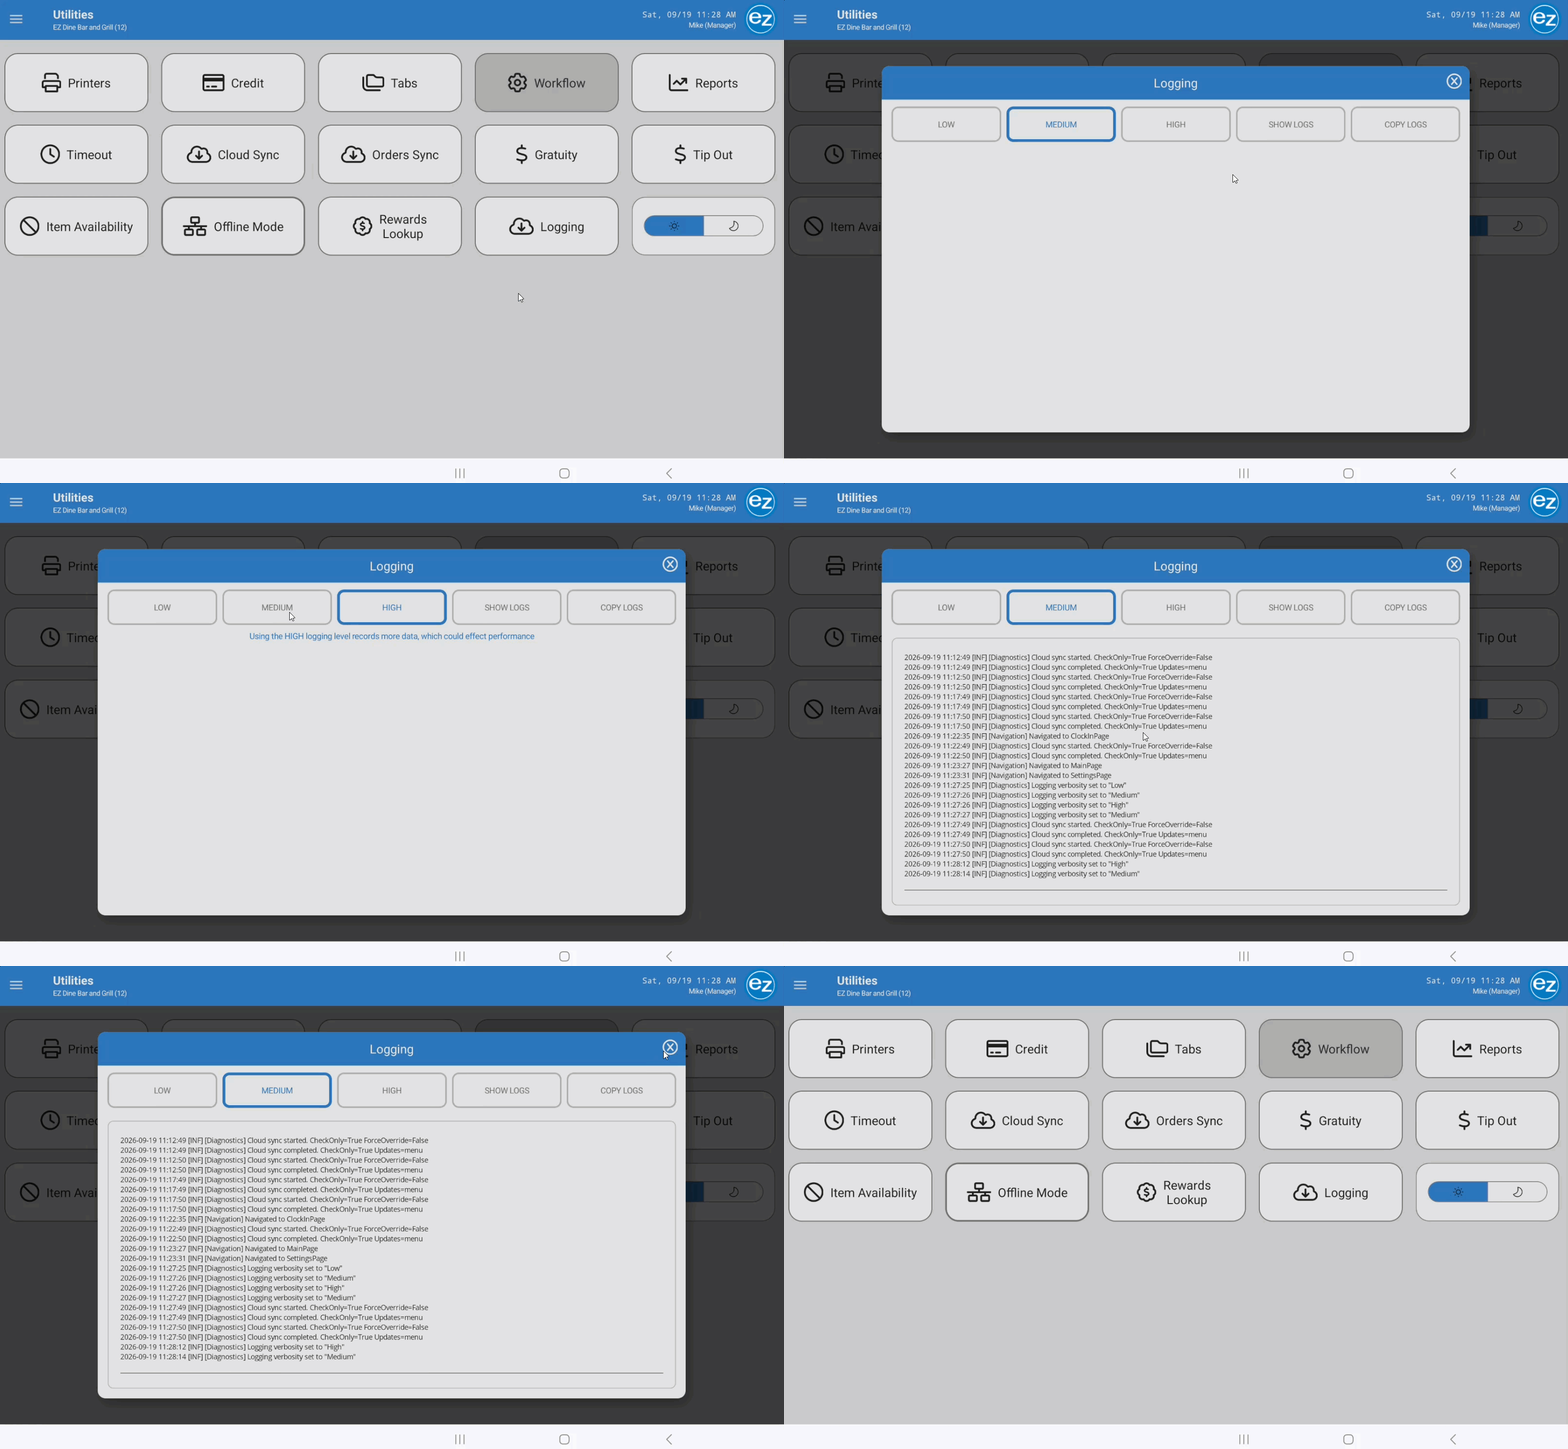
- If experiencing software errors or crashes, capture diagnostic logs for technical support
- Select a data recording threshold: Low, Medium, or High (High records maximum detail but may temporarily impact system performance)
- Tap Show Logs
- Tap Copy Logs and Submit to send diagnostics directly the the technical support team
Step 15: Dark Mode
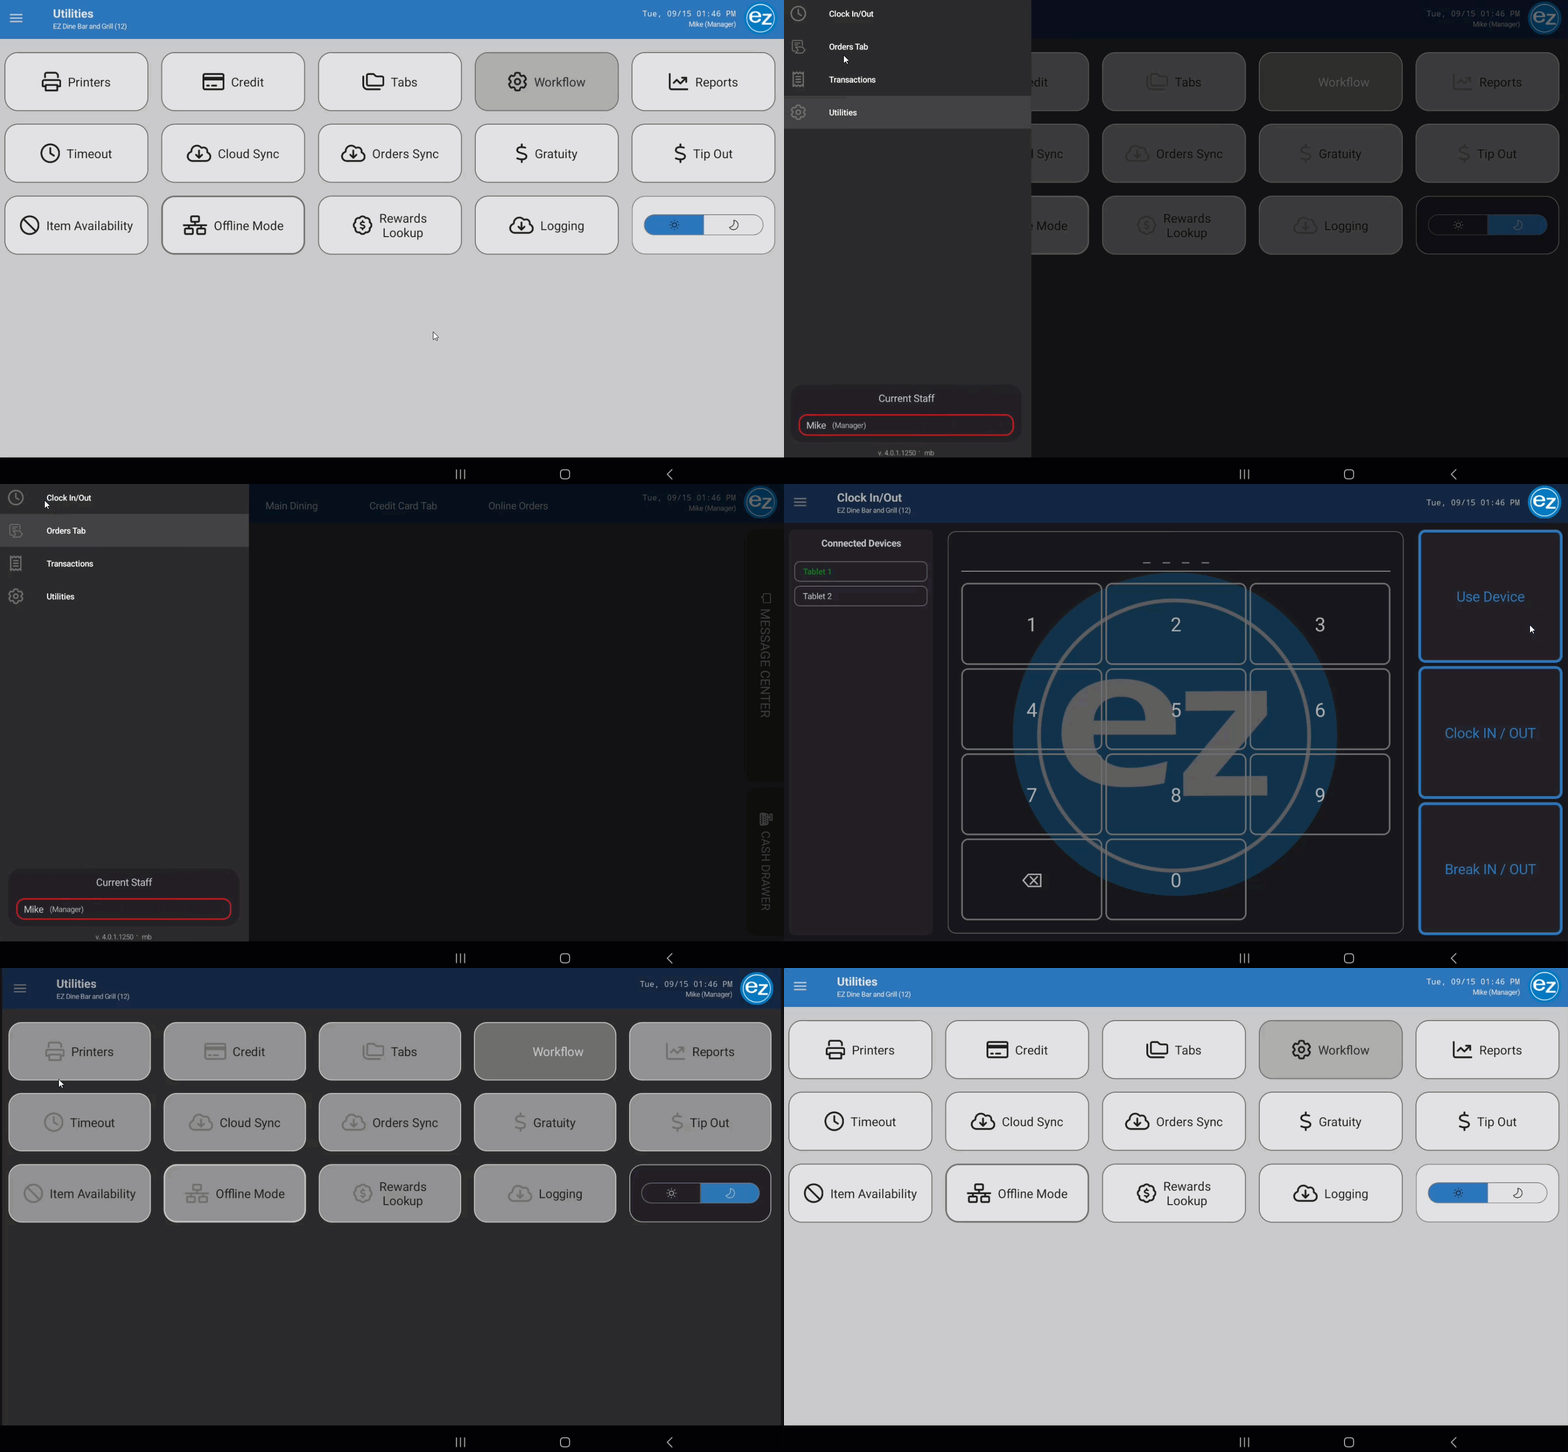
- Switching between dark and light modes can be done when selecting the sun/moon icons
Additional Resources and Help!
Still have questions? Please contact us any time at support@ezsoftpos.com.
NOTE: If emailing, please include your business name in the subject line of the email
and provide your preferred contact information for the best response time.
Visit our help center Help Center for more guides and tutorials