
TABLE OF CONTENTS
- Step 1: Generating Reports
- Step 2: Sales Reports
- Step 3: Rewards Reports
- Step 4: Audit Reports
- Step 5: Labor Reports
- Step 6: Report Queue
- Step 7: Scheduled Reports
- Additional Resources and Help!
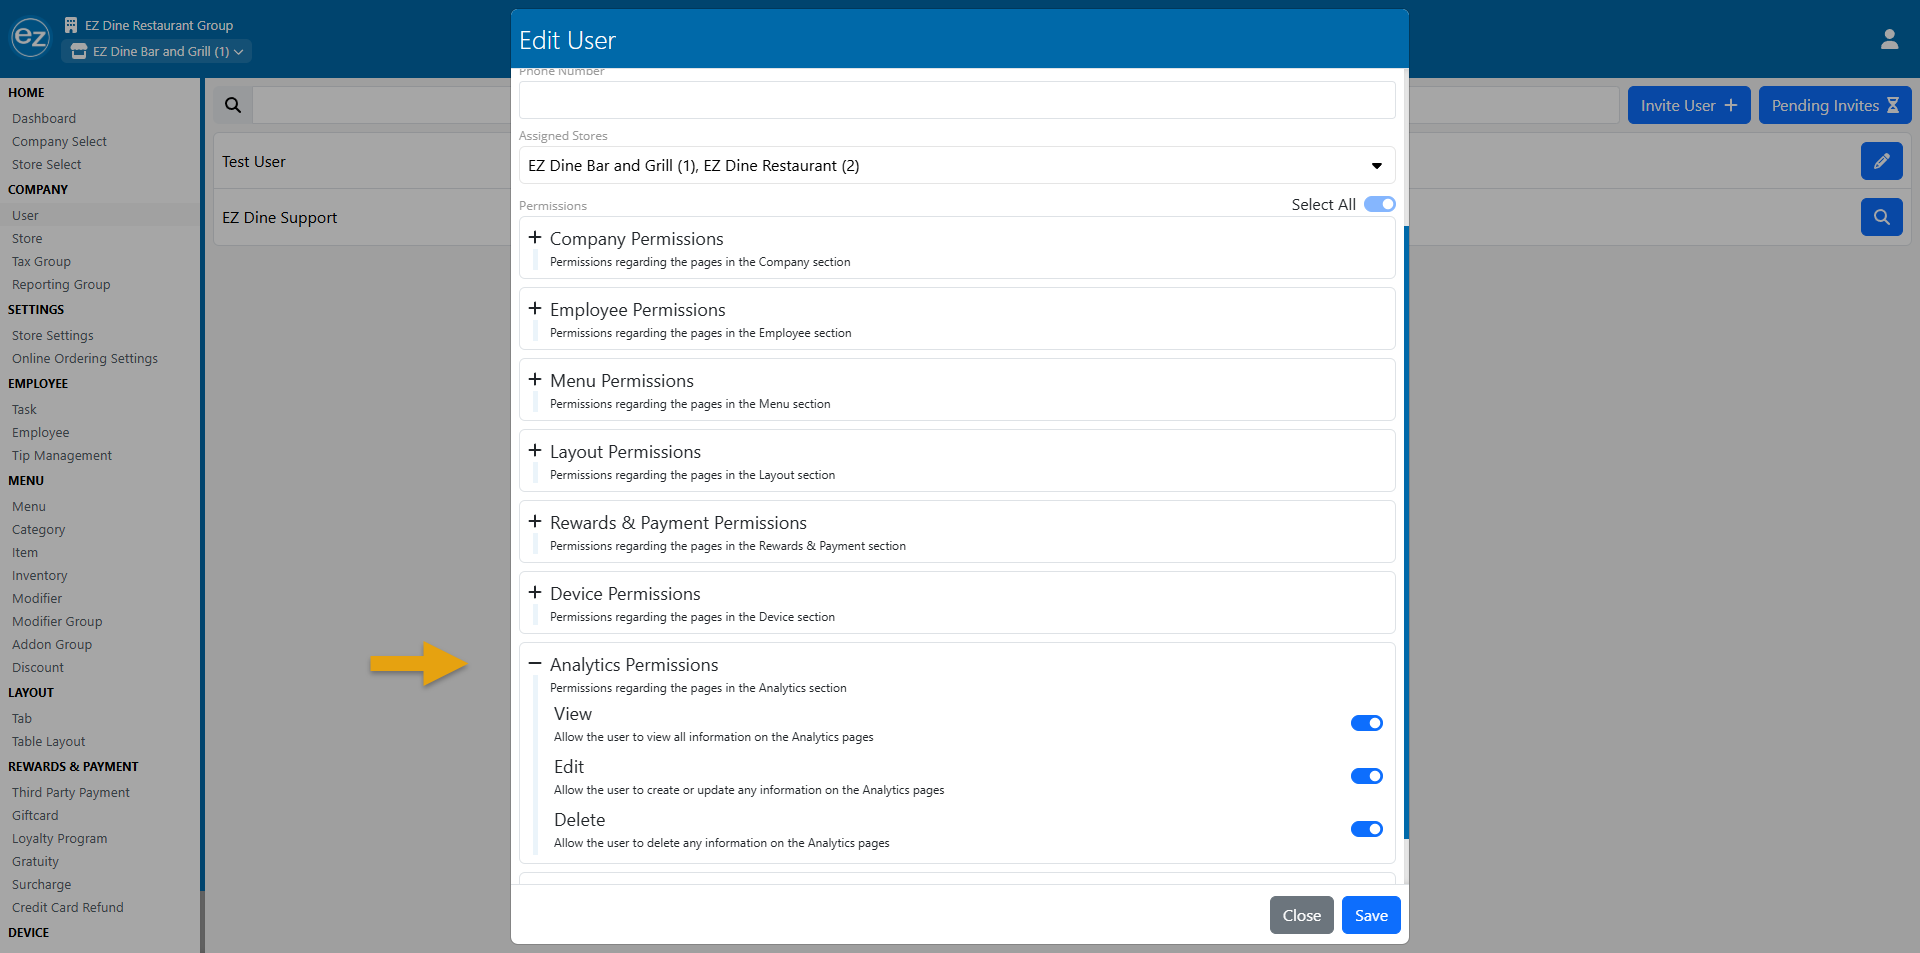
Accessing the report section will require the analytics Studio user permissions to be enabled
Step 1: Generating Reports
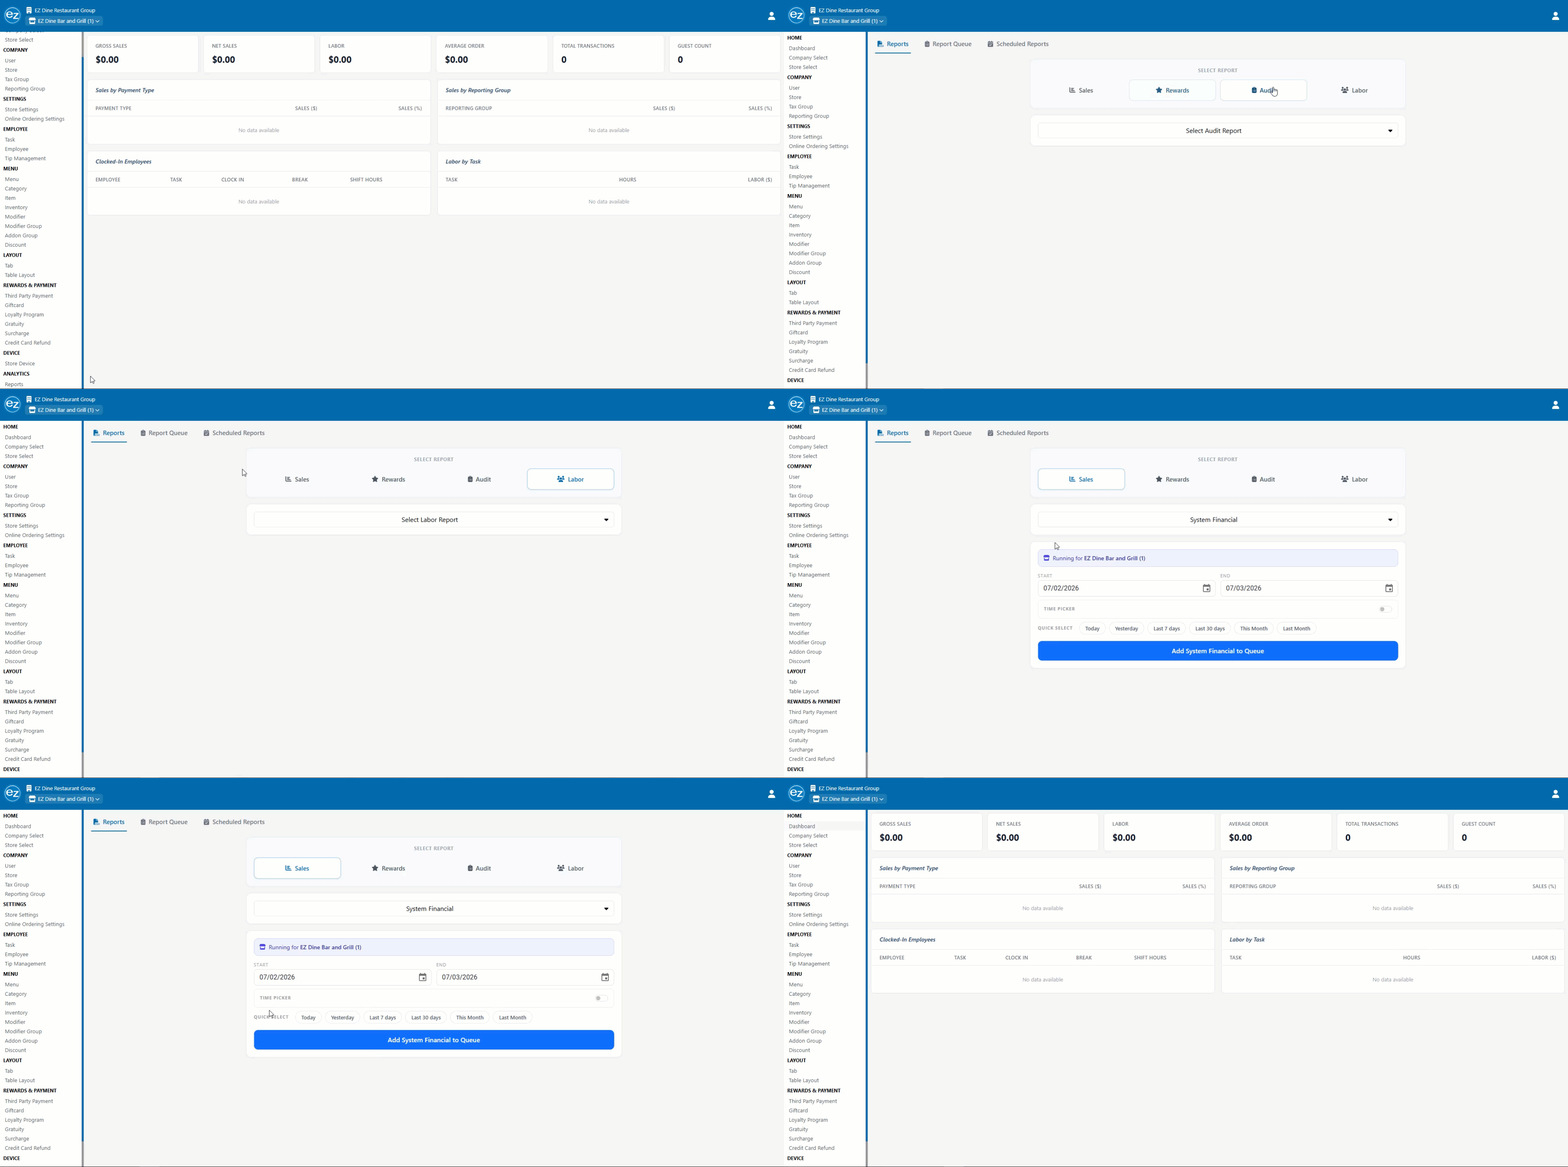
- Select Reports from the Analytics tab in Studio. The main interface displays your default reporting categories
- Navigate to your desired reporting category and click the report dropdown menu to view the available selections
- The selected report name is highlighted on the dropdown and displayed on the Add to Queue tab
- By default, the report pulls data for the store you are currently signed into. Note: You can only select one store at a time. To switch locations, use the store dropdown menu located in the top-left corner beneath the company name
- Once you choose a report, define a custom start and end date range, or choose from the predefined quick-pick timeframes. By default, the date fields are based from the previous day
- To enter a custom date, select the Calendar icon. In the window that appears, navigate to your target year, month, and day for both the start and end ranges
- When the configuration is ready, click the Add Report to Queue tab. This automatically sends your request to be processed inside the reporting queue section. For details on managing the report queue, refer to the Report Queue article here: Report Queue
- The Studio navigation menu remains accessible; To return back to the main Studio page simply press any tab in the main navigation panel
Step 2: Sales Reports
Tracks revenue generated from products sold, broken down by location and employee
- System Financial: The primary sales report used to reconcile sales, payments, and taxes. When balancing your numbers, the Net Collected total should match your total payments collected for the period. Note: Use the custom time picker to filter your data by specific operational windows
- Hourly Sales: Breaks down gross sales by hourly blocks and calculates transaction and guest count averages
- Product Mix: Displays the quantities of specific items sold by reporting group and includes food cost percentages (provided item costs are entered)
- Credit Card Details: Logs every individual credit card transaction, detailing authorization codes, base amounts, gratuities, and totals
- Employee Sales: Outlines sales performance, tip percentages, and calculated tips owed for each member of your staff
- Employee Product Mix: Details the exact item quantities sold by individual employees
Step 3: Rewards Reports
Gift card and loyalty rewards program must be activated at the company and store level before being used
- Gift Card Details: Tracks gift card activity including current balances, redemptions, and value-added. For security, full gift card numbers are masked
- Loyalty Summary: Provides an overview of total program performance, tracking member signups, points earned or redeemed, and the total revenue generated through your loyalty program
- Loyalty Members: Examines individual member histories, including join dates, current point balances, last visit dates, and lifetime spend
- Loyalty Points Activity: Breaks downs specific instances of points earned and redeemed, giving you complete visibility into every member discount reward used
Step 4: Audit Reports
Verifies the accuracy and details of your transaction data
- Comp Details: Tracks all comp types, categories by reason, date, transaction number, employee, specific items, total amount, and the approving manager
- Discount Details: Outlines all applied discounts, organized by discount name, date, transaction number, employee, discount type, total amount, and the approving manager
- Void Details: Provides a breakdown of all voided items, organized by reason, date, transaction number, employee, total amount, and the approving manager
- Pay-In/Pay-Out Details: Logs every instance of a cash drawer being opened for a pay-in or pay-out, detailing the transaction type, reason, date, employee, and amount
- Transaction Details: Allows you to look up any finalized transaction within a 24-hour window. Search by a specific Transaction Id, with capabilities to view, print, or save the finalized receipt
- Third Party Payment Details: Records miscellaneous custom payment types, categorized by payment type, date, employee, amount, tips, and totals
- Third Party DSP Orders: If utilizing the Stream integration, this report summarizes the delivery service provider name, transaction number, customer name, sales totals, and tax collected(when applicable)
Step 5: Labor Reports
Provides detailed information regarding employee hours worked, wages, and tips
- Timesheet Summary: Groups labor data by employee name, assigned task, pay rates, total hours worked, gross pay, tips, and automatic gratuity
- Timesheet Details: List each individual clock-in and clock-out shift by employee name, date, task, hours, pay, tips, and automatic gratuity
- Labor By Task: Aggregates hours, pay, and tips according to specific employee roles or operational tasks
- Tip Pooling: If utilizing the tip pooling feature, this report details how credit card tips are distributed among staff based on the hours worked per employee
Step 6: Report Queue
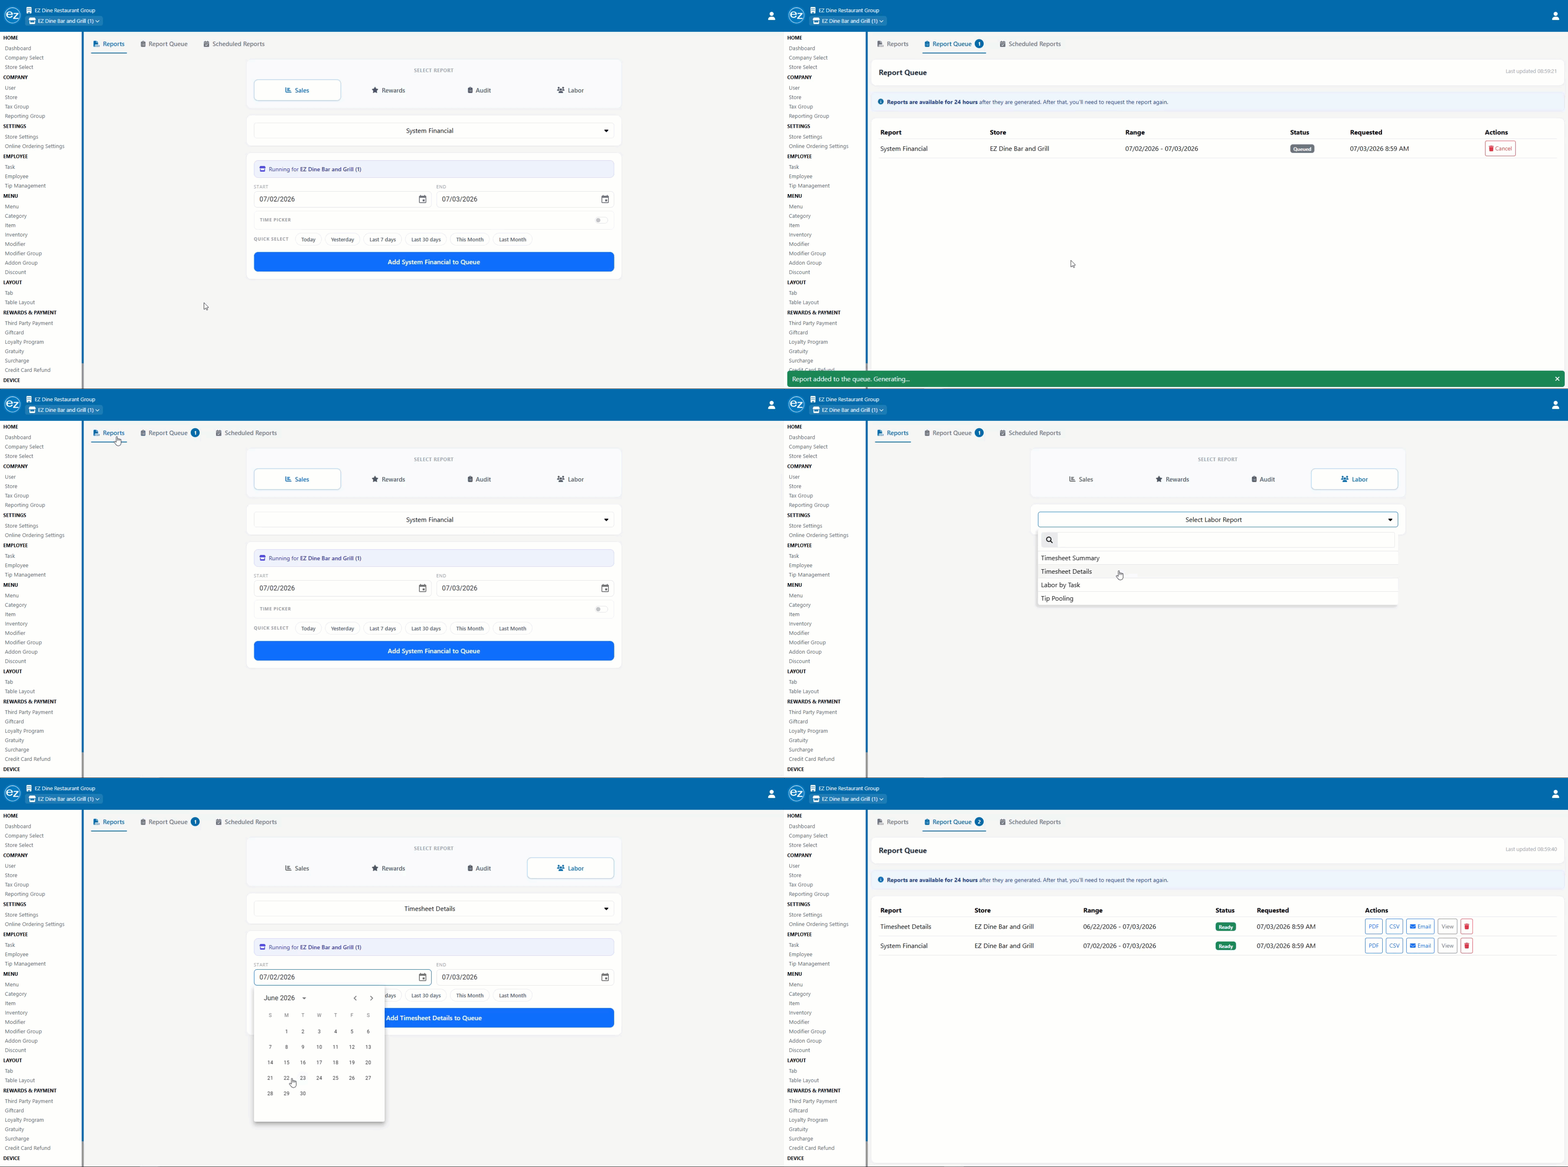
- The system automatically processes all generated reports within the central Report Queue section. A counter to the right of the Report Queue heading displays your current number of pending requests
- After the report is generated, the Report Queue page appears automatically. The status remains pending until it completes successfully, updating the queue status to ready. Failed reports are highlighted in red text alongside the failure reason. From here, you can retry processing the report or delete it entirely
- Each queue entry tracks the report name, store location, date range, status, request time, and available actions
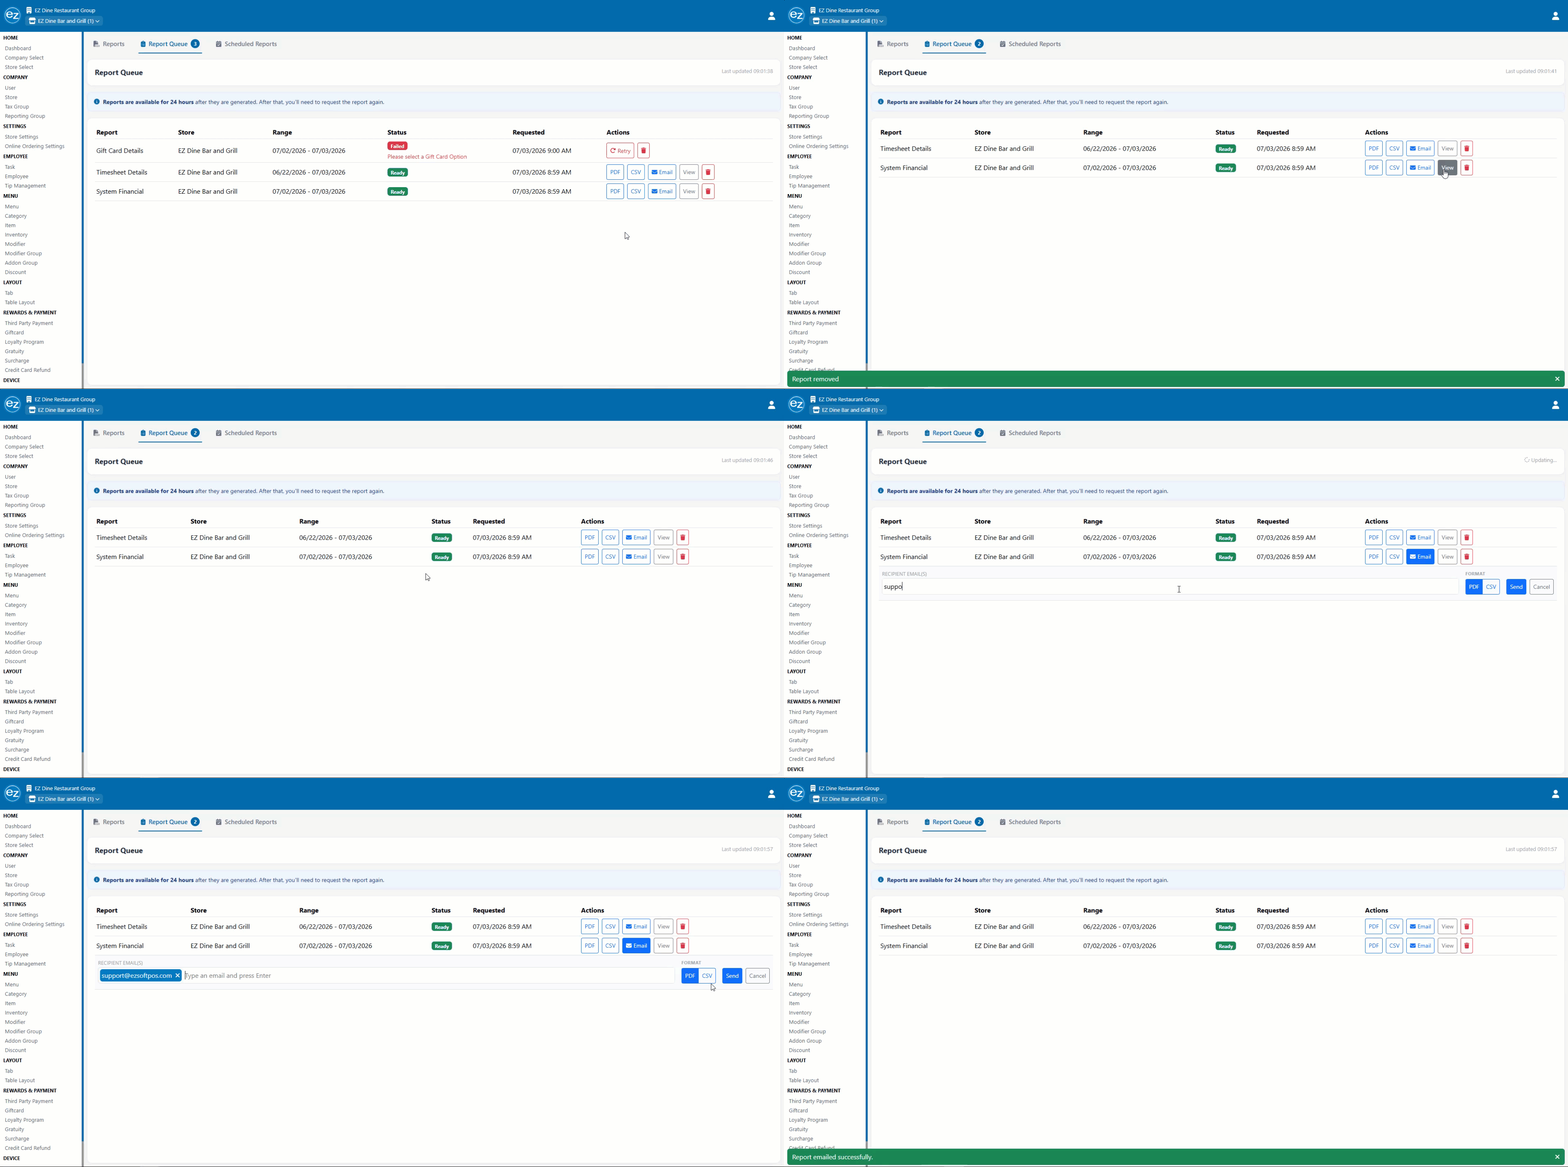
- When a report is ready, you can export it using the following tools: Save as PDF, Save as CSV, Email or View
- Selecting Email opens a recipient address line. Enter the destination email address, press enter to save, choose your preferred file format, and click Send. A "Report Emailed Successfully" notification confirms delivery
- Reports remain active in your queue for 24 hours from their generate time before expiring
Report Queue
Exporting
Step 7: Scheduled Reports
Creates automated email schedules for your recurring batch reports
- Select the Create Scheduled Report tab to open the configuration window
- Name the scheduled report. The scheduled report name will serve as the email subject line when the report is sent
- Choose your frequency from the Email Interval dropdown menu (Daily, Weekly, or Monthly). Choosing Weekly opens a day of the week selector, while selecting Monthly automatically defaults the schedule to the first day of the month
- The system sends scheduled reports automatically based on your store's reporting cutoff time
- Choose the stores and specific reports to include. Note: You can attach a maximum of five reports per automated schedule
- Select your preferred report format and input the recipient email addresses. Press enter after typing each email to successfully link the email address
- Click save to add the new scheduled report. From here, you can use the management utilities to edit configurations or delete a schedule entirely
- The system displays the next scheduled run date directly beneath the report name
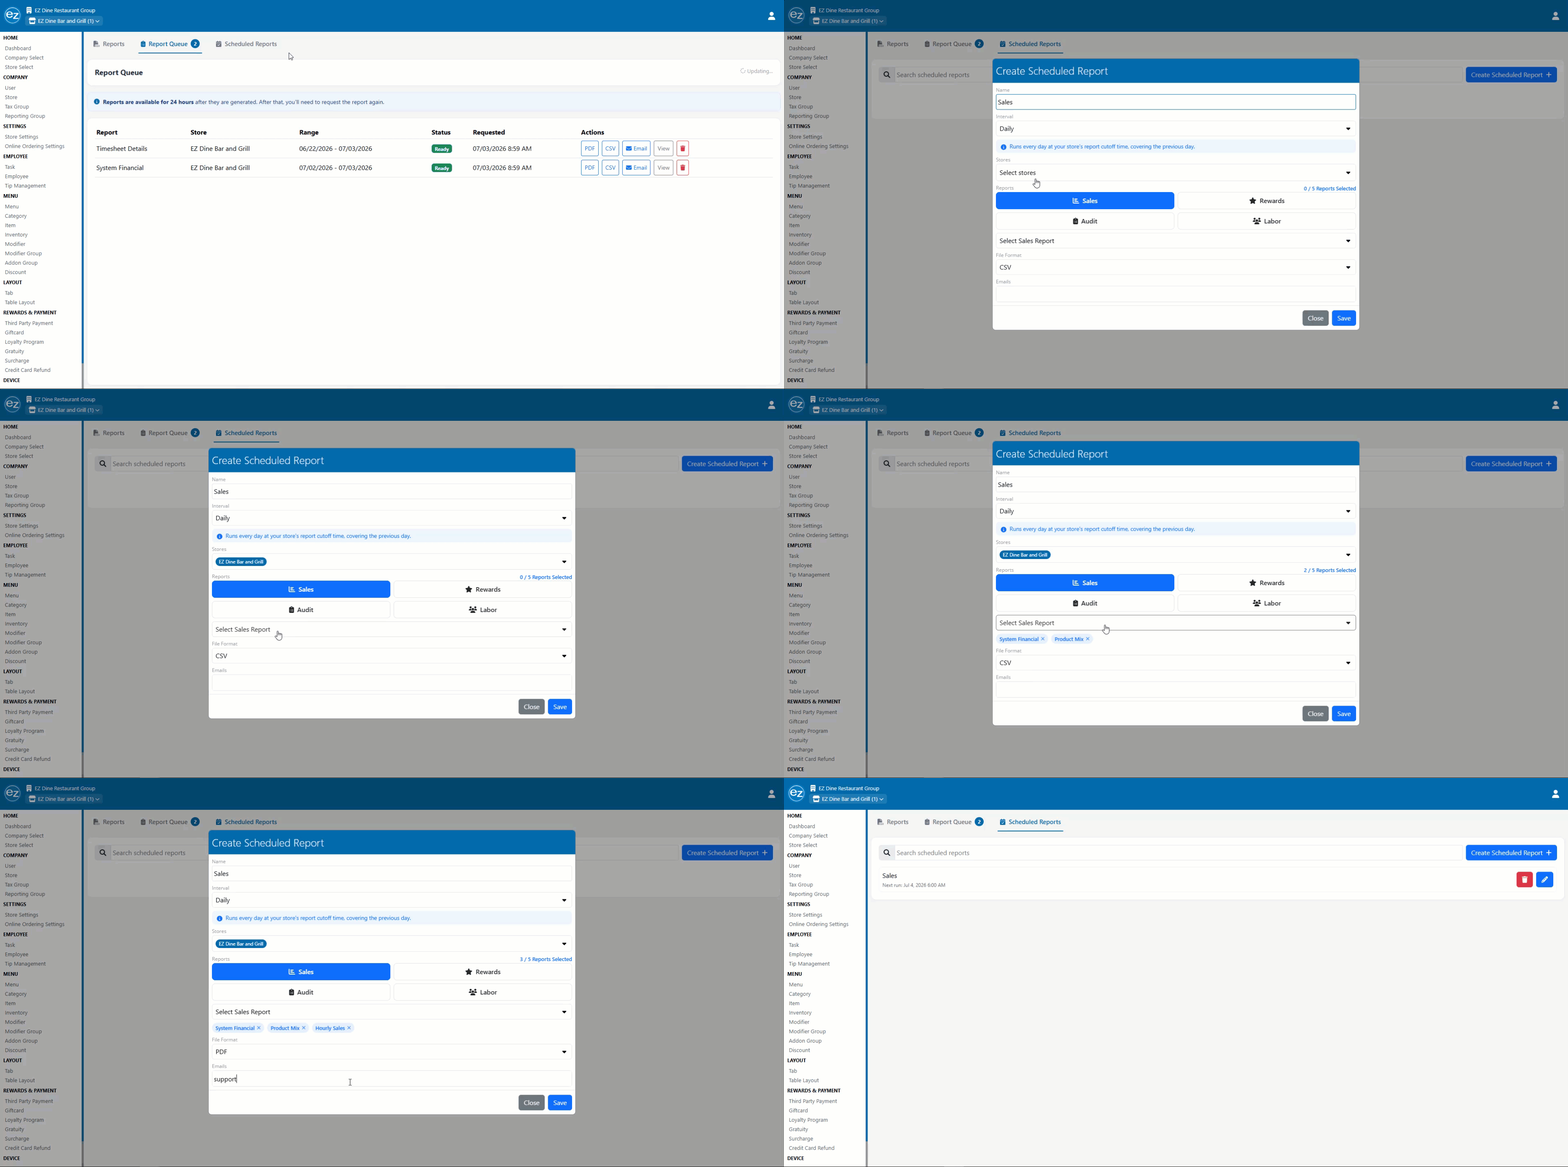
Scheduled Report
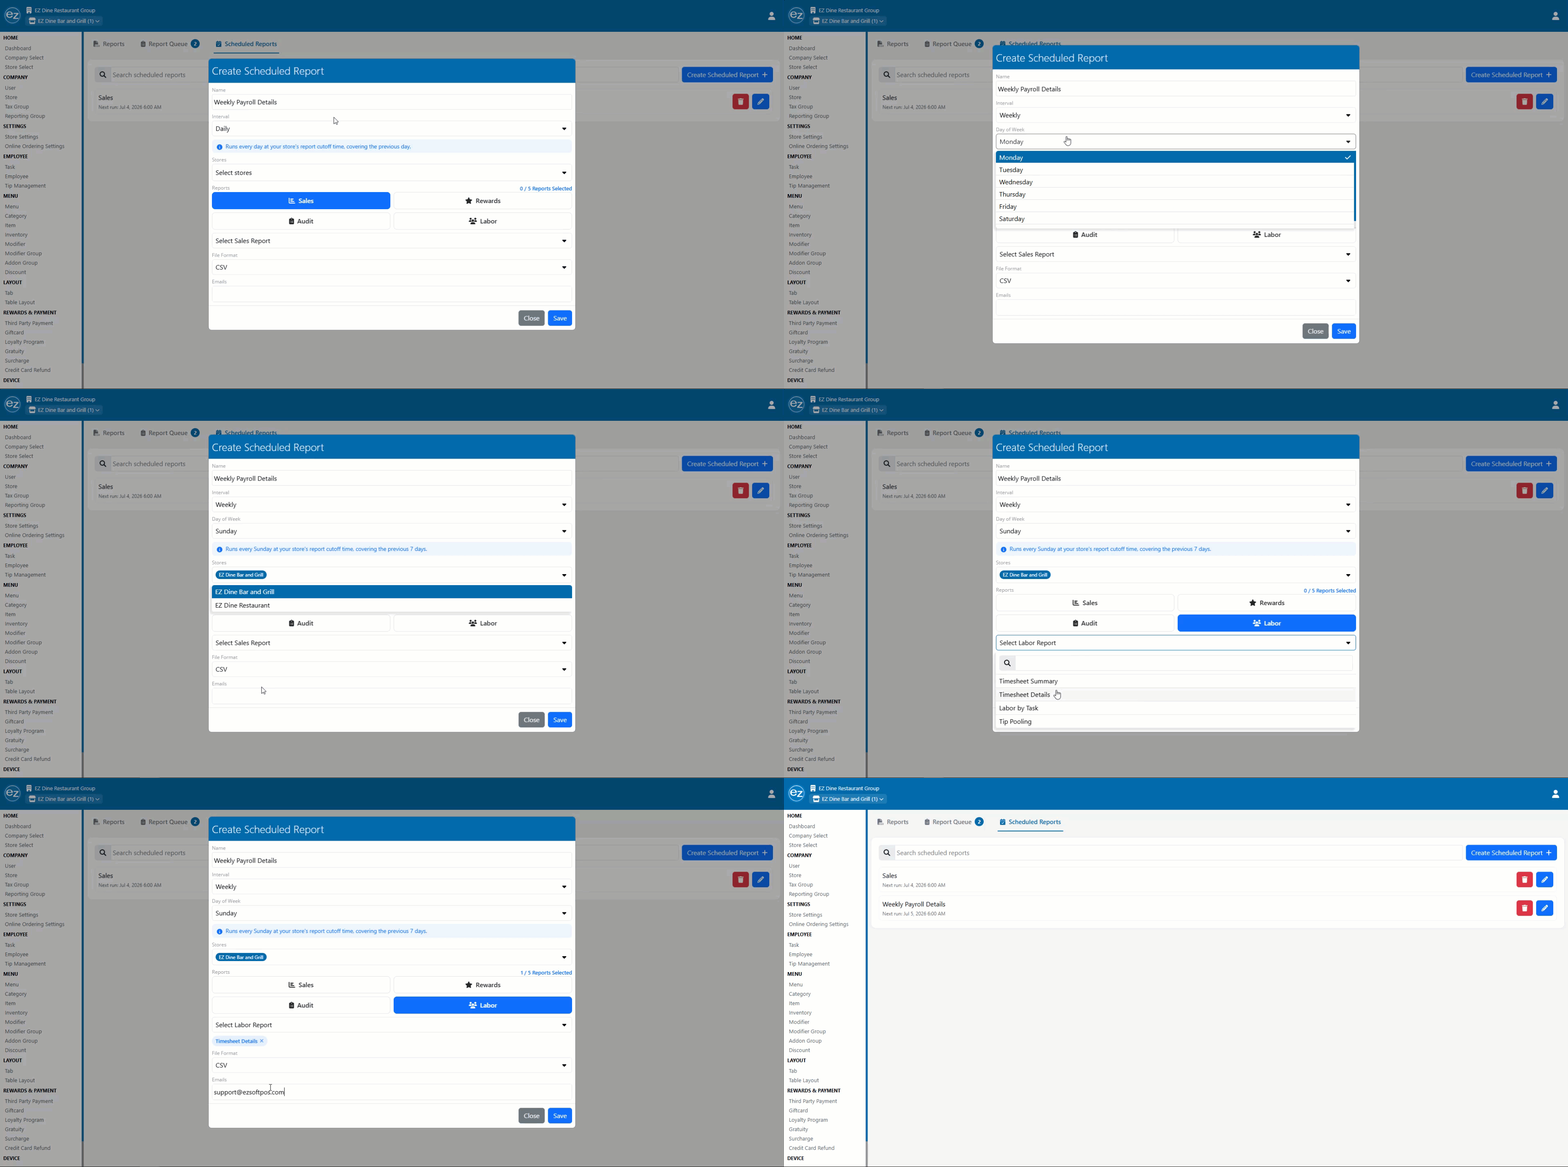
Weekly Schedule
Additional Resources and Help!
Still have questions? Please contact us any time at support@ezsoftpos.com.
NOTE: If emailing, please include your business name in the subject line of the email
and provide your preferred contact information for the best response time.
Visit our help center Help Center for more guides and tutorials