
TABLE OF CONTENTS
- Step 1: Ordering Basics
- Step 2: Entering Items
- Step 3: Item Search
- Step 4: Manual Entry Open Items
- Step 5: Items with Tax Included
- Step 6: Items with Add-on Groups
- Step 7: Modifiers with Add-on Groups
- Step 8: Entering Items with Modifiers
- Step 9: Item Doubles
- Step 10: Item Recipes & Instructions
- Step 11: Editing Items Before Sending
- Step 12: Sending Items on the Order
- Step 13: Editing Items after Sending
- Step 14: Applying Item Discounts
- Step 15: Applying Item Comps
- Step 16: Item Voids
- Step 17: Managing Seats on an Order Ticket
- Step 18: Manager/Employee Override
- Step 19: Reassigning Orders
- Step 20: Transferring Seats
- Step 21: Merging Orders
- Step 21: Voiding an Order
- Step 22: Re-sending Orders
- Step 23: Order History
- Additional Resources and Help!
Step 1: Ordering Basics
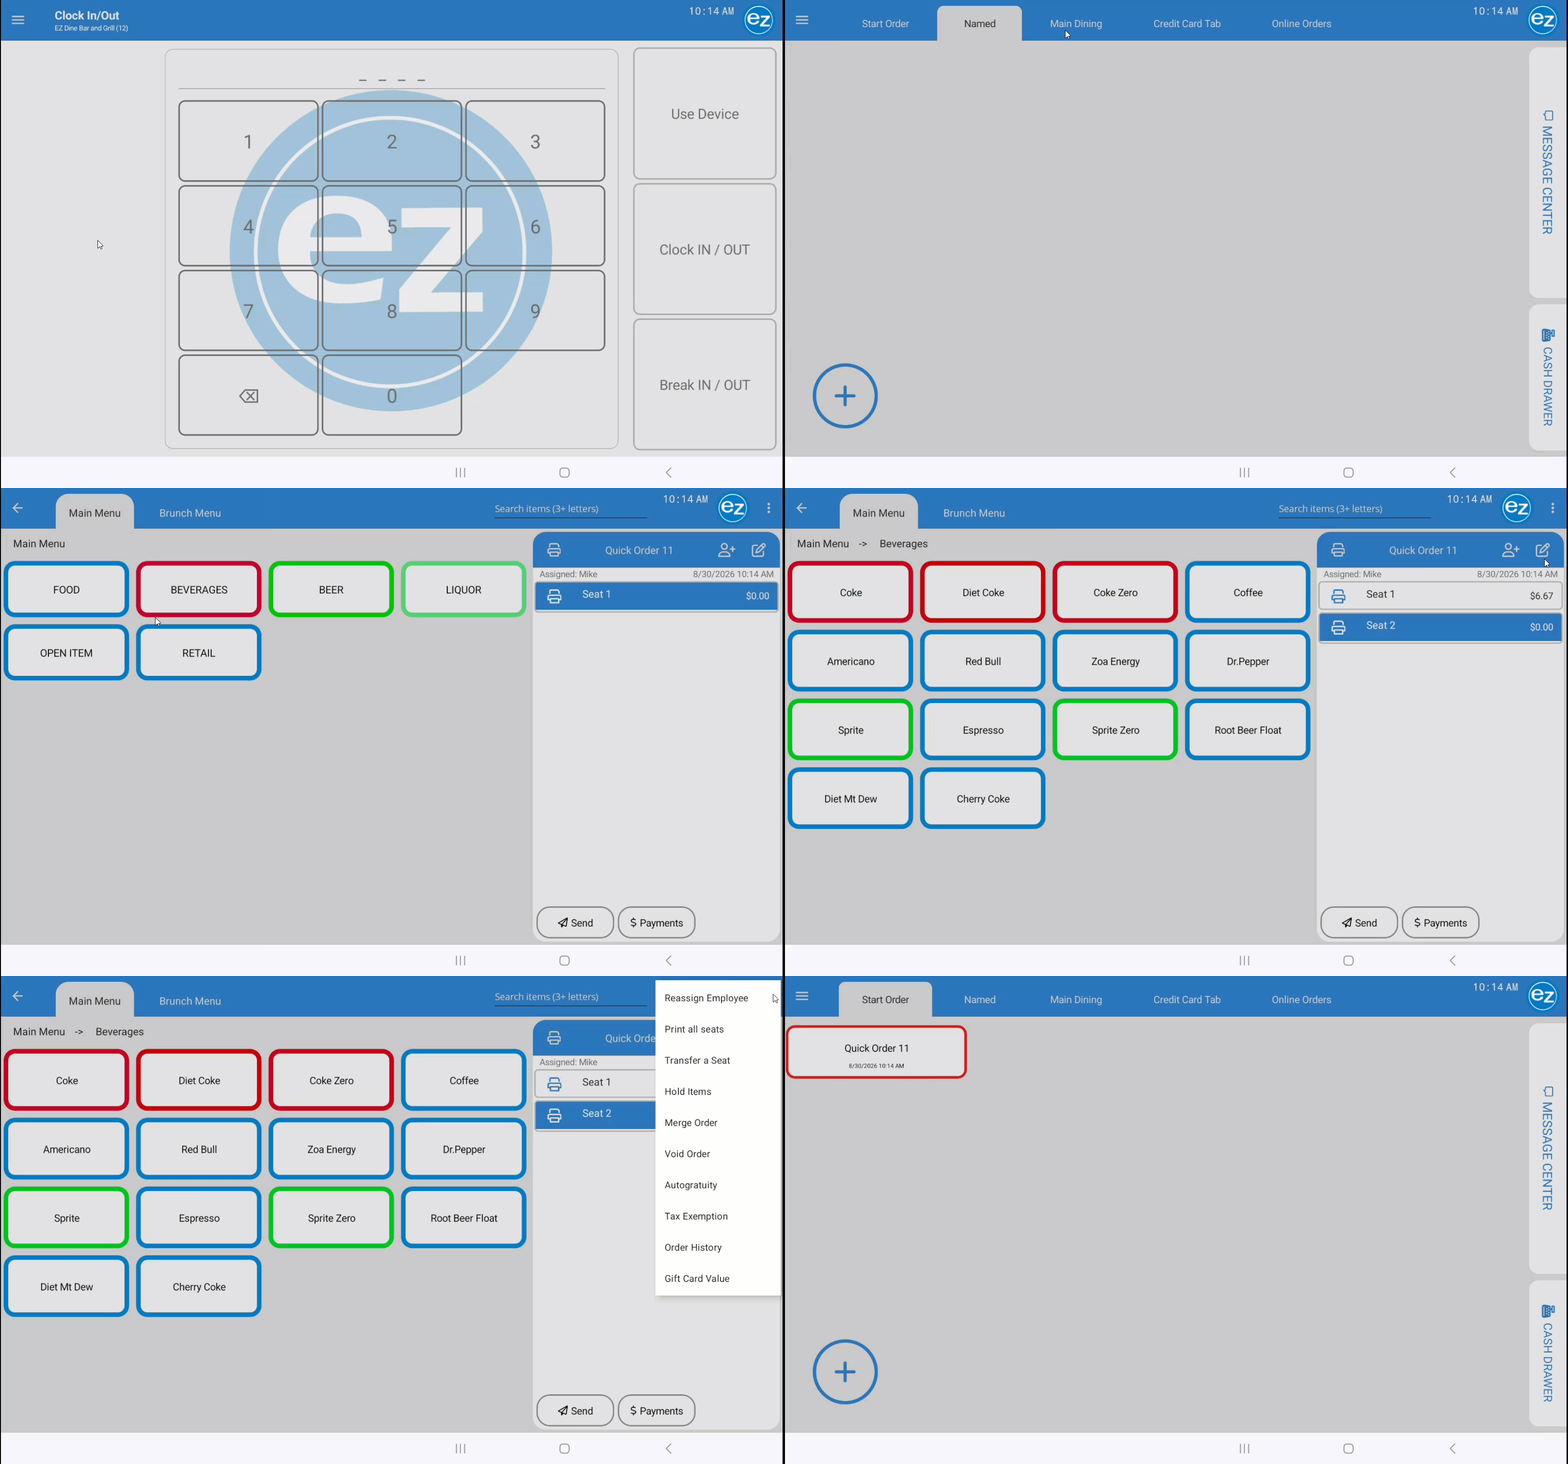
- Selecting Use Device from the Login page automatically opens the Orders tab, displaying all tab names and layout types configured in Studio. Select the target tab type and tap the blue plus (+) Add New icon to start a new order
- Order Ticket Header Controls: The top header identifies the order name and highlights in the assigned server's custom employee color. Key controls include
- Add Guest (+) Icon: Adds another seat to the ticket to organize items for kitchen printing or split payments
- Edit Pencil Icon: Prompts an overall order instruction that prints directly at the top of the kitchen ticket
- Order Options Menu: Located in the top-right corner; displays additional order editing options based on employee permissions levels
- Back Navigation Arrow: Located in the top-left corner; routes back to the main tab list
- Empty Tickets: Tapping the Back Navigation Arrow on a ticket with no items automatically cancels and removes the order
- Active Tickets: Tapping the Back Navigation Arrow on a ticket containing pending or sent items preserves the open order in its tab list for later access
Step 2: Entering Items
- Starting or selecting an order opens the menu display alongside the active ticket
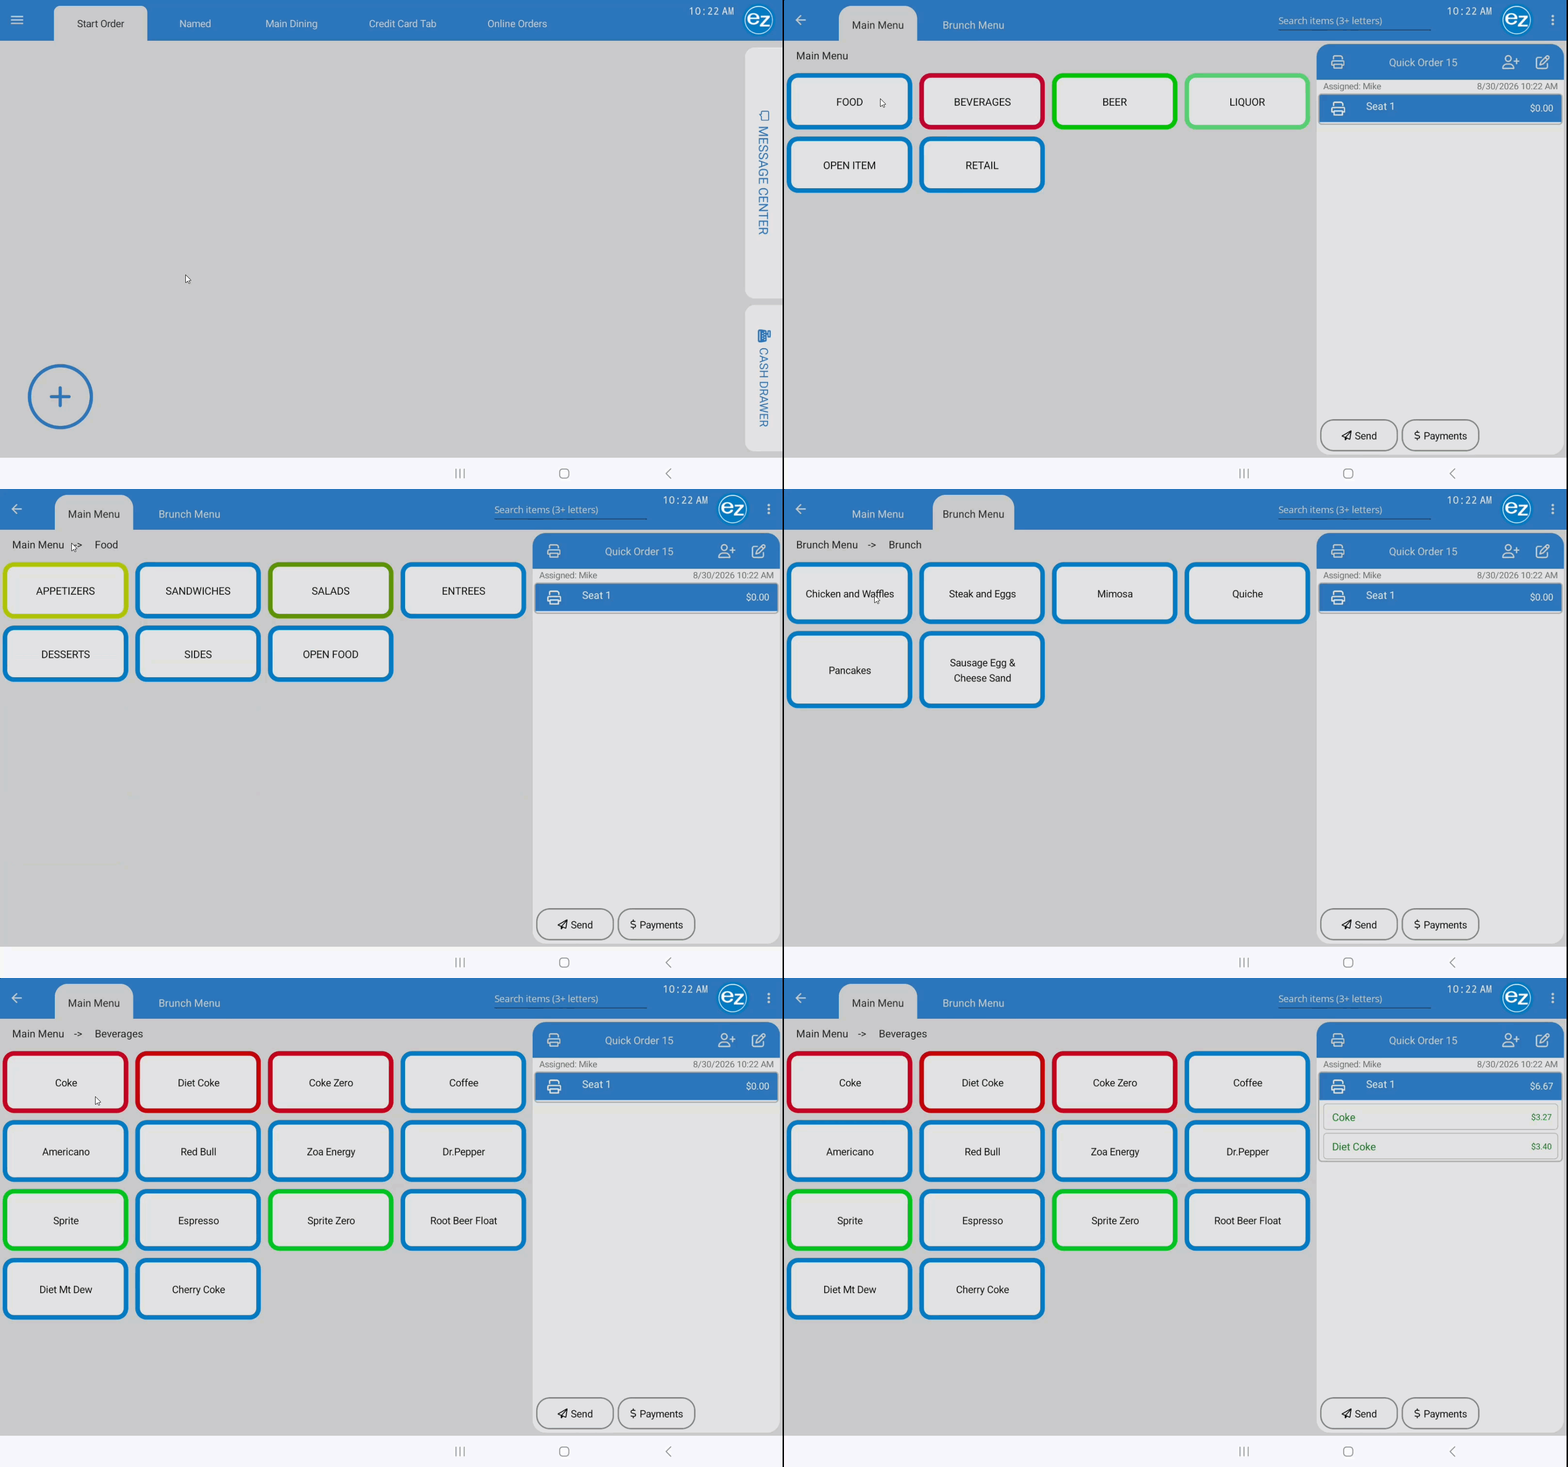
- Category Navigation: Menu categories display directly beneath the main menu header. EZ Dine Studio supports multiple menus per store, including item and day visibility
- Category Display & Colors: Tapping a category displays its assigned menu items. The menu header updates to show the active category path and inherits any custom category color configured in Studio
- Breadcrumb Navigation: To navigate back to a higher category level, tap the category name directly in the header
- Default Seat Placement: Tapping a menu item adds it to Seat 1 by default, displaying the item name, price, and line total on the order ticket
- Unsent Items (Green Text): Pending items that have not yet been dispatched to the kitchen display in green text. Items must be sent to dispatch kitchen tickets and prepare the order for payment
- Sent Items (Black Text): Once items are dispatched to the kitchen, the green text updates to black text to confirm their sent status
Step 3: Item Search
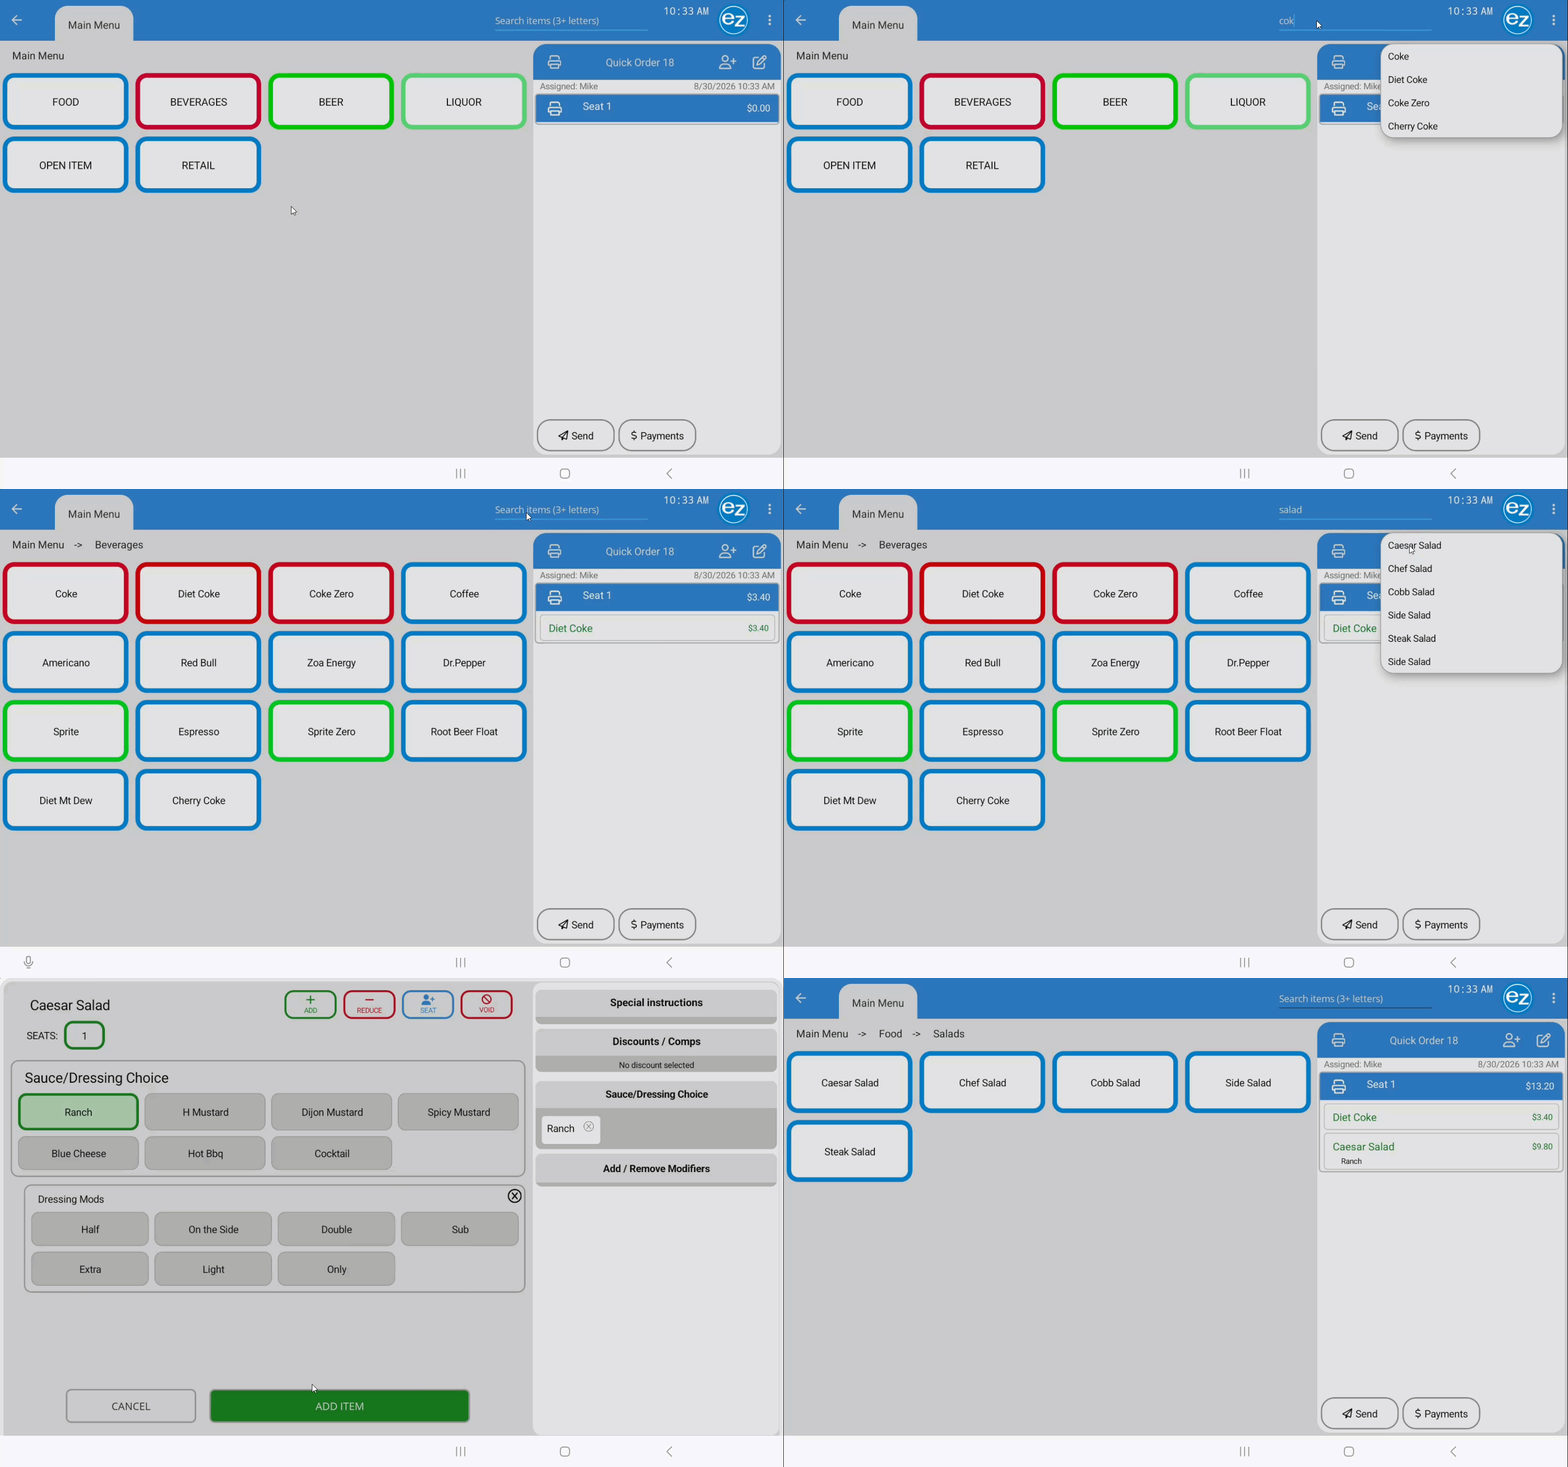
- Use the Item Search Bar located above the menu tabs to locate menu items quickly without manually browsing categories
- Type the first three letters of an item name into the search field to generate matching results automatically
- Tap the desired item from the list. The EZ Dine app navigates directly to that item's category and adds it to the order ticket
- If the selected item requires mandatory modifiers or add-on groups, the selection window pops-up automatically before placing the items on the ticket
- Attempting to select an item assigned to a restricted menu (outside of its allowed time or day schedule) will not return any search results for those items
Step 4: Manual Entry Open Items
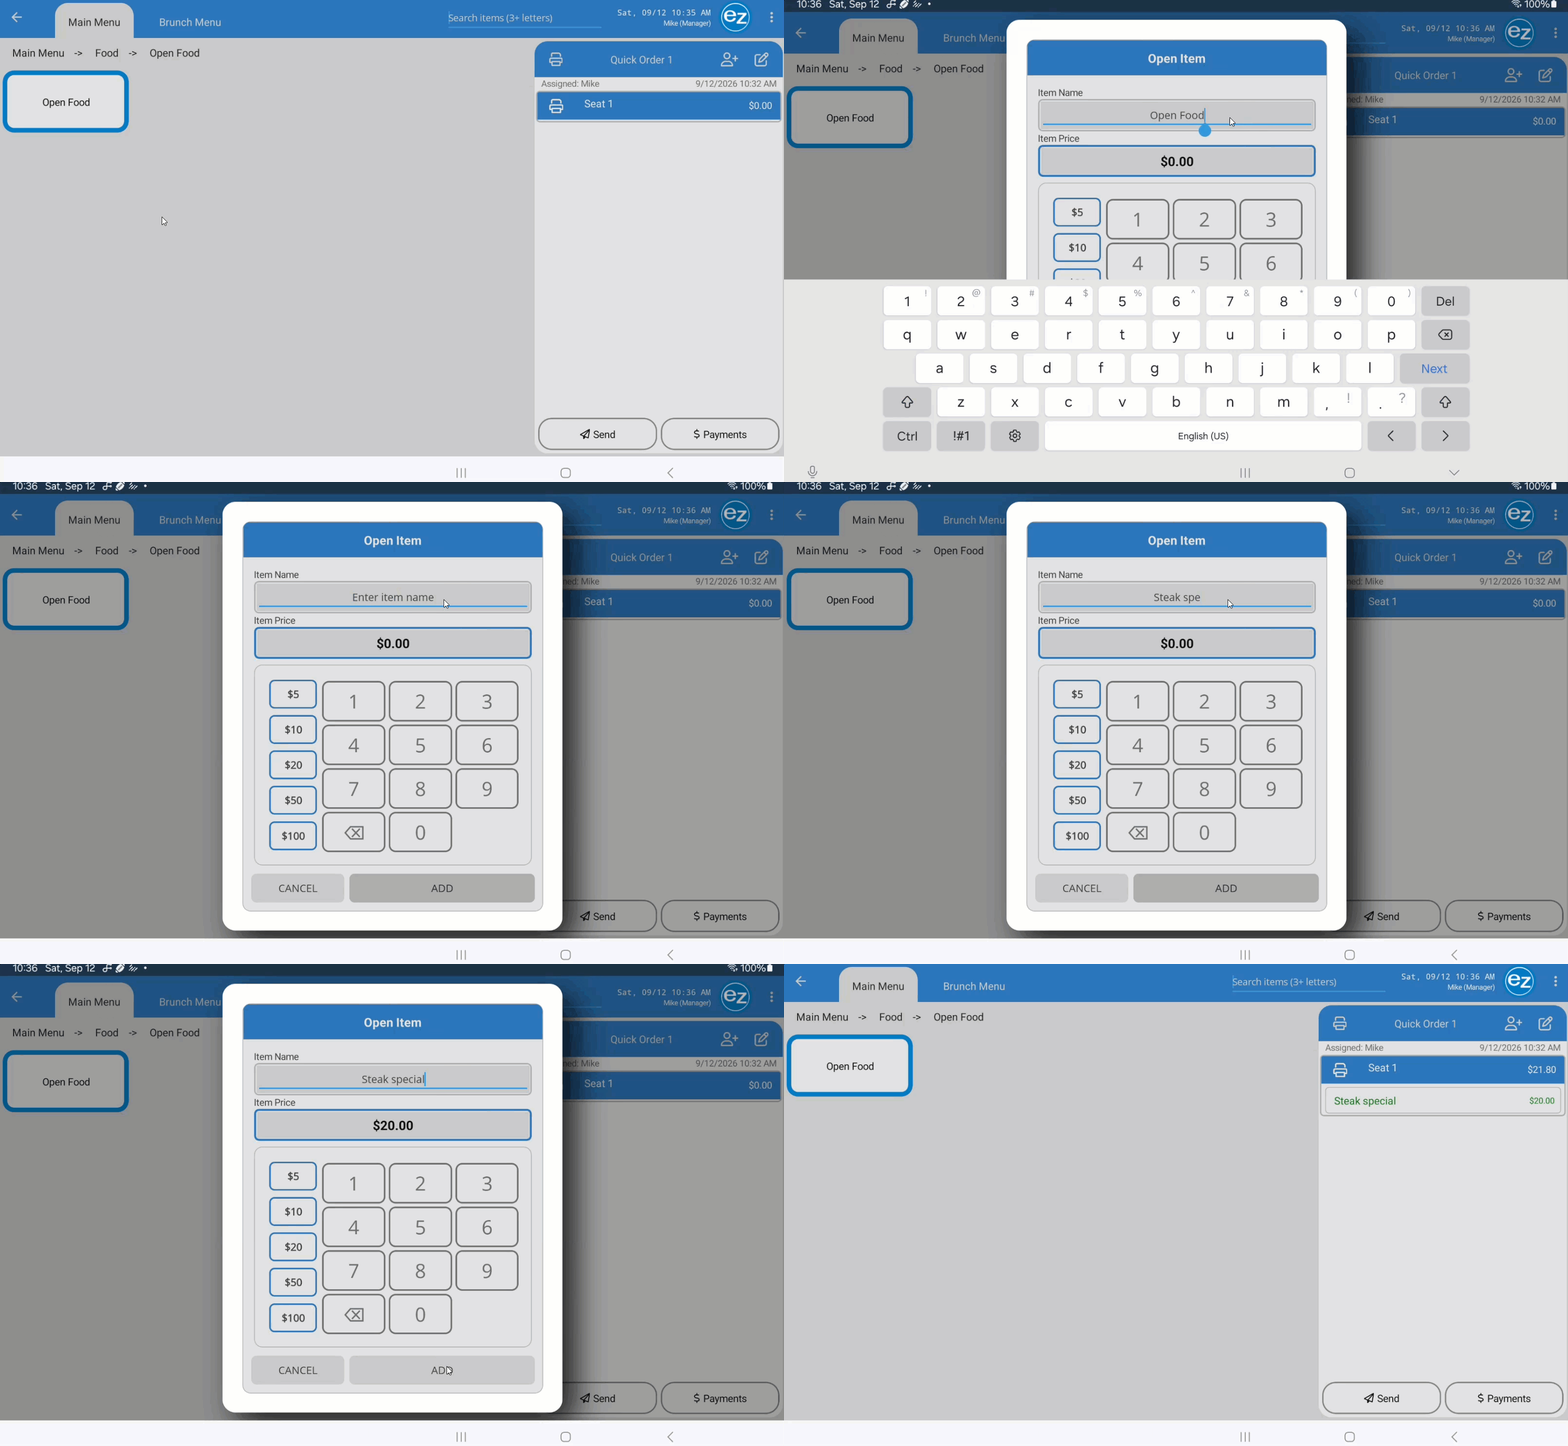
- Items configured in Studio for manual entry allow staff to specify custom item names and prices on the fly
- Enter the item price using the numerical keypad
- The default Studio item name populates automatically. To customize it, tap the Change Item Name field to bring up the on-screen keyboard
- Type the custom name and tap Done
- The custom name and price appear on the order ticket and transfer directly to kitchen tickets, customer receipts, and financial reporting
Step 5: Items with Tax Included
- Items configured with tax included display their flat, total menu price on the ordering screen
- On printed customer receipts, the EZ Dine app automatically breaks down the base price and tax components separately. For example, a $3.00 tax-inclusive item at a 9% tax rate renders on the receipt as a $2.75 base price plus $0.25 tax, equaling the flat $3.00 price point
Step 6: Items with Add-on Groups
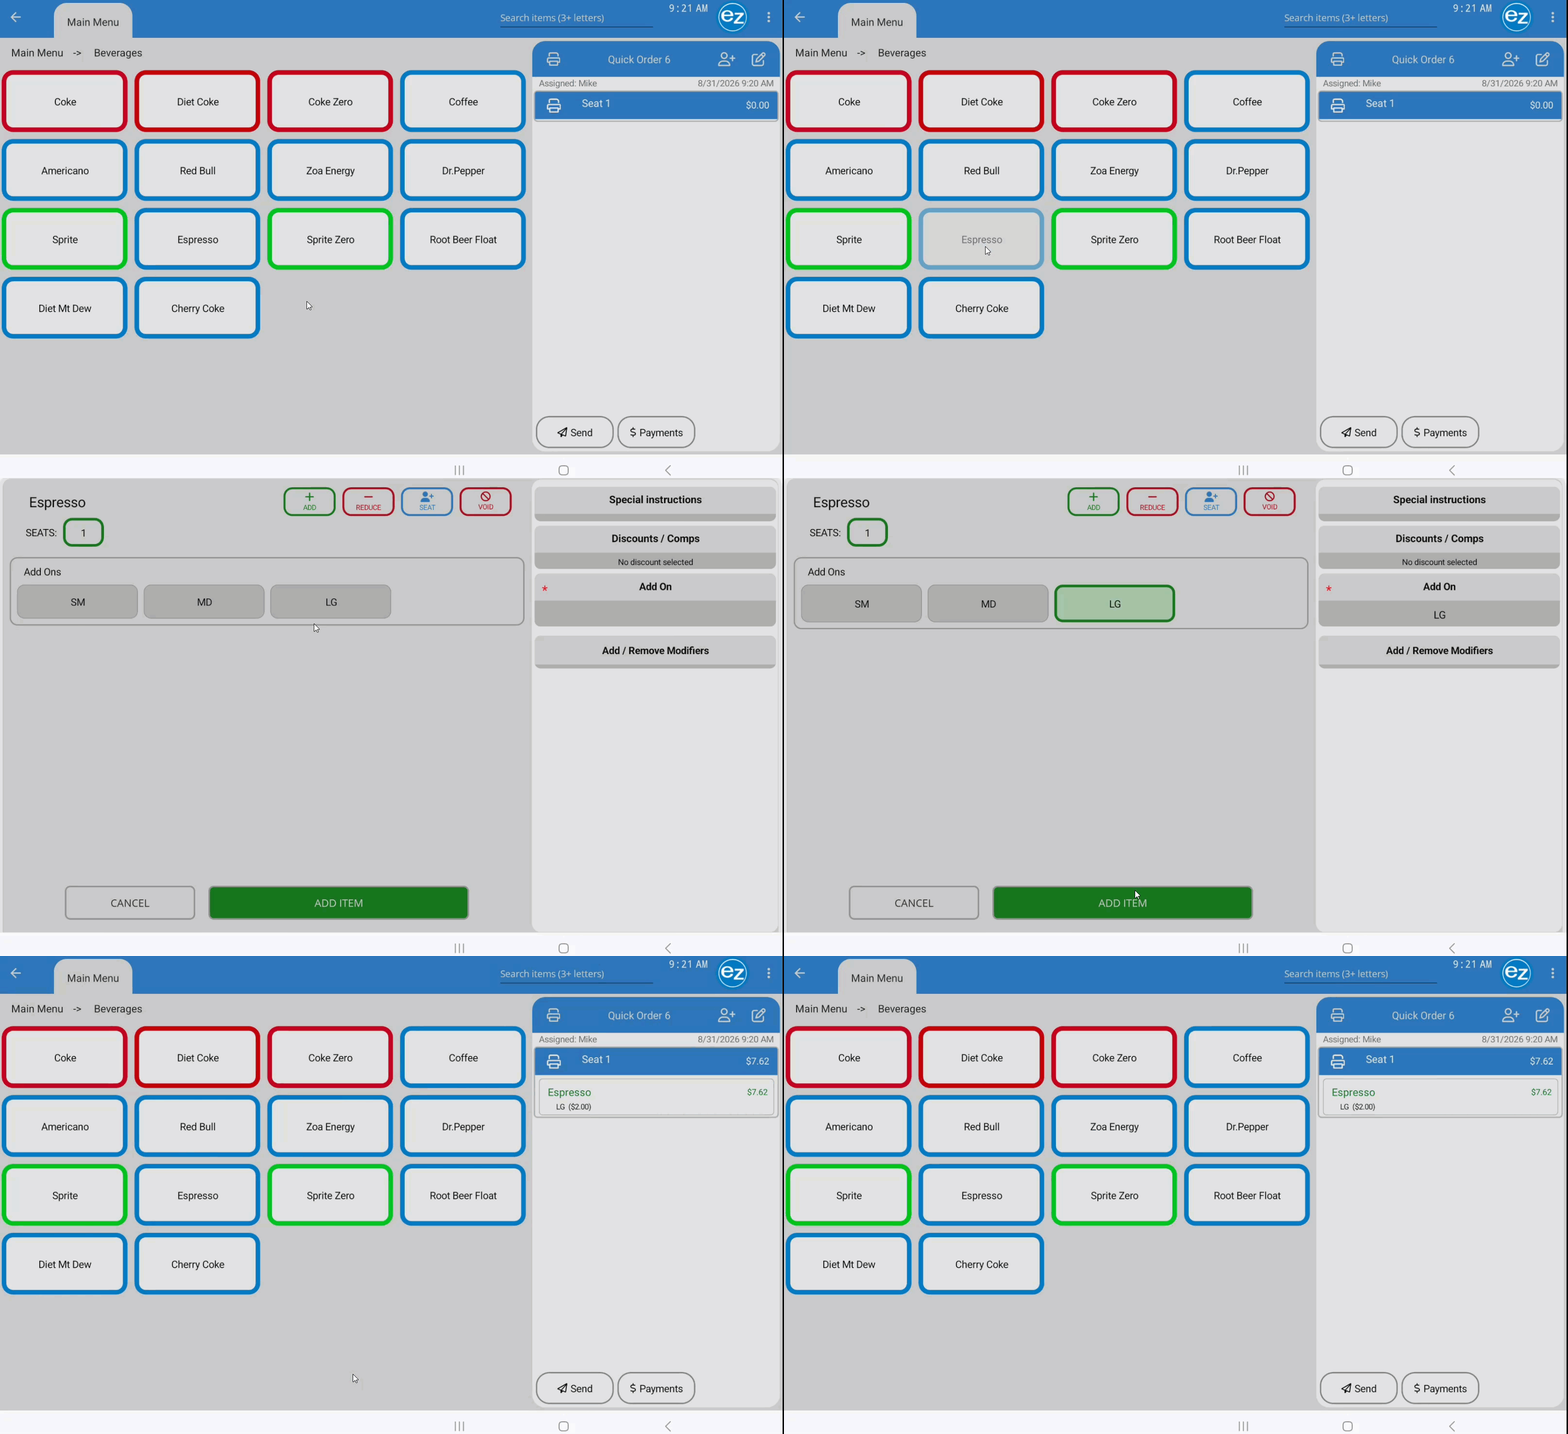
- Items tied to Add-on groups (such as drink sizes or portion levels) prompt a mandatory selection upon adding the item to the ticket. Each item accommodates exactly one Add-on choice
- Add-on choices display on the modifier page inside the Add-ons selection window
- Select the desired option and Add Item. The chosen Add-on appears directly beneath the item name on the ticket, with any applicable upcharges displayed in parentheses
- Add-ons will printed on the kitchen tickets appended to the right of the item name
Step 7: Modifiers with Add-on Groups
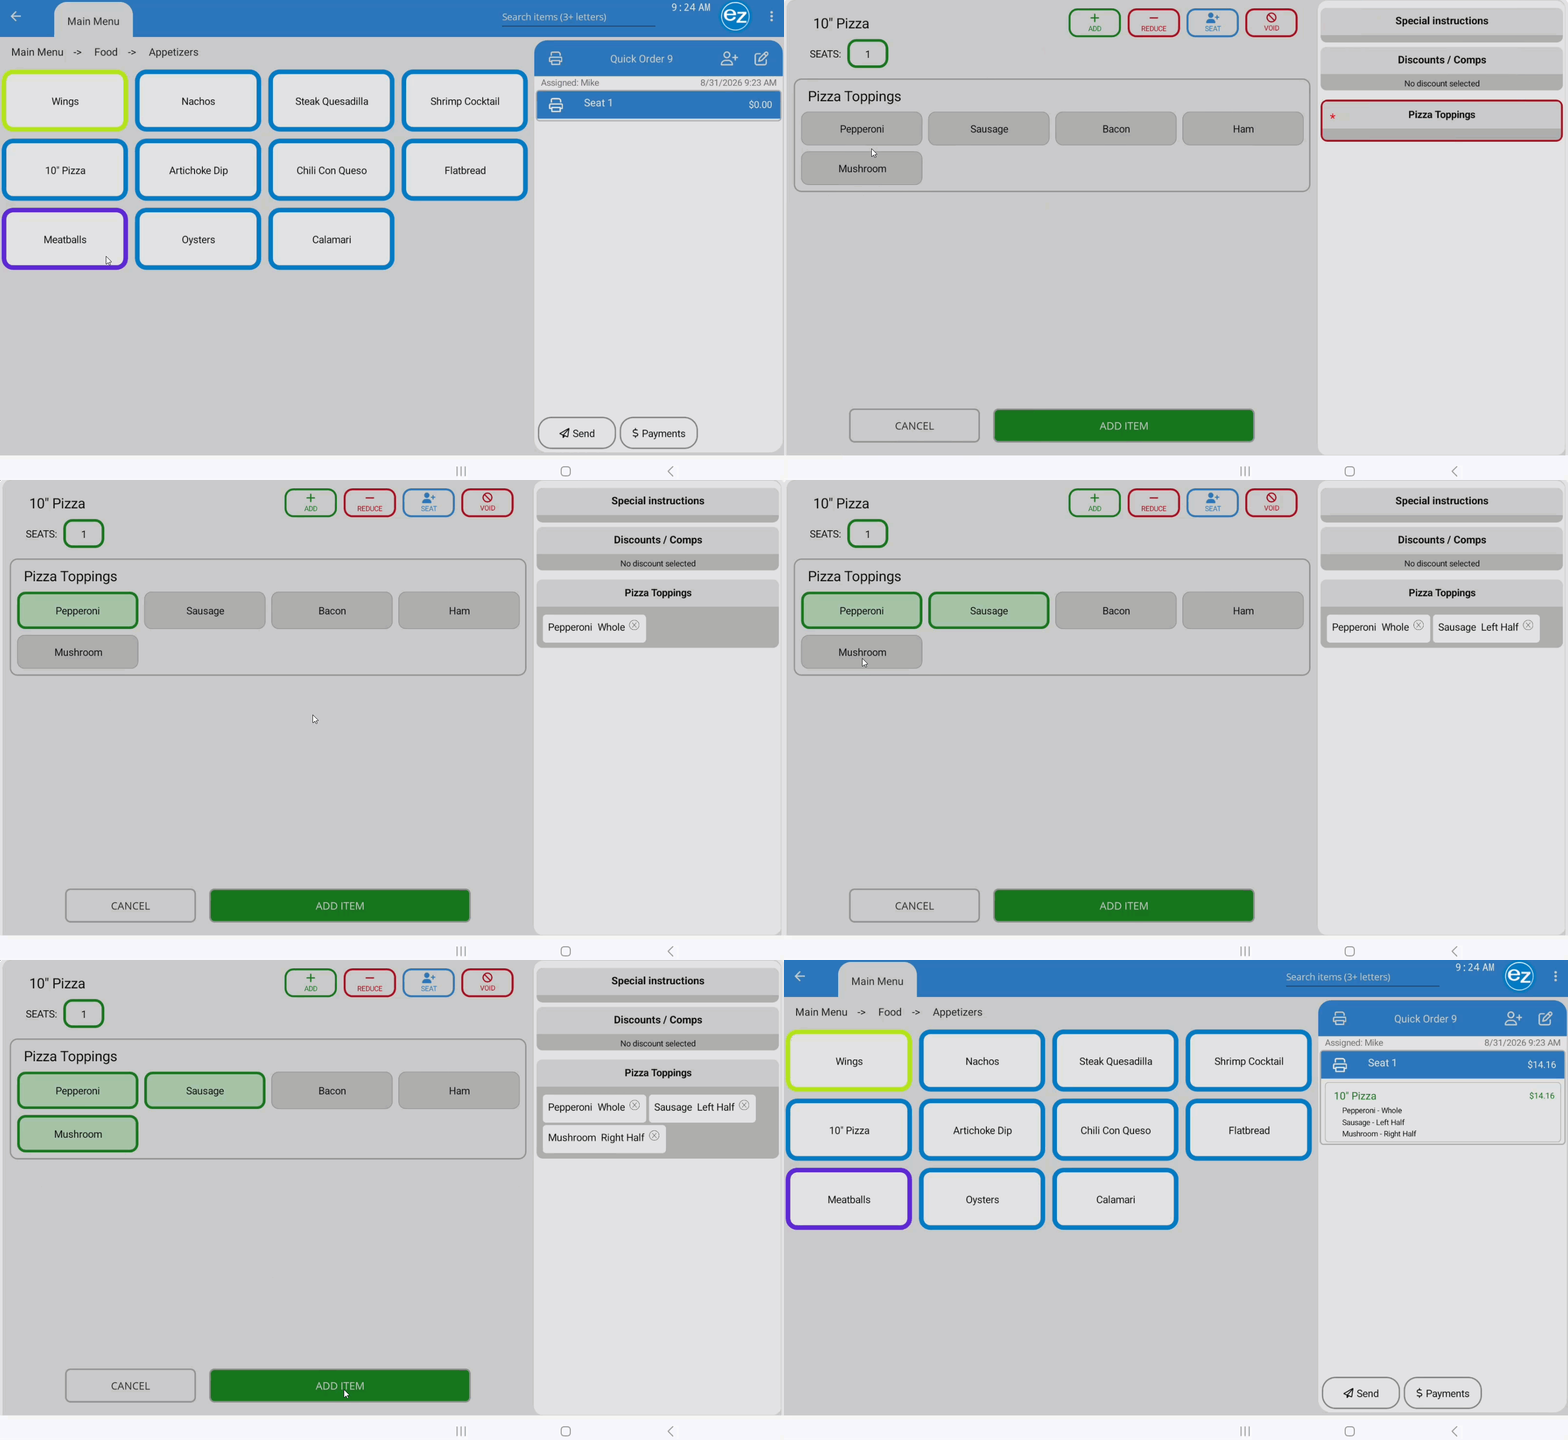
- Modifiers can also include Add-on selections to specify portion sizes (e.g., Left Half, Right Half, Whole pizza toppings) or preparation instructions (e.g., Light, Extra, On the Side)
- Modifier Add-ons appear directly beneath the main modifier group list
- Tap an Add-on to attach it to the selected modifier. Once chosen, the Add-on menu closes and links the modifier to that selection
- Each individual modifier accepts only one Add-on selection at a time. Unlike item-level Add-ons, modifier Add-ons are optional and do not require a selection to proceed
Step 8: Entering Items with Modifiers
- Modifier menus display automatically whenever a selected item has attached modifier groups or modifiers configured in Studio
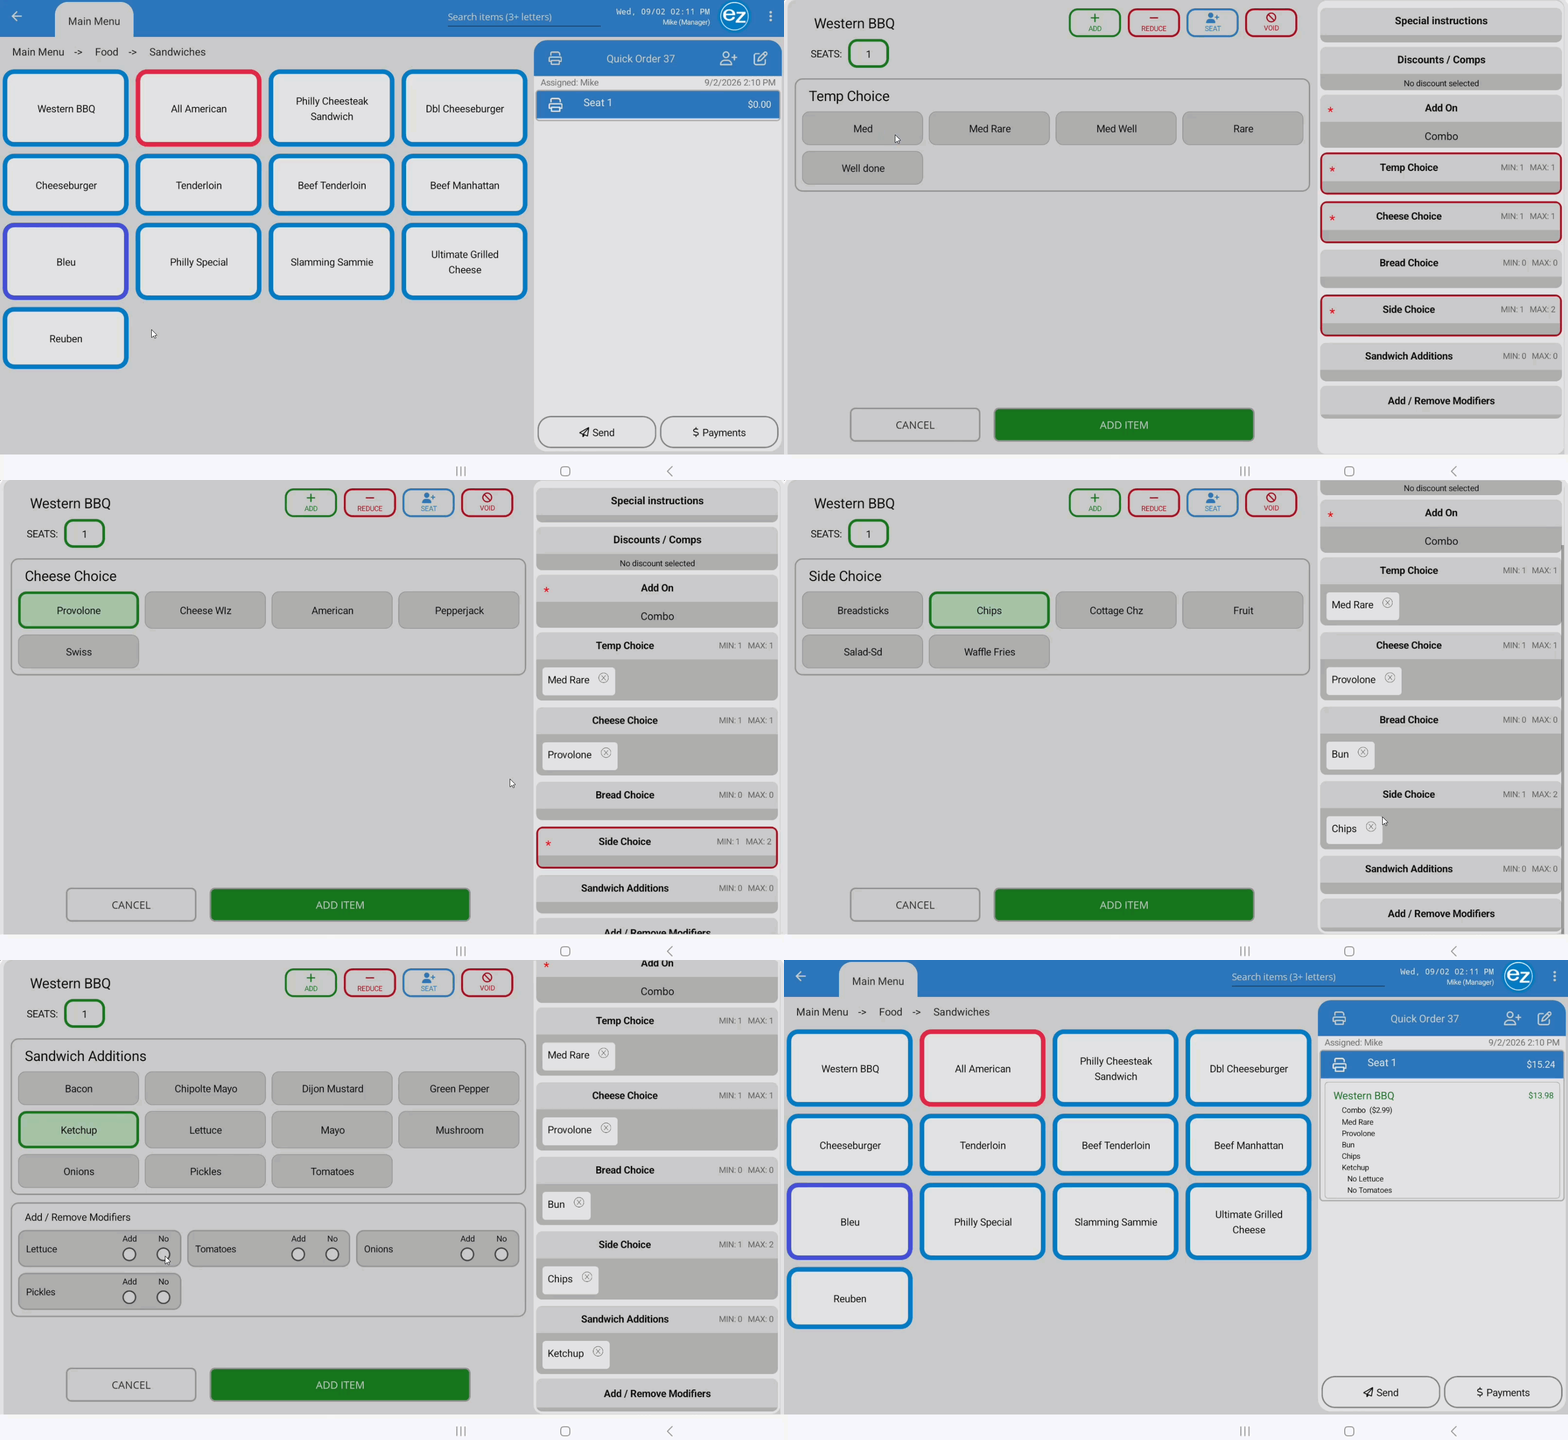
- Modifier Groups: Display on the right panel in the sequence configured in Studio
- Visual Selection Indicators: Selected modifiers highlight with a green background
- Mandatory groups display a red asterisk (*) alongside a red border. The red highlight disappears once the minimum required selections are met
- Quantity Limits & Selection Rules: Selection rules display in the top-right corner of each group. Exceeding the maximum limit triggers a "Maximum Reached" count warning, and the EZ Dine app blocks further selections
- Deselecting: Tap any active modifier again to clear the selection
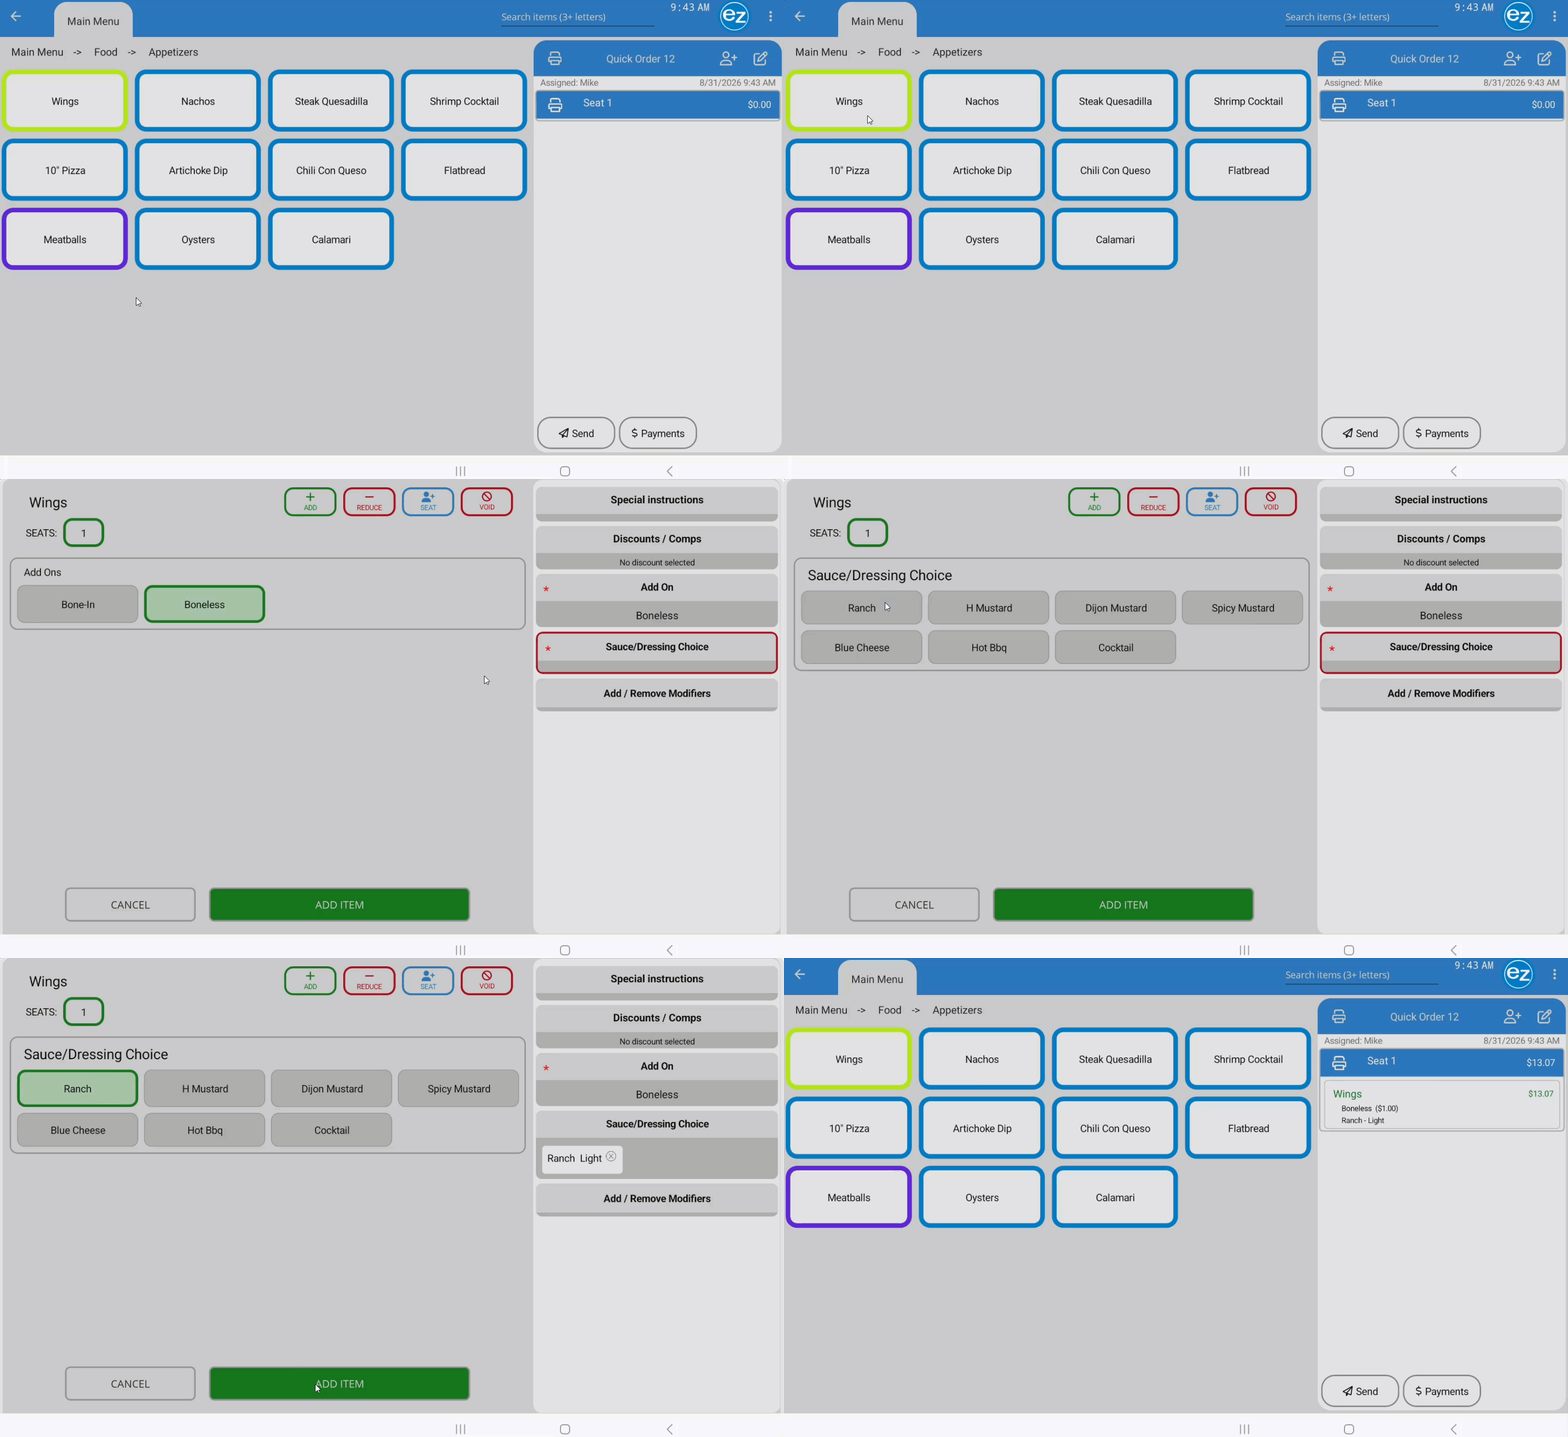
- Nested Modifiers: Certain options automatically trigger secondary sub-menus with required follow-up choices (e.g., selecting a "Side Salad" prompts a "Salad Dressing" choice, or selecting a protein prompts a "Meat Temperature" choice)
- Add/Remove Modifiers: Default item ingredients not assigned to a specific group display toward the bottom of the group list under Add/Remove Modifiers
- Tap Add to add an ingredient
- Tap No to remove a default ingredient
- Save to Ticket: Tap the green Add Item tab in the bottom-right corner to save your selections and open the order ticket. If mandatory selections are missing, a pop-up warning details the required choice before allowing you to proceed
- Exist Without Saving: Tap Cancel at any time to close the window and return to the menu without saving
- Editing Existing Items: Tap any item on the order ticket to reopen the modification window. Adjust the group choices or Add/Remove toggles, then tap Update Item to apply the updated changes to the order ticket
Modifier Groups & Modifiers
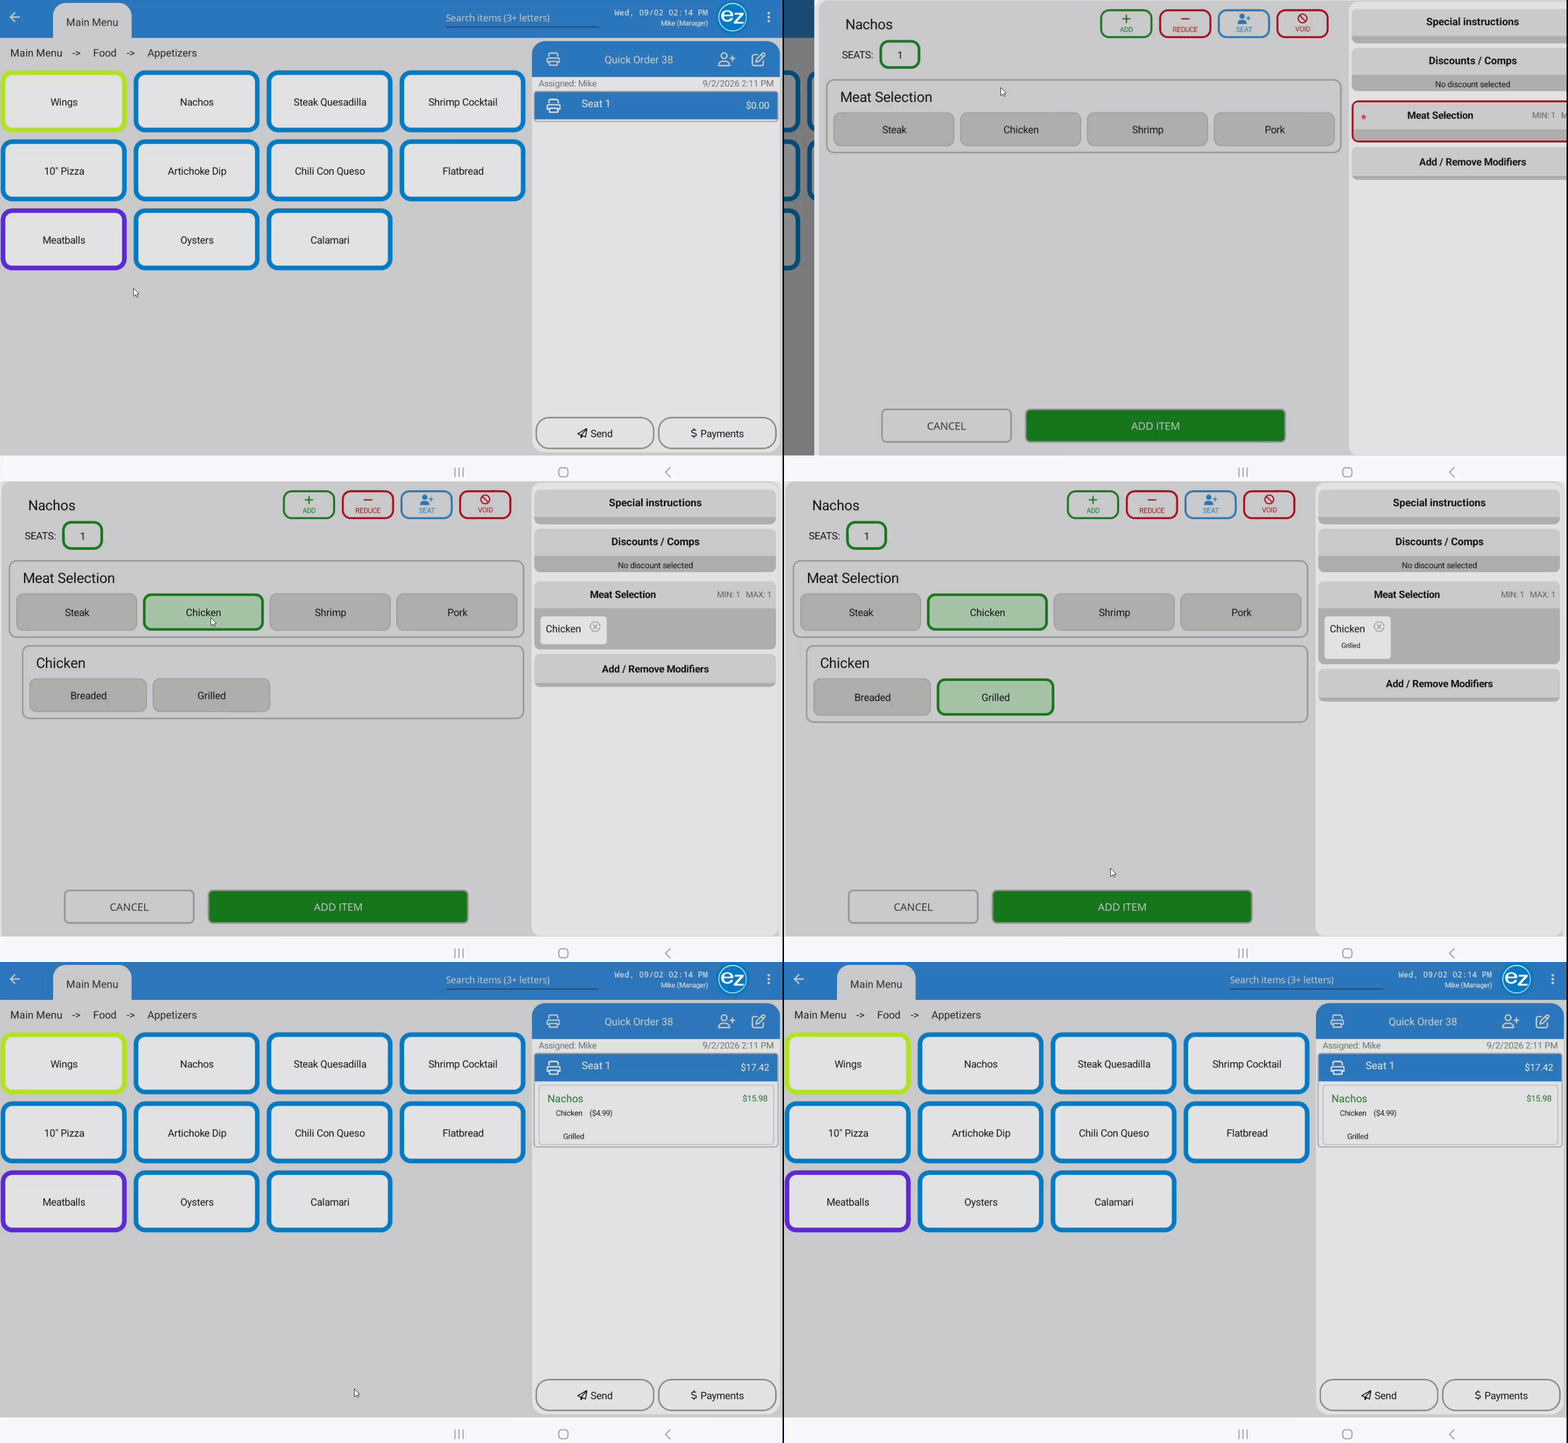
Nested Mods
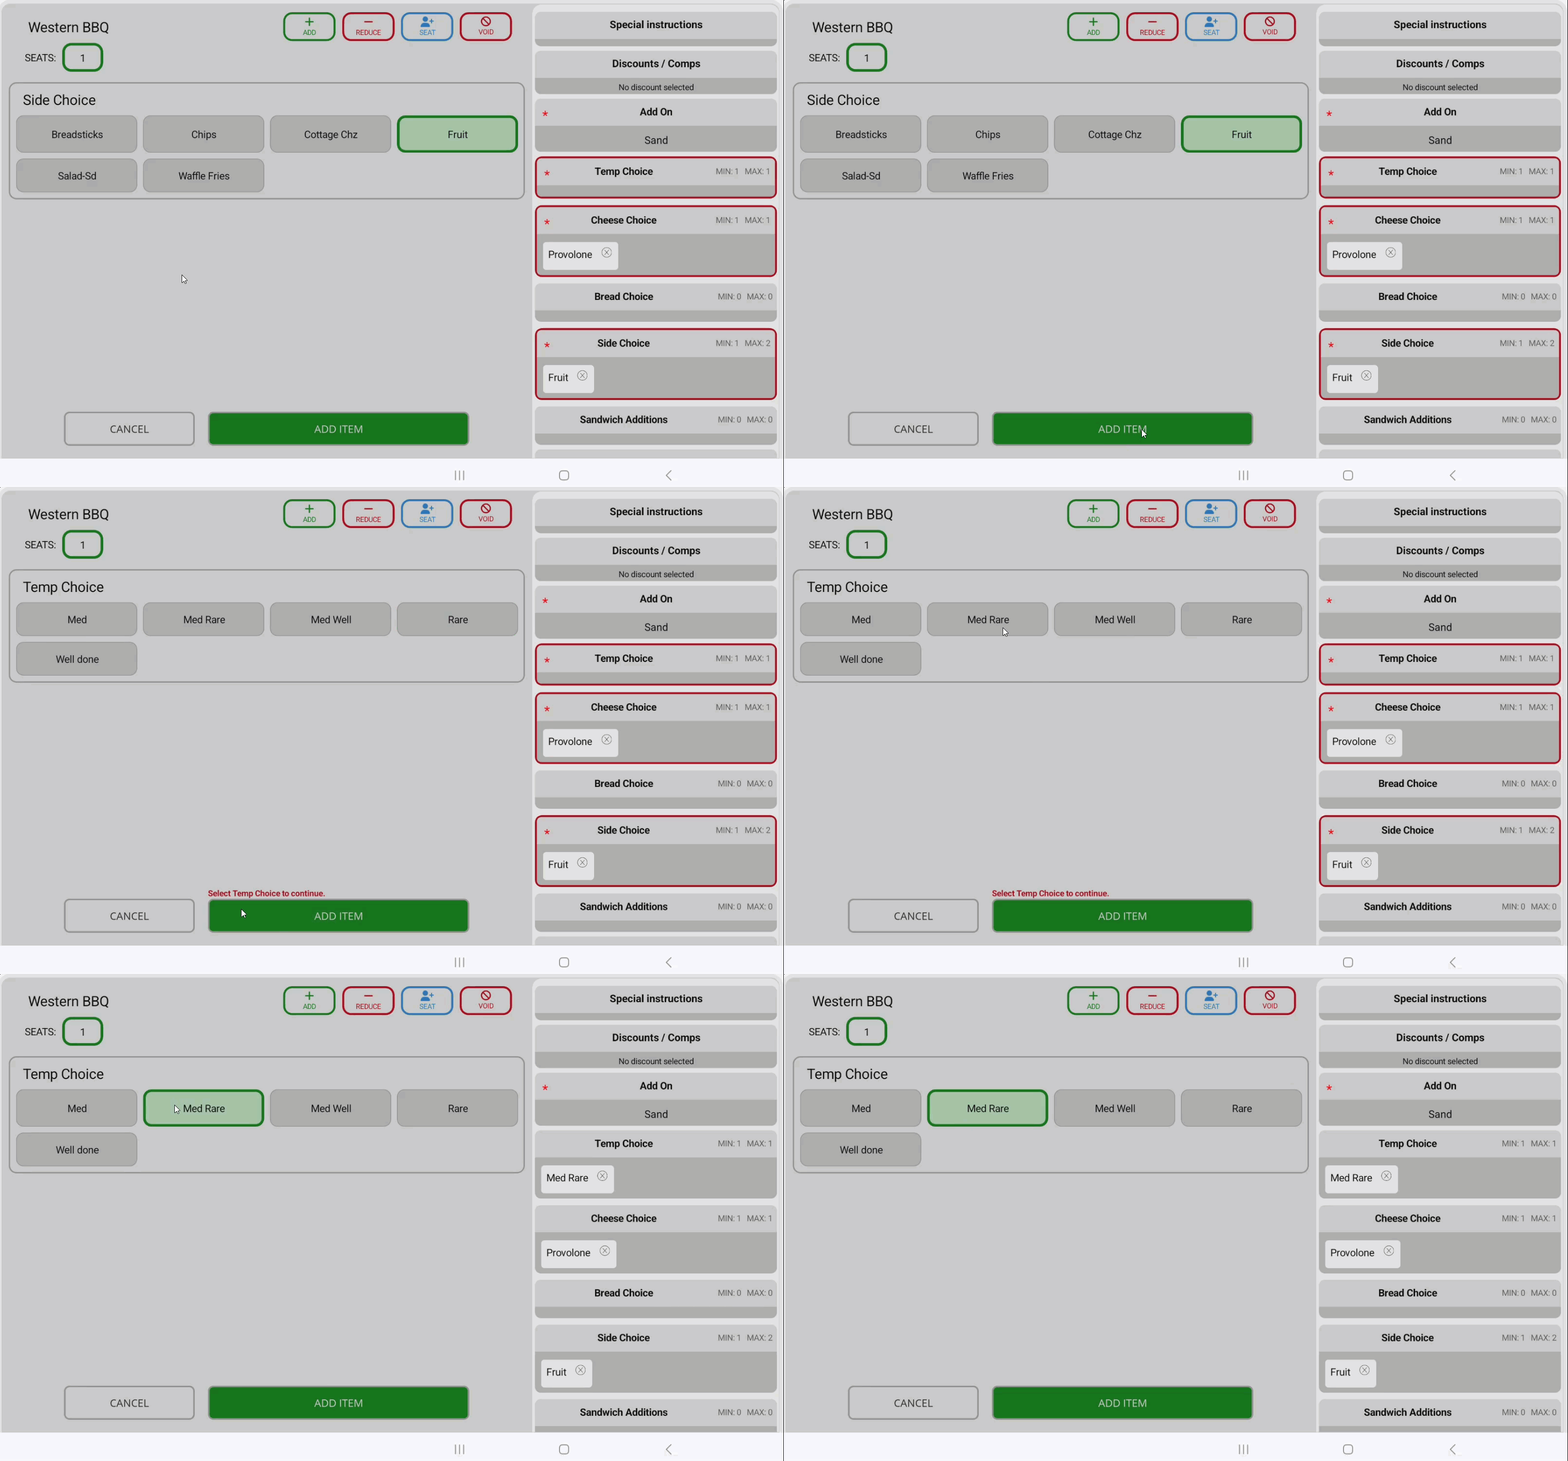
Modifier Requirement
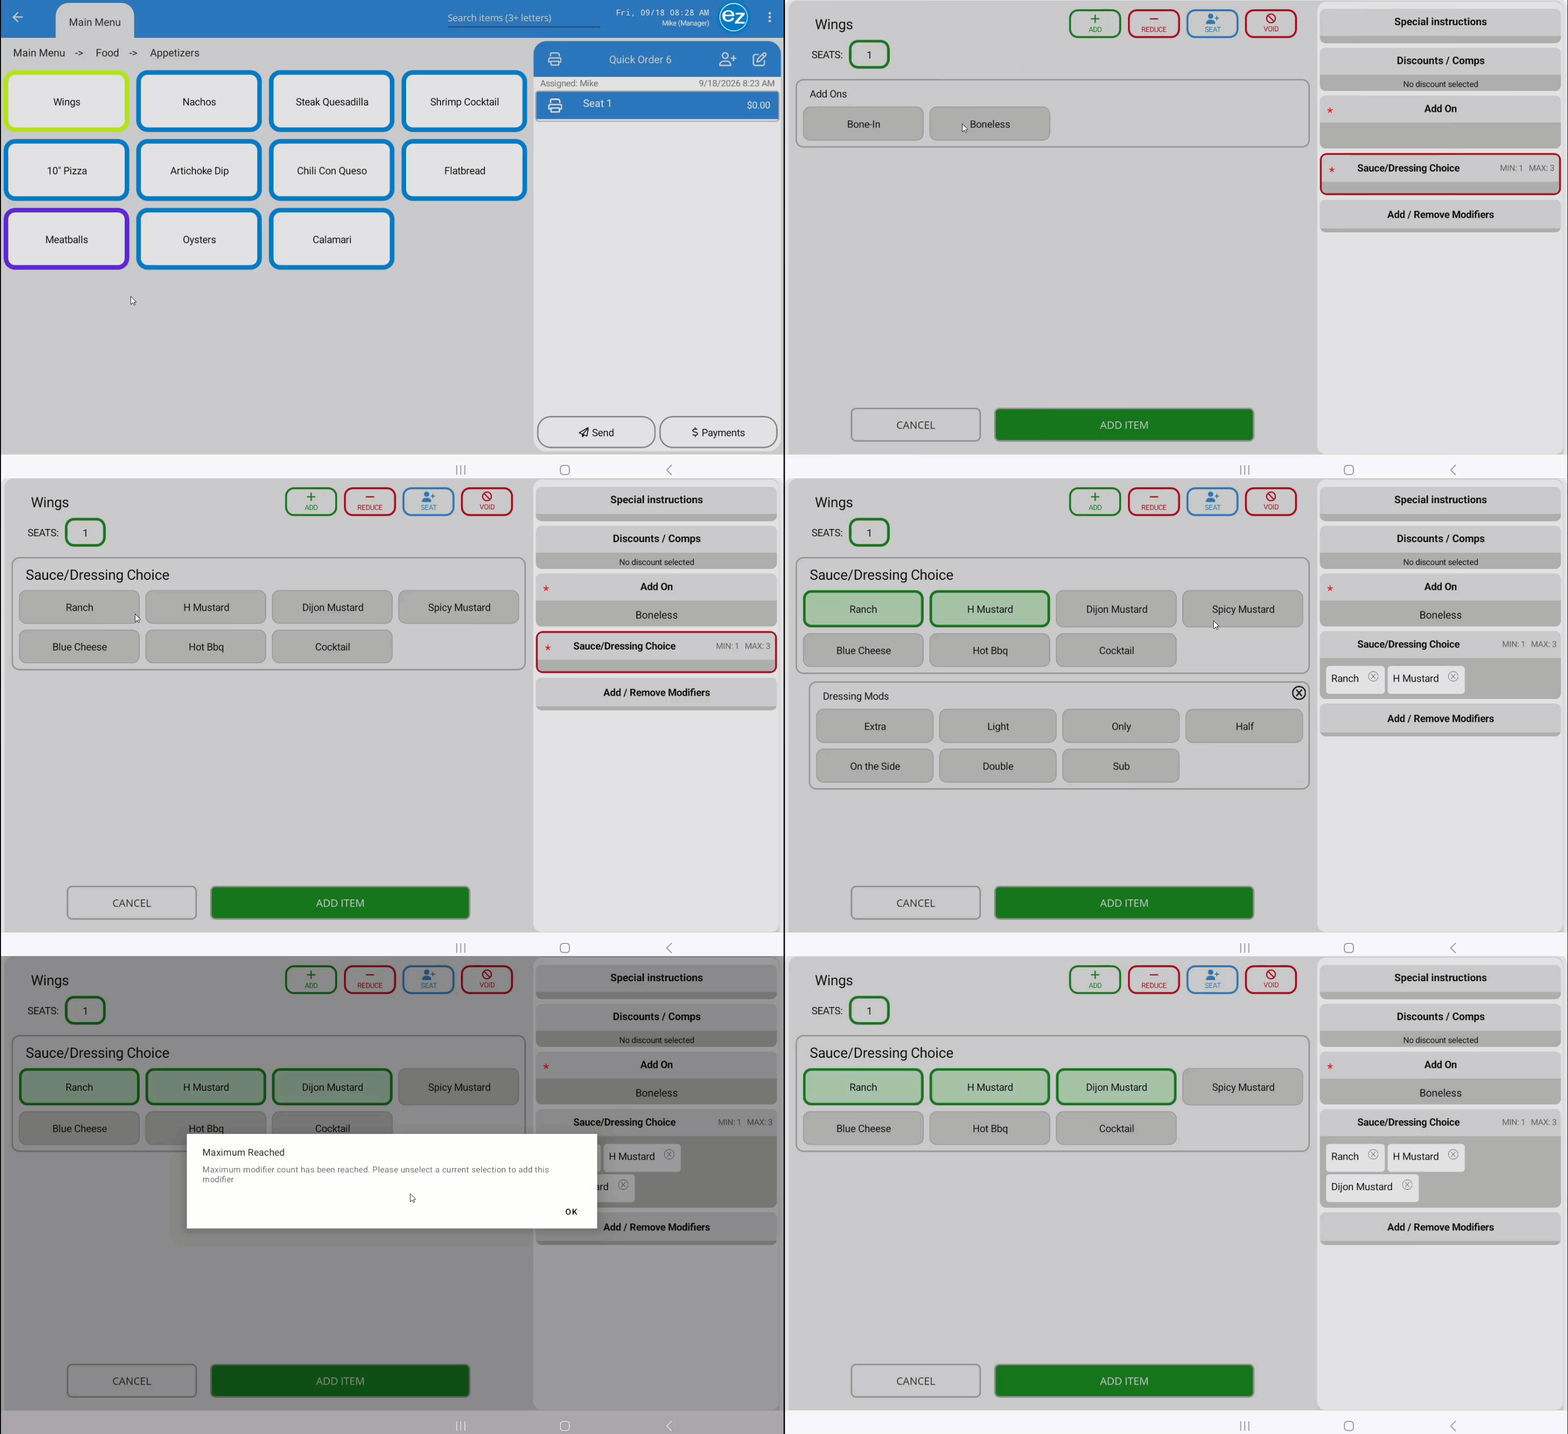
Max Mod Selection Reached
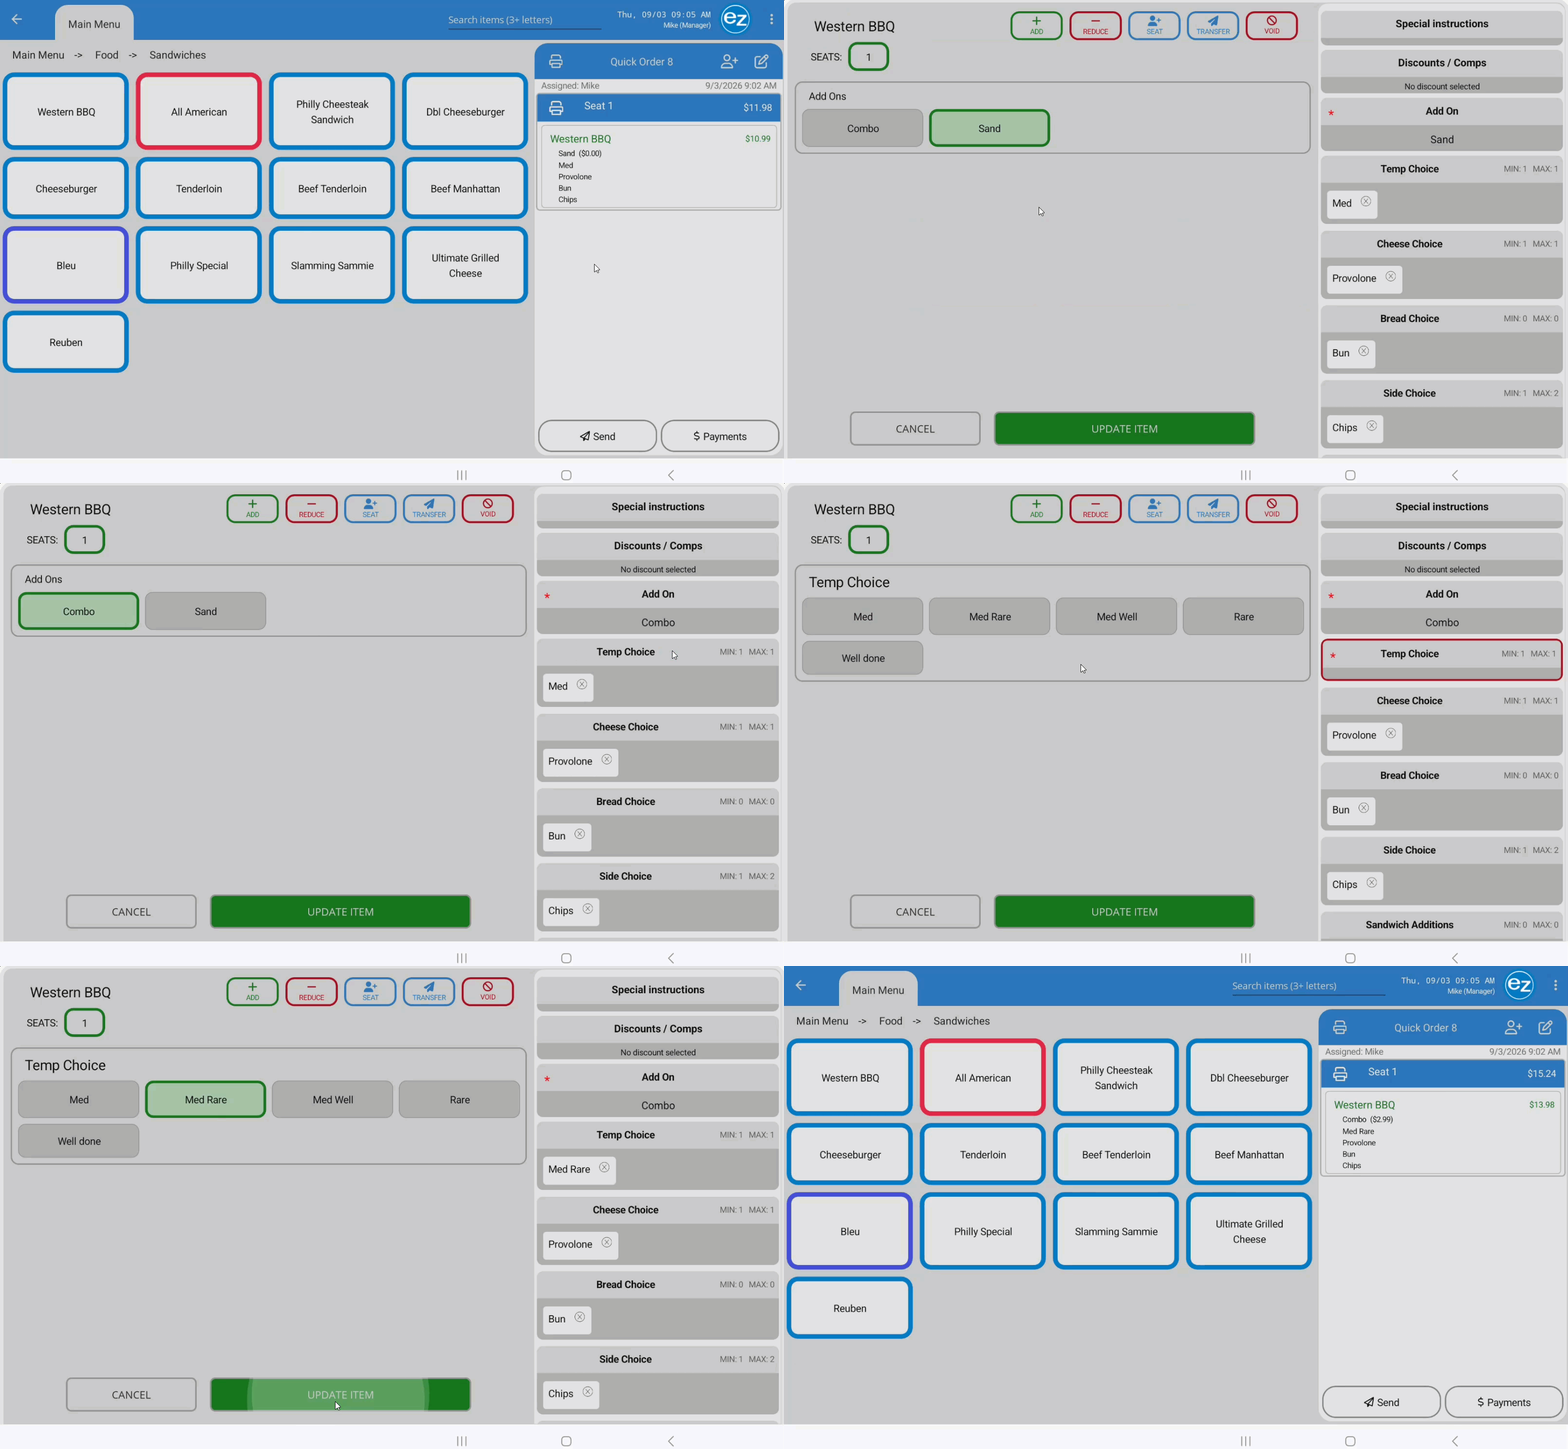
Editing Selections
Step 9: Item Doubles
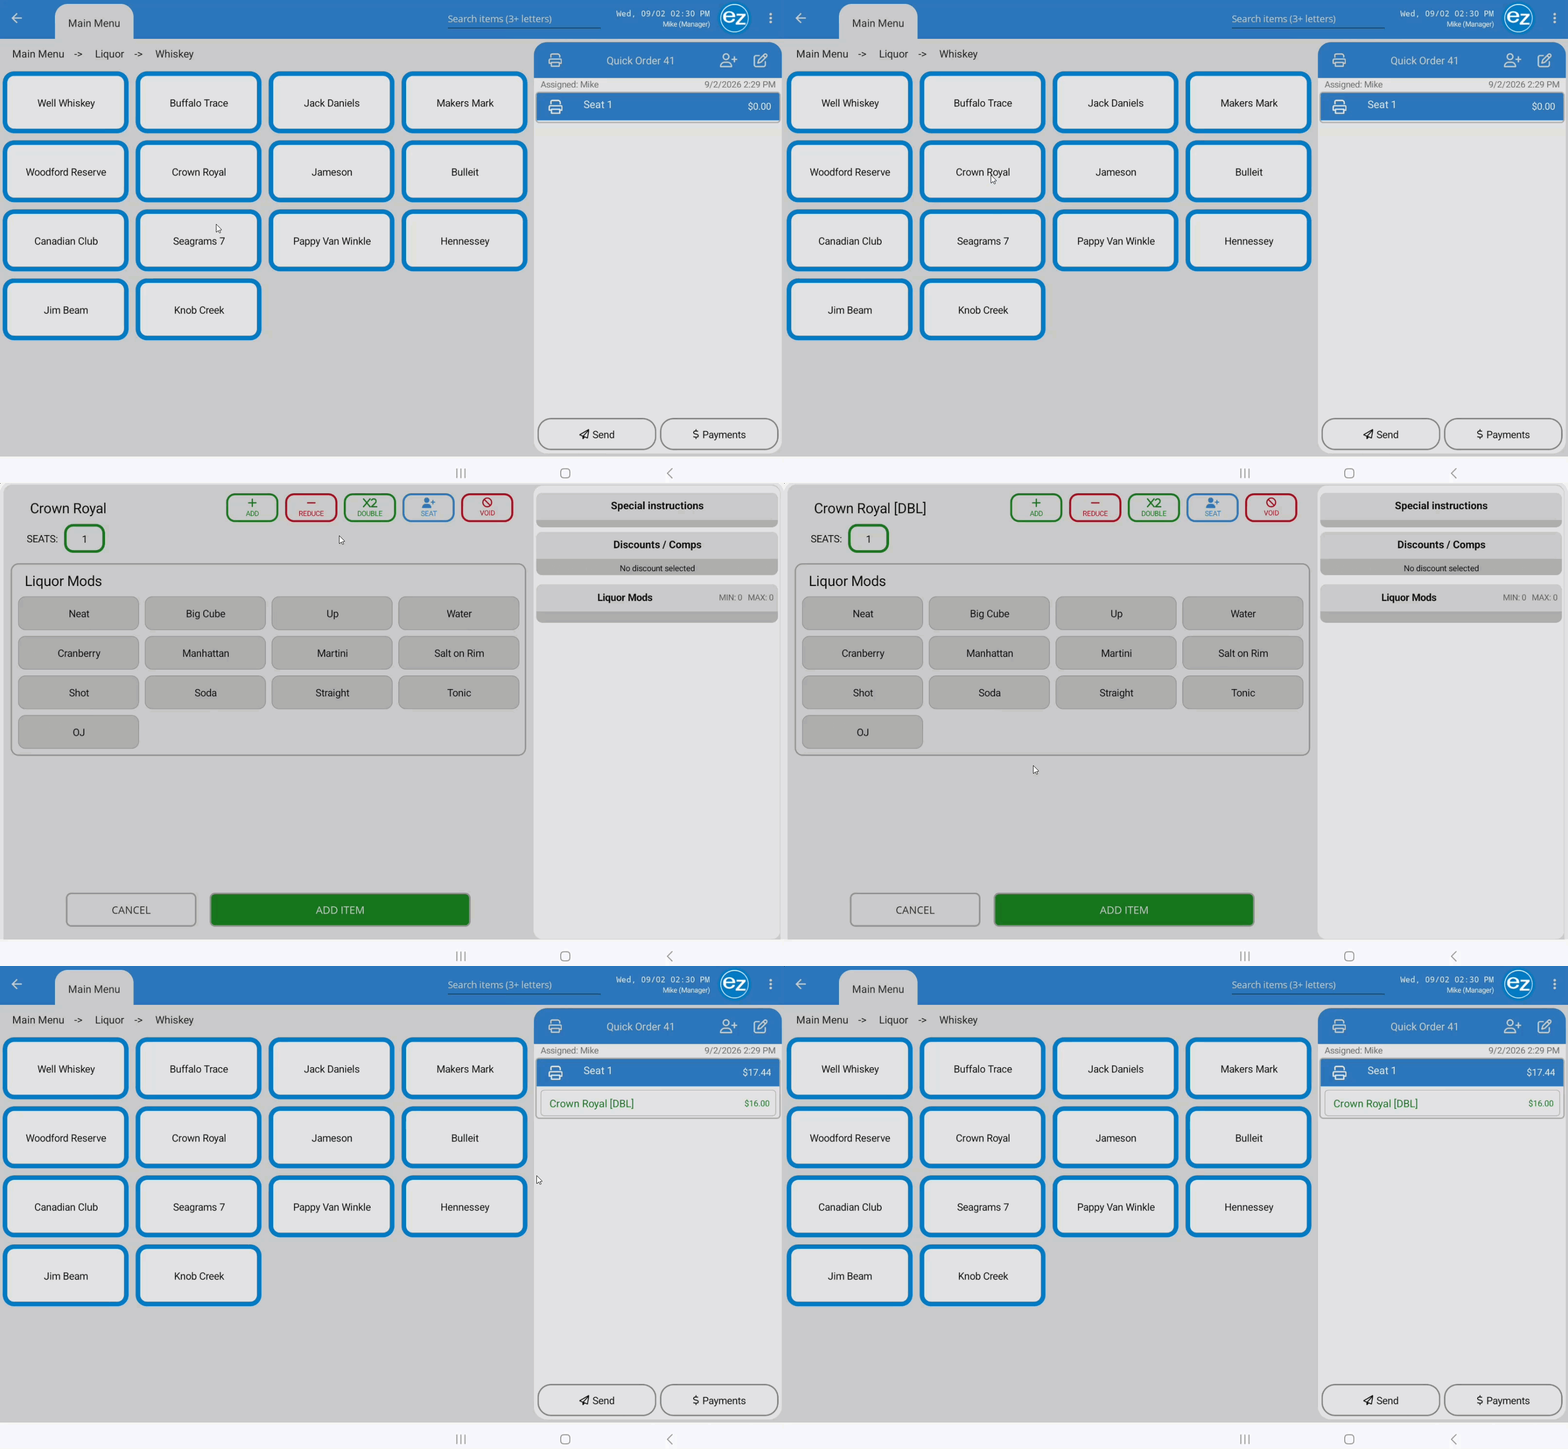
- Use the "Double" function (commonly used for bar drinks) to instantly apply a secondary, higher price point for a larger pour or portion
- Select an item configured with double pricing in Studio
- Tap the green X2 DOUBLE Icon from the top Item's Modifications window
- The EZ Dine app automatically appends the item name with "DBL" (which prints on all customer and kitchen receipts) and updates the line total to reflect the double price point
Step 10: Item Recipes & Instructions
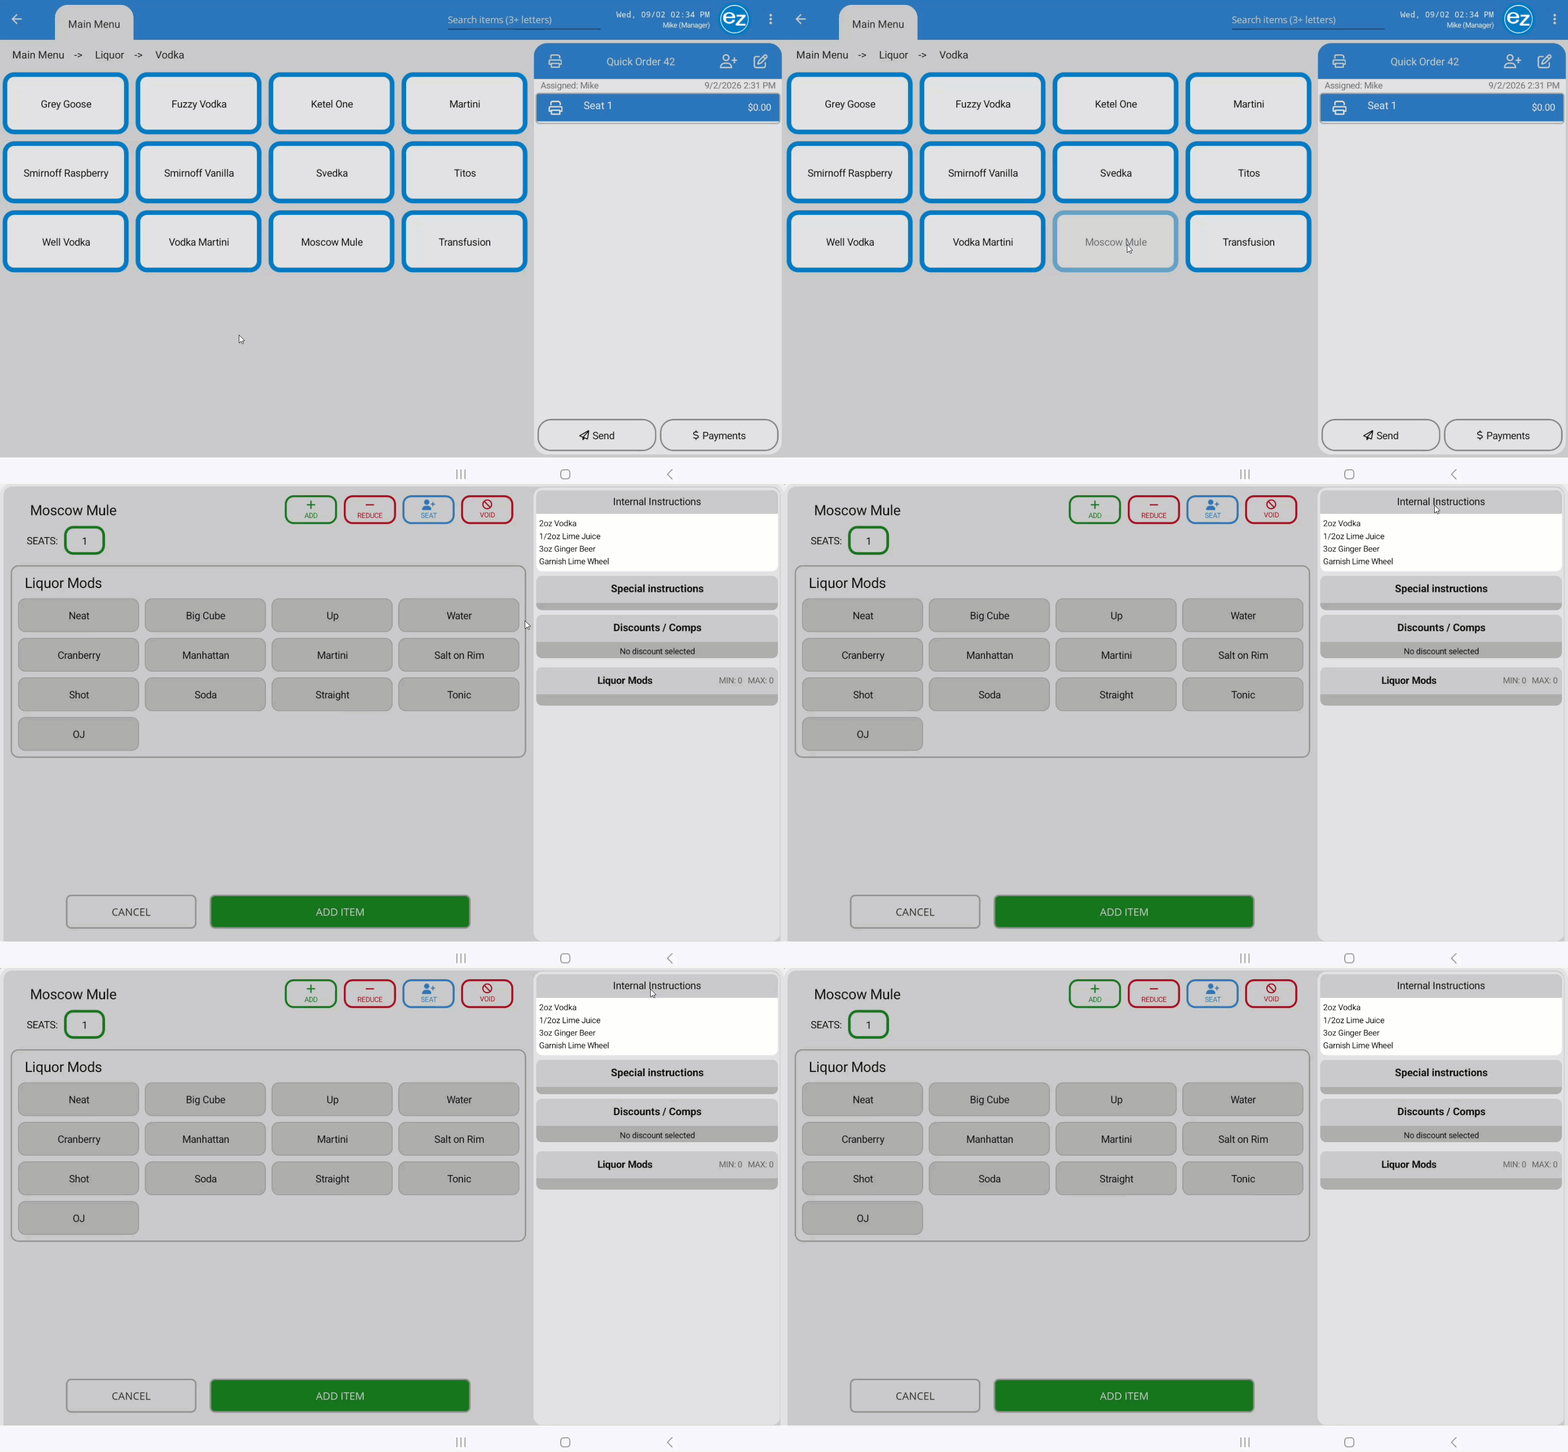
- Items configured with internal instructions in Studio allow staff to view receipts, ingredient lists, or prep guidelines directly from the ordering screen. Note: These instructions are strictly for internal staff reference and do not print on customer receipts
- Internal Instructions will be listed at the top of the Item Modifications window
- Review the preparation instructions
- Tap the Internal Instructions window to collapse the instructions list
Step 11: Editing Items Before Sending
- Selecting an item on an unset order ticket opens the Item Modifications window
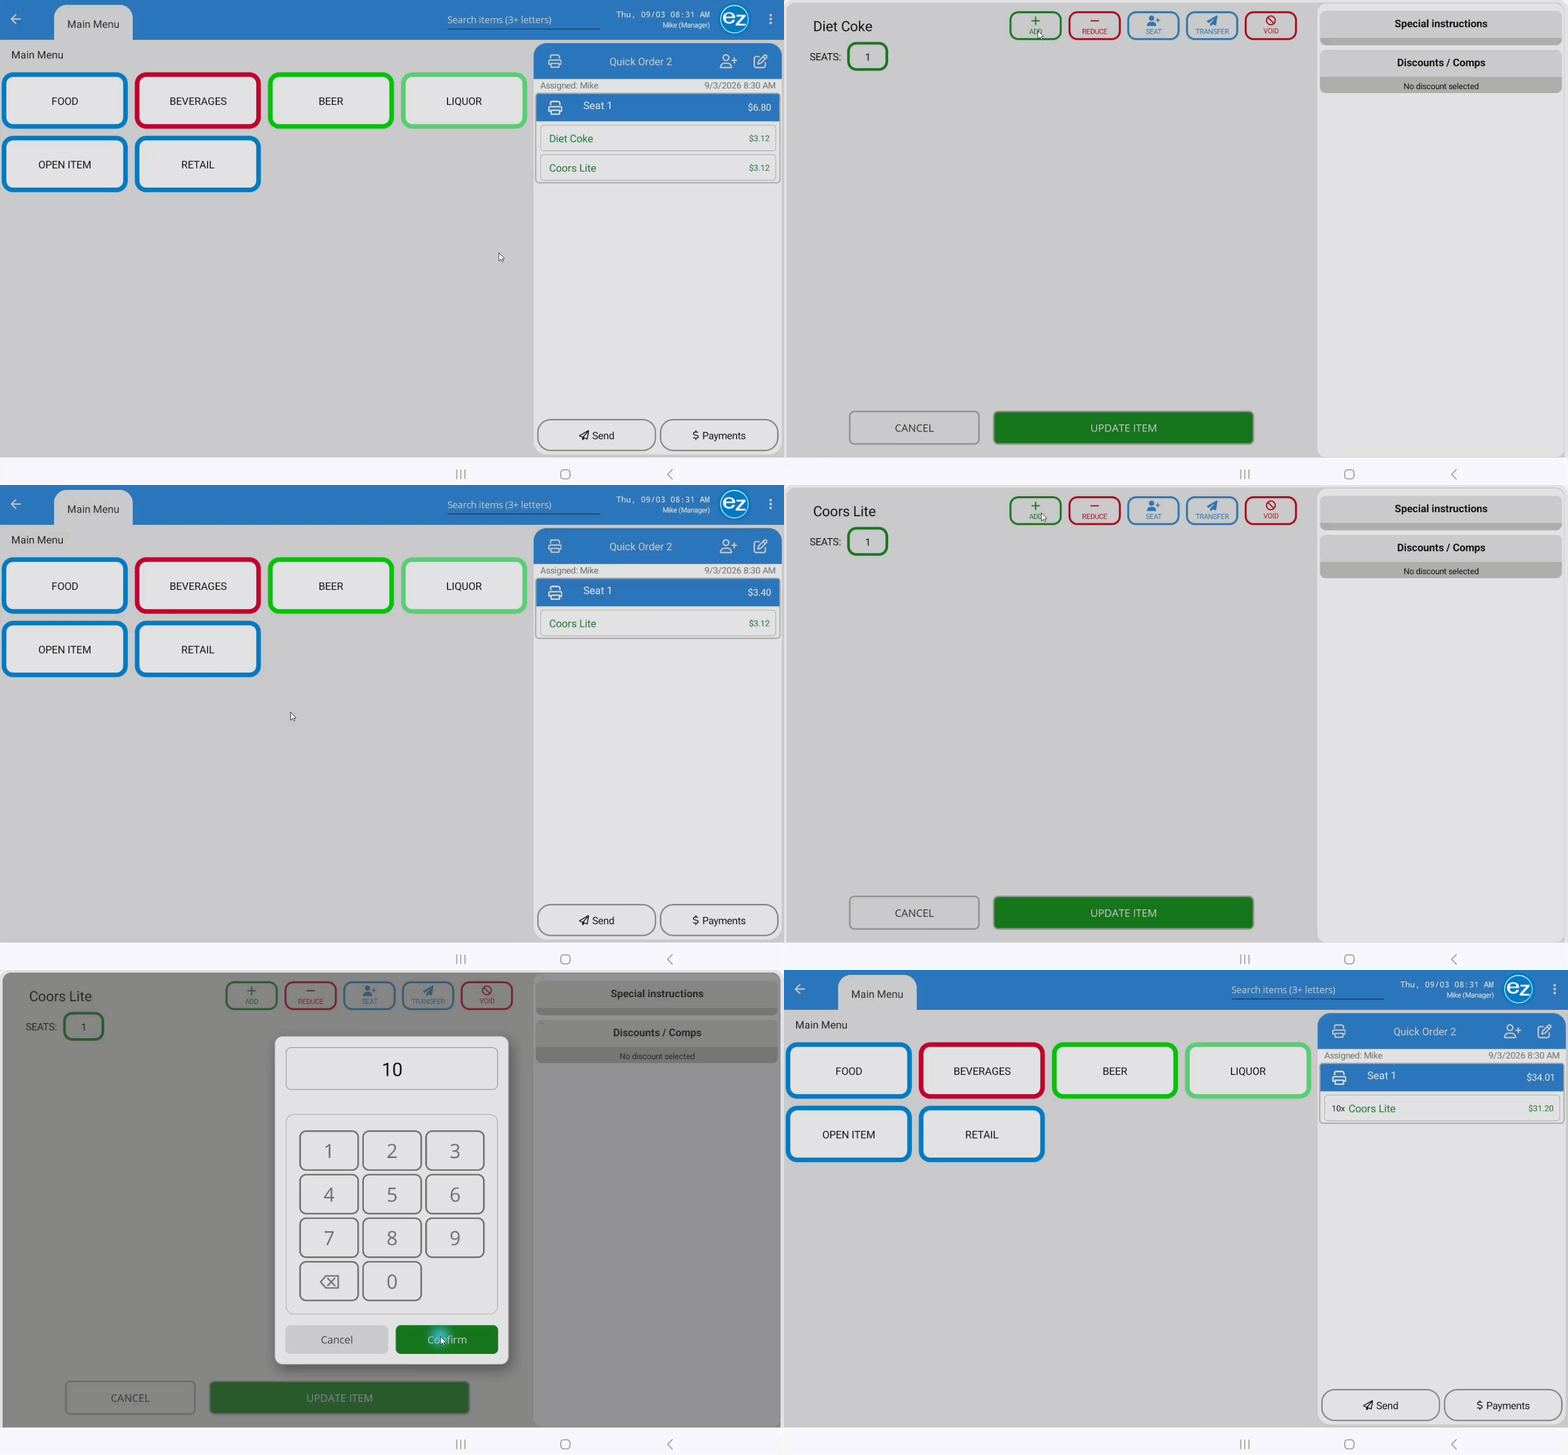
- Adjusting Quantity or Deleting Items: Tap the green Plus (+) icon to increase quantity by one, or tap the red Reduce (-) icon to reduce quantity or delete the item
- For larger quantities, long press the green Plus(+) to open the numerical keypad and enter the additional count needed
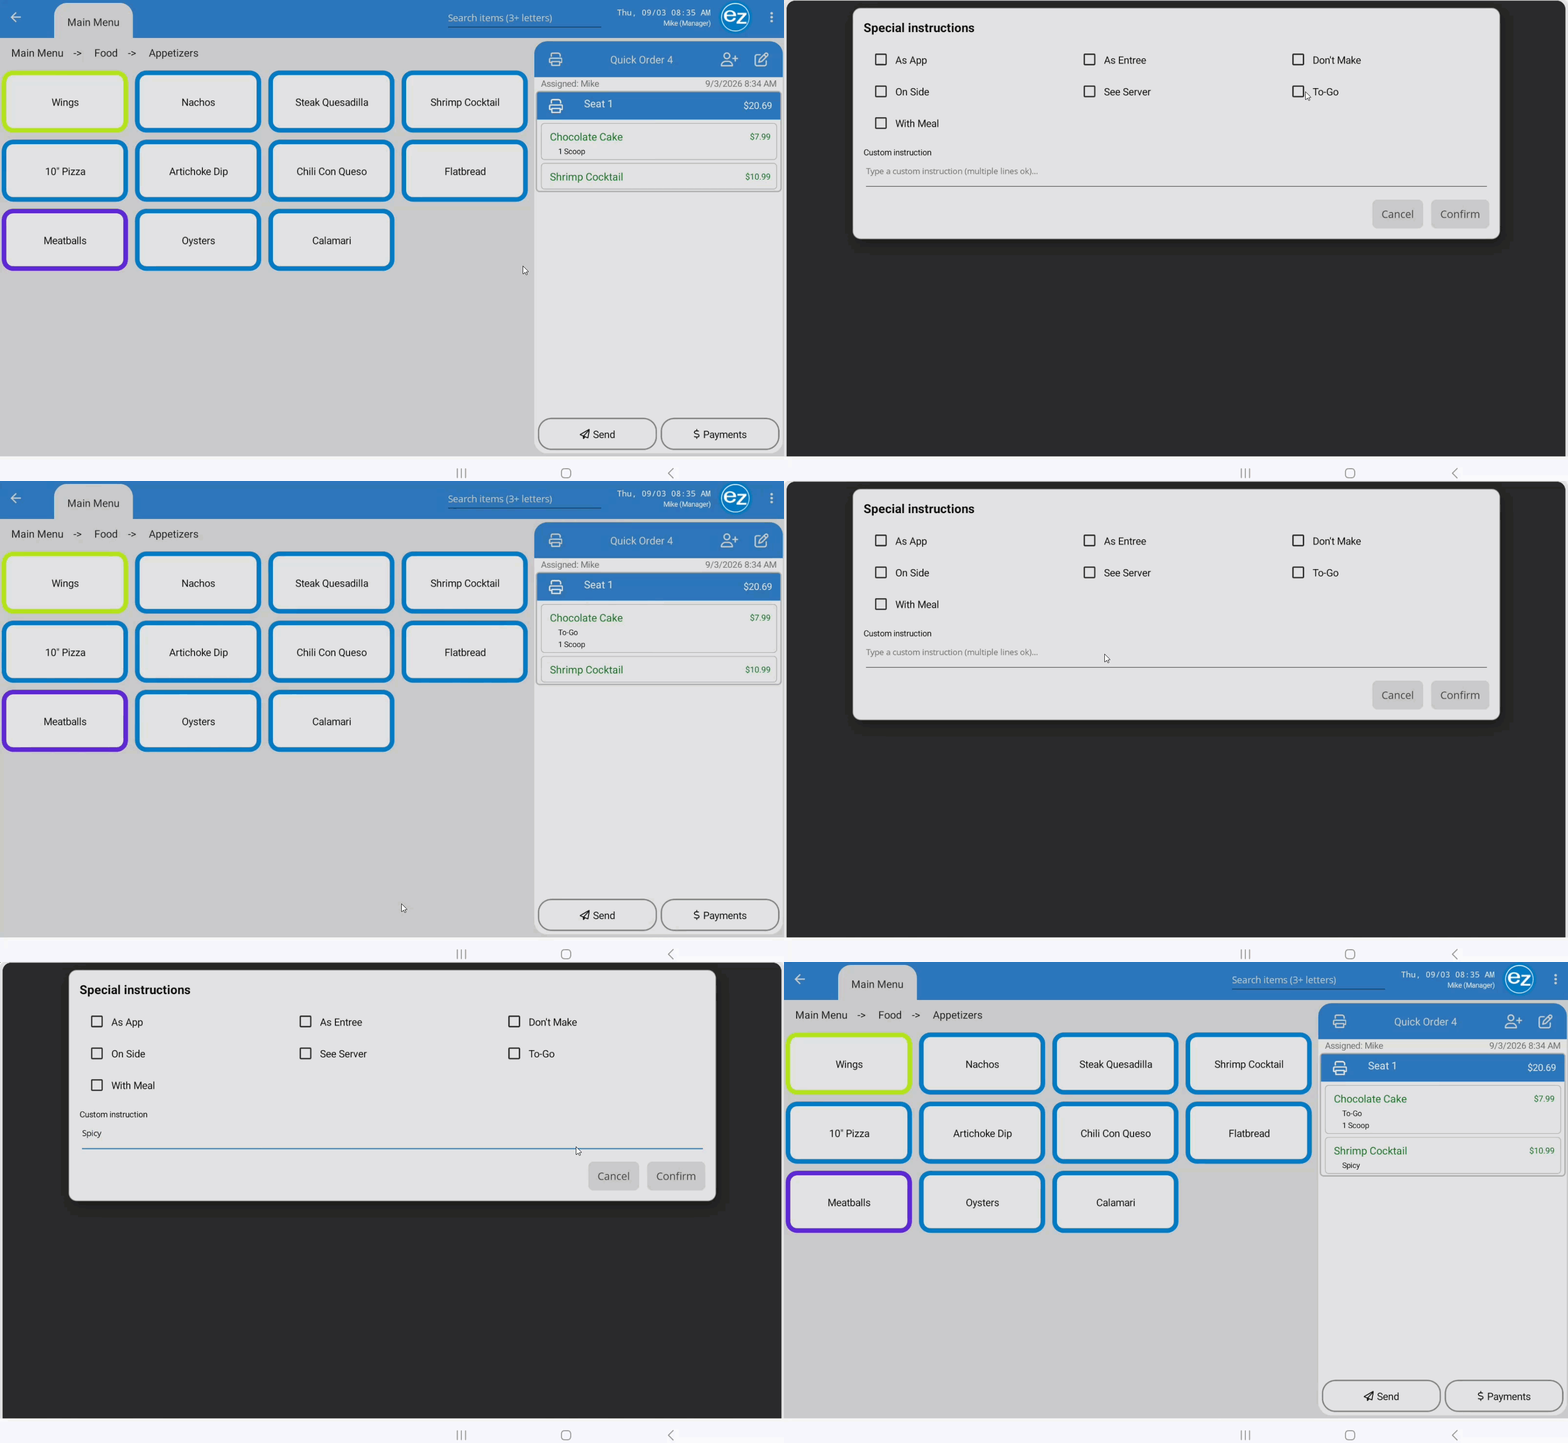
- Item Special Instructions: Tap the Special Instructions section which will be listed at the top of the modifier window right side panel
- Select from the pre-configured Studio reasons, or tap the Custom instruction line to type a custom note using the on-screen keyboard, then tap Confirm
- Applied instructions appear in red text with an asterisk directly beneath the item name
- Moving Items Between Seats: The top left will list the current seat number selections. The current seat your on will be outlined in a green color while open seats to transfer to will be outlined in blue
- Select the target seat number to reassign the item. Confirm on the move item prompt window and tap Update Item. (Items can be moved between seats before or after sending)
- Applying Order-Level Instructions: Tap the Edit Pencil icon in the top-right ticket header to apply a note to the entire order
- Select or type the instruction and tap Confirm
- Order instructions display below the order name and print directly beneath the timestamp on the kitchen tickets once sent
Item Quantity
Special Instructions
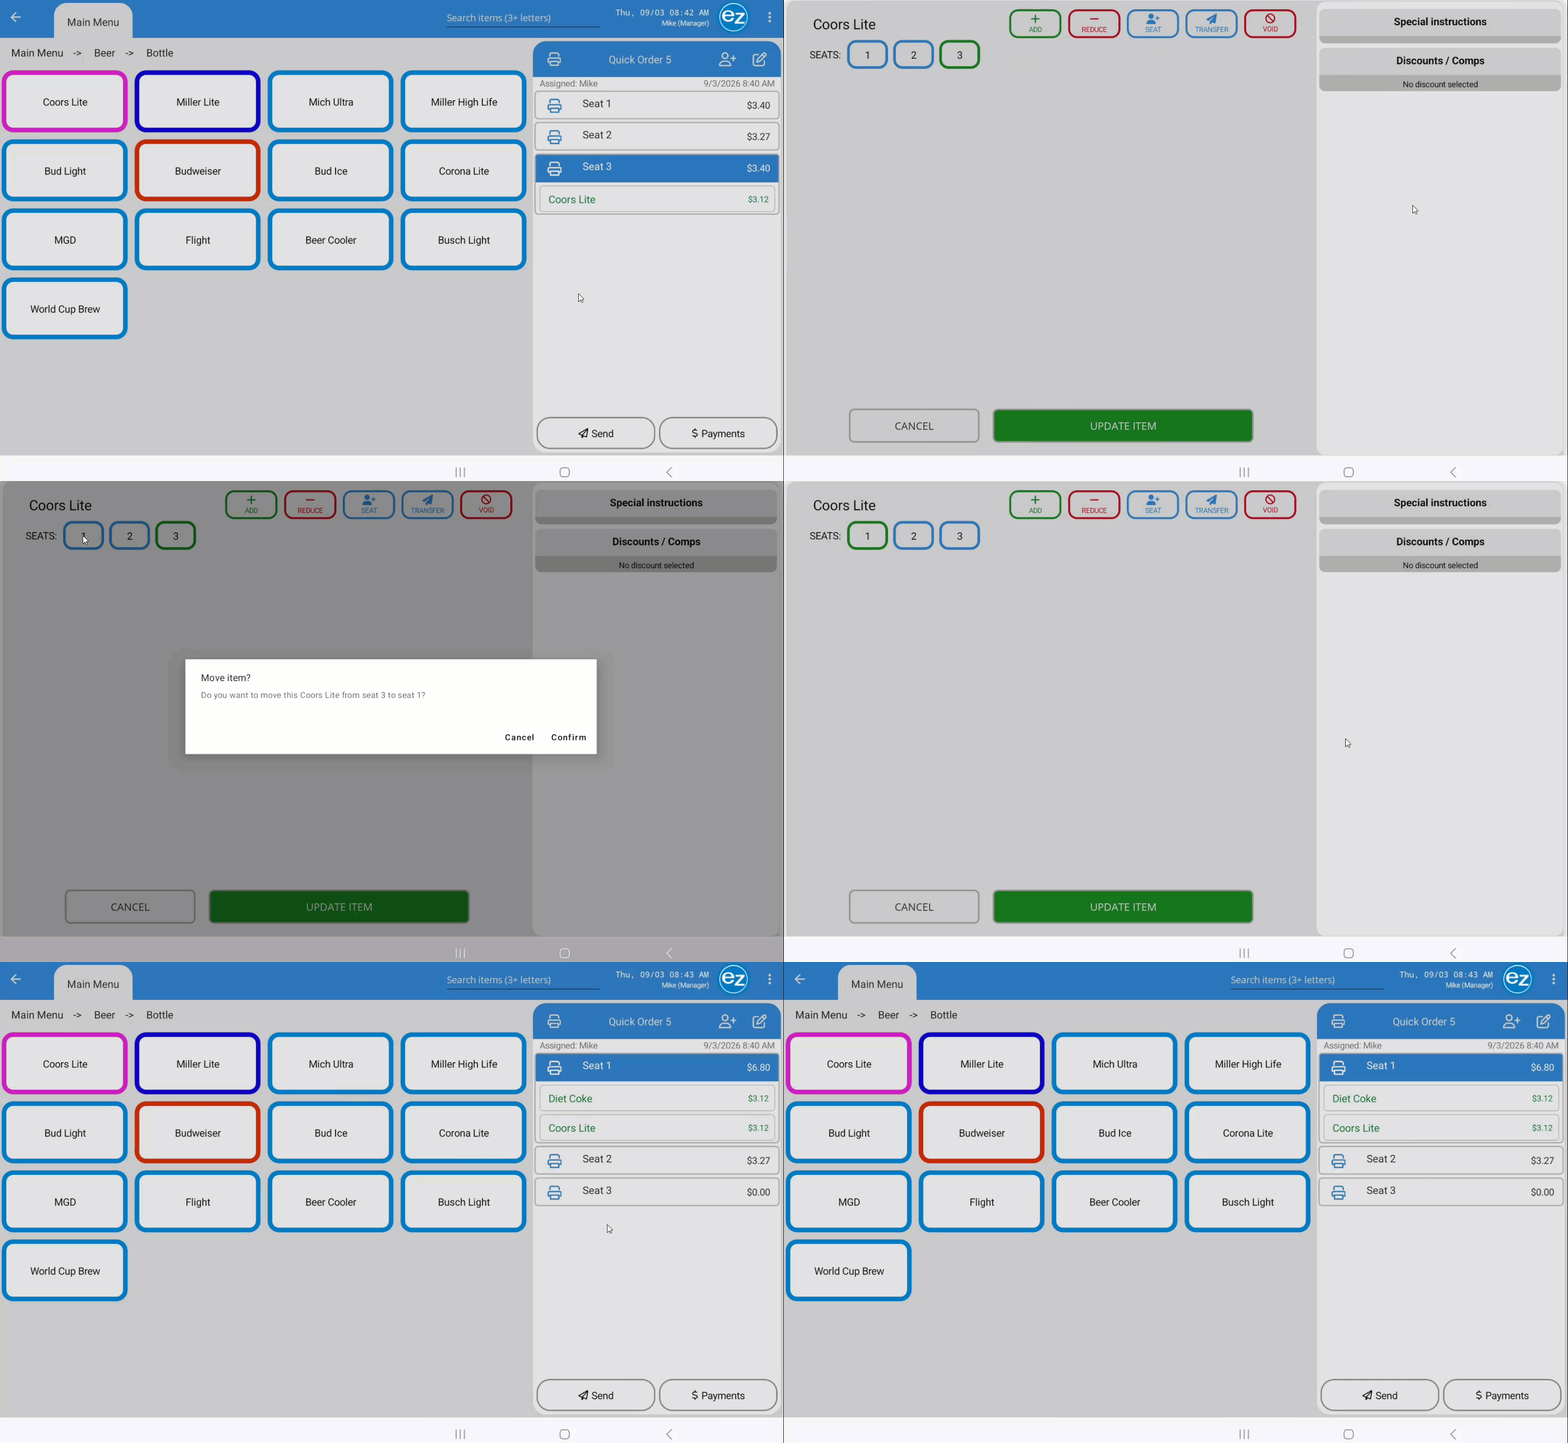
Move Items
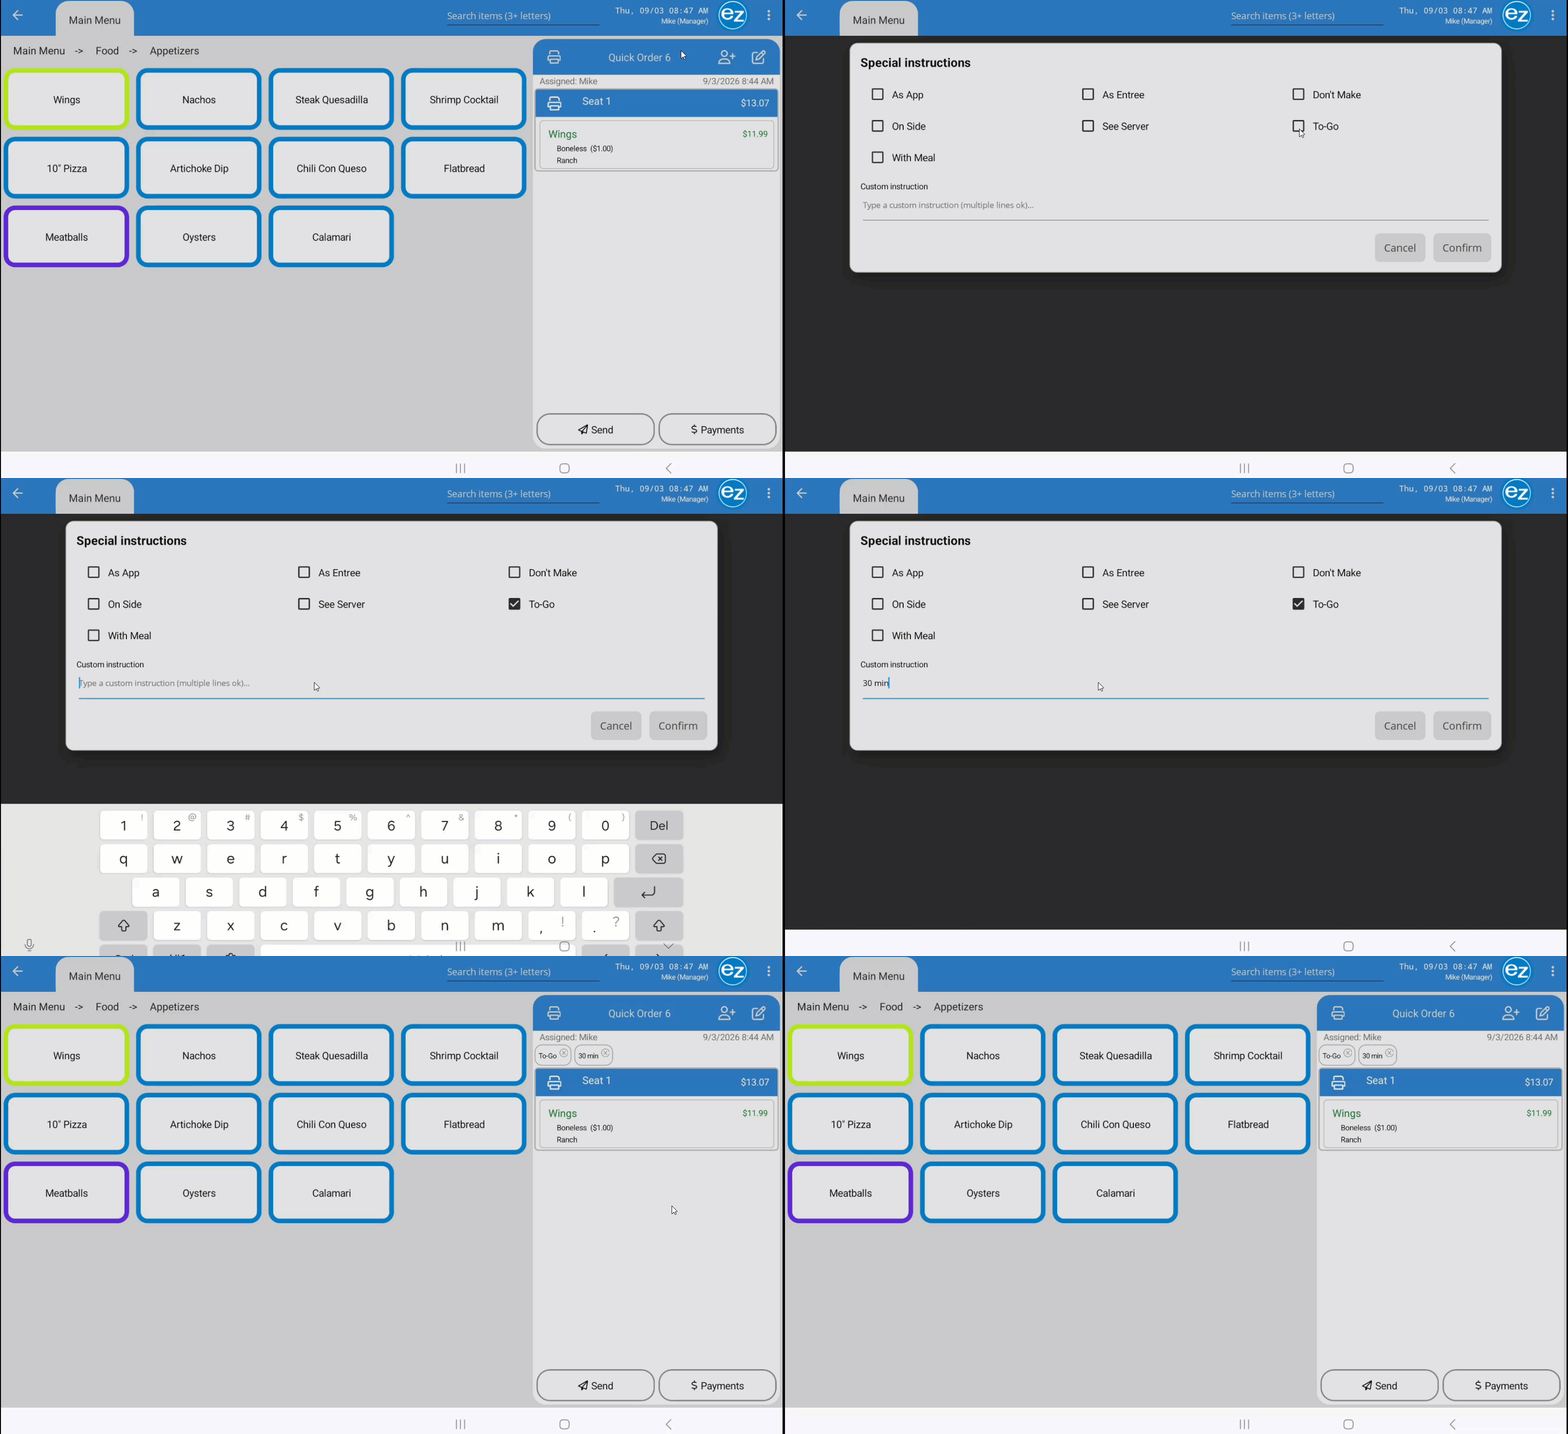
Order Instructions
Step 12: Sending Items on the Order
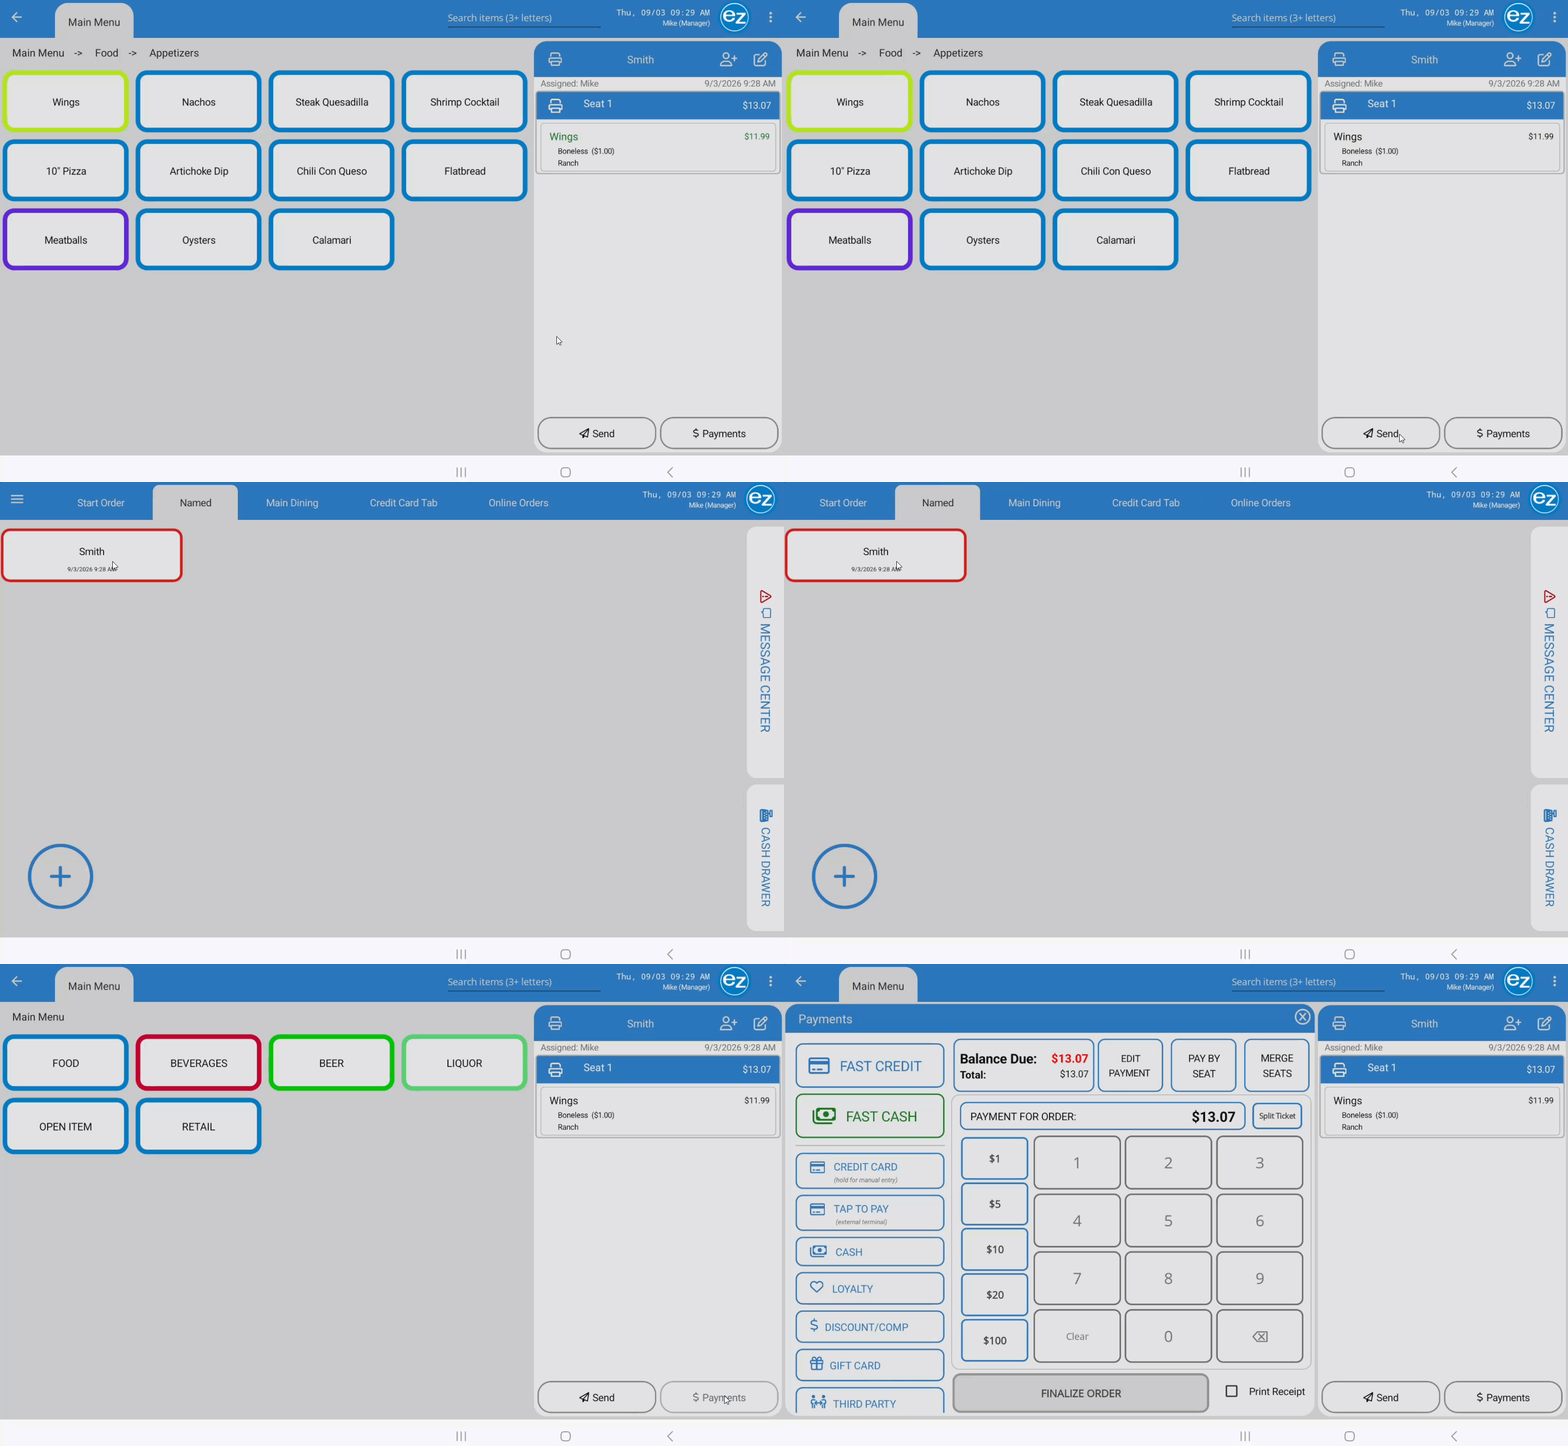
- When an order is ready to dispatch, tap the appropriate send action button on the ticket
- Depending on the control button selected (Send/Payments), the app automatically routes you back to either the ordering section or directly to the payment page
- Sent items print automatically to designated printers and kitchen display screens based on category and item configurations set in Studio
- Unsent items switch from green (pending) to black (sent) once dispatched. Note: Quick orders when selecting payment will automatically send any unsent items on the order ticket
Step 13: Editing Items after Sending
- Selecting a sent item opens the Item Modifications window. The reduce item option will not be available once an item has been dispatched
- Repeat Item: Tap the green Plus (+) Add icon to duplicate a sent item. The EZ Dine app automatically adds an additional quantity to be repeated for sending
- Editing Modifier Selections: Item modifier and addon selections can be changed after the item has been sent
- Tap the item to open the Item Modifications window. Remove current selections and update the item. Send the order and the kitchen ticket will print a new order with CHANGED status in red text and time highlighted at the top of the kitchen ticket
- Transferring Items: Tap the Transfer icon and the Transfer Item To Another Order window will be shown
- List of open orders will be displayed that can be selected. Tap the order and the green confirm transfer. The item will be moved from the current order to the new order and positioned on seat 1 by default. The merge order employee permission will be required in order to transfer
- Item Discounts/Comps: Tap the Discounts/Comps window located below the special instructions to apply an item-level discount or comp
- Item Voids: Tap the Red Void icon to void the item. This prompts a pop-up window to select a mandatory void reason configured on Studio
- Applying discounts, comps, and voids requires appropriate employee permission levels enabled in EZ Dine Studio
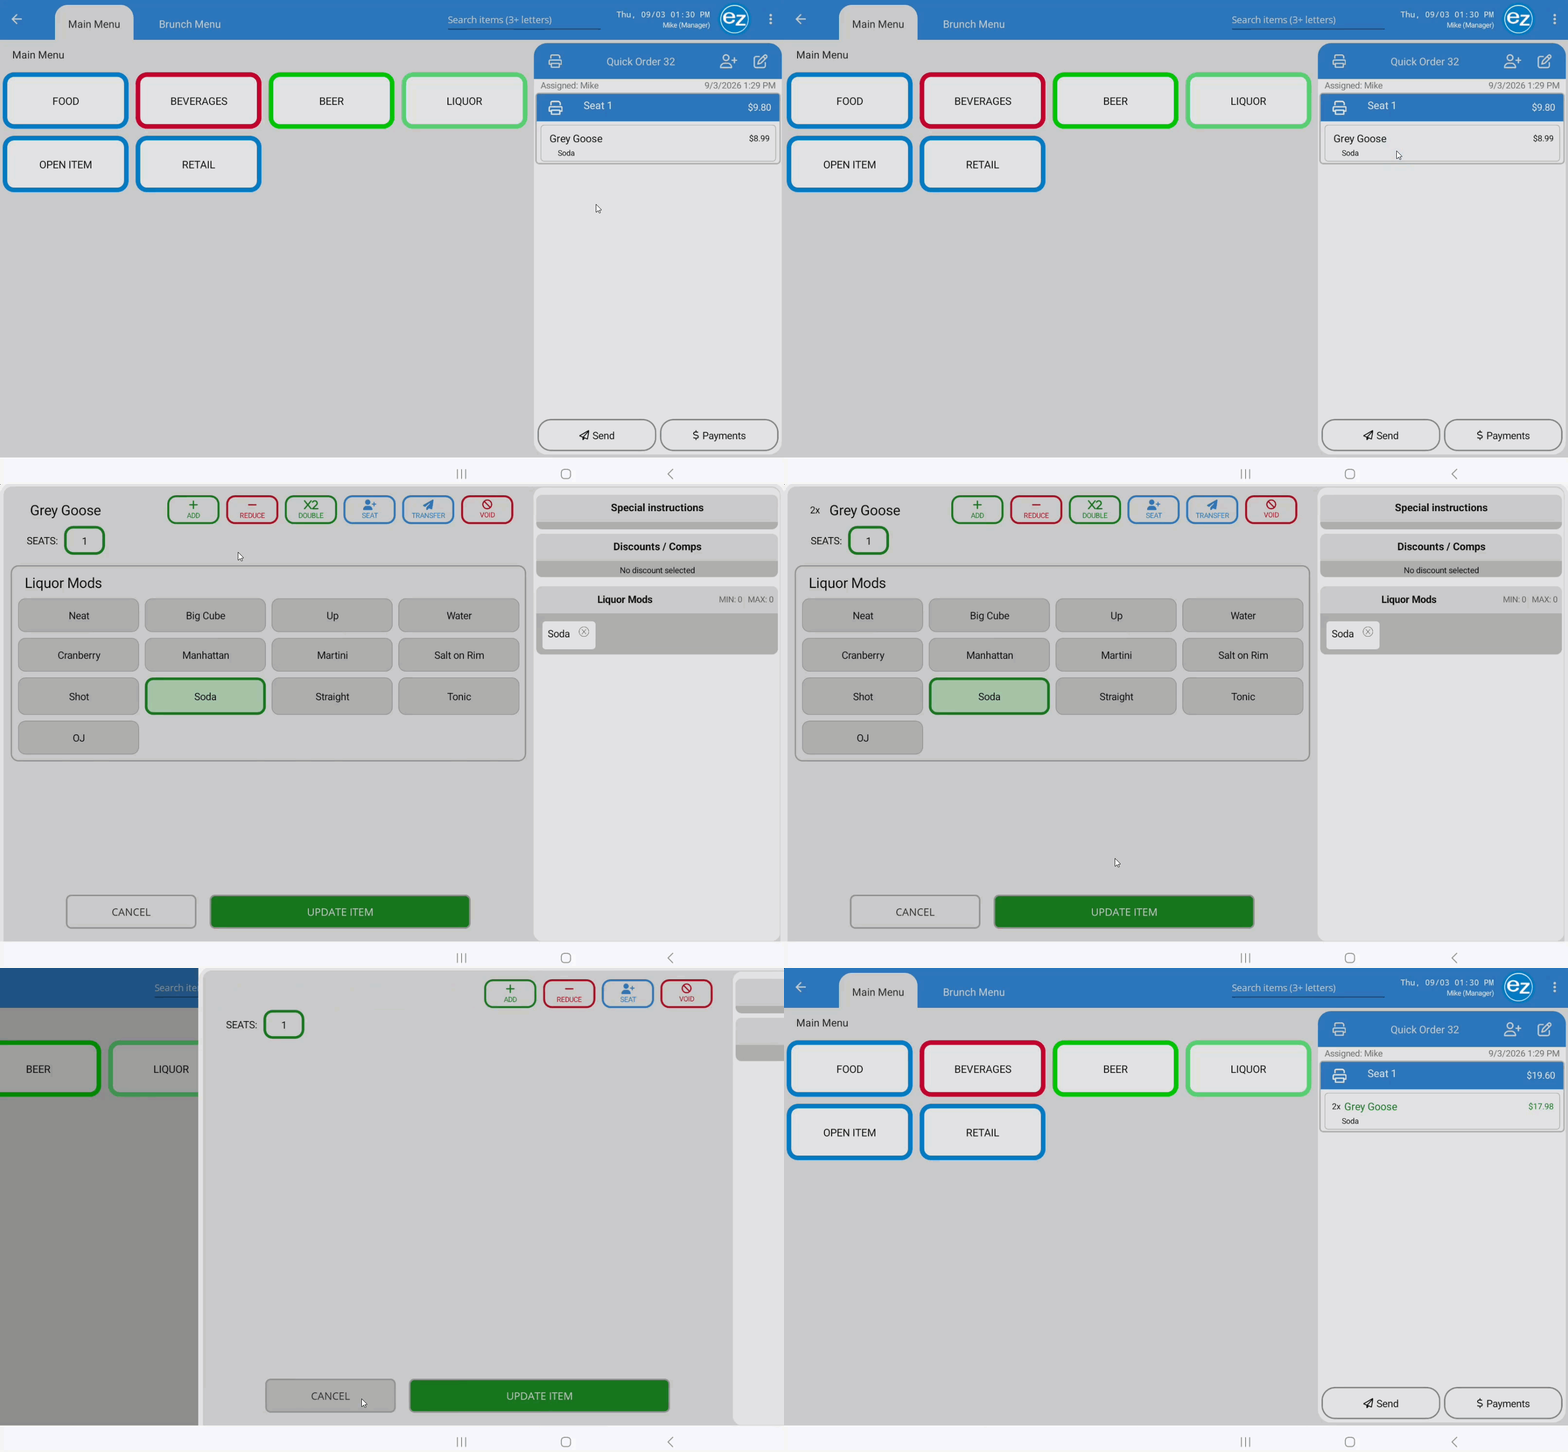
Repeat Item
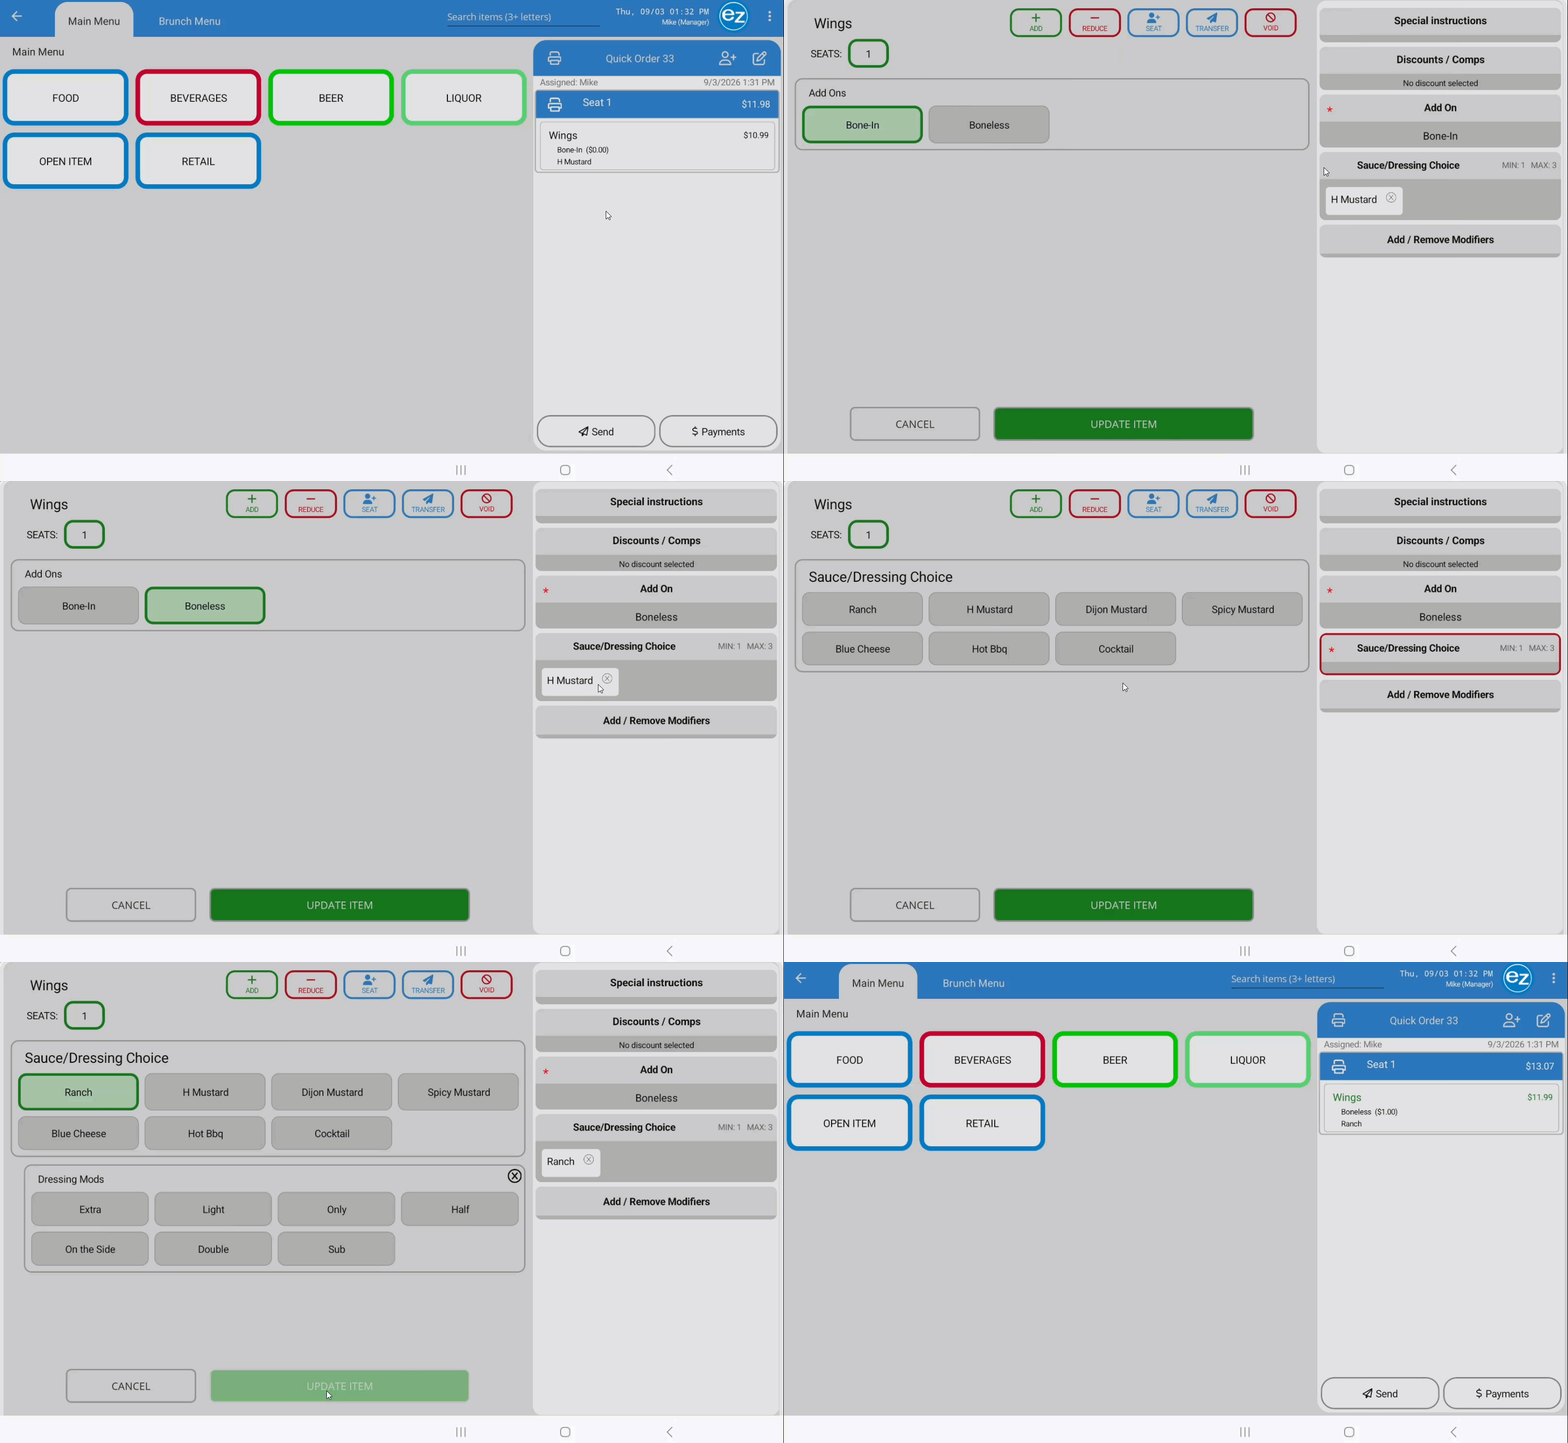
Editing Sent Item
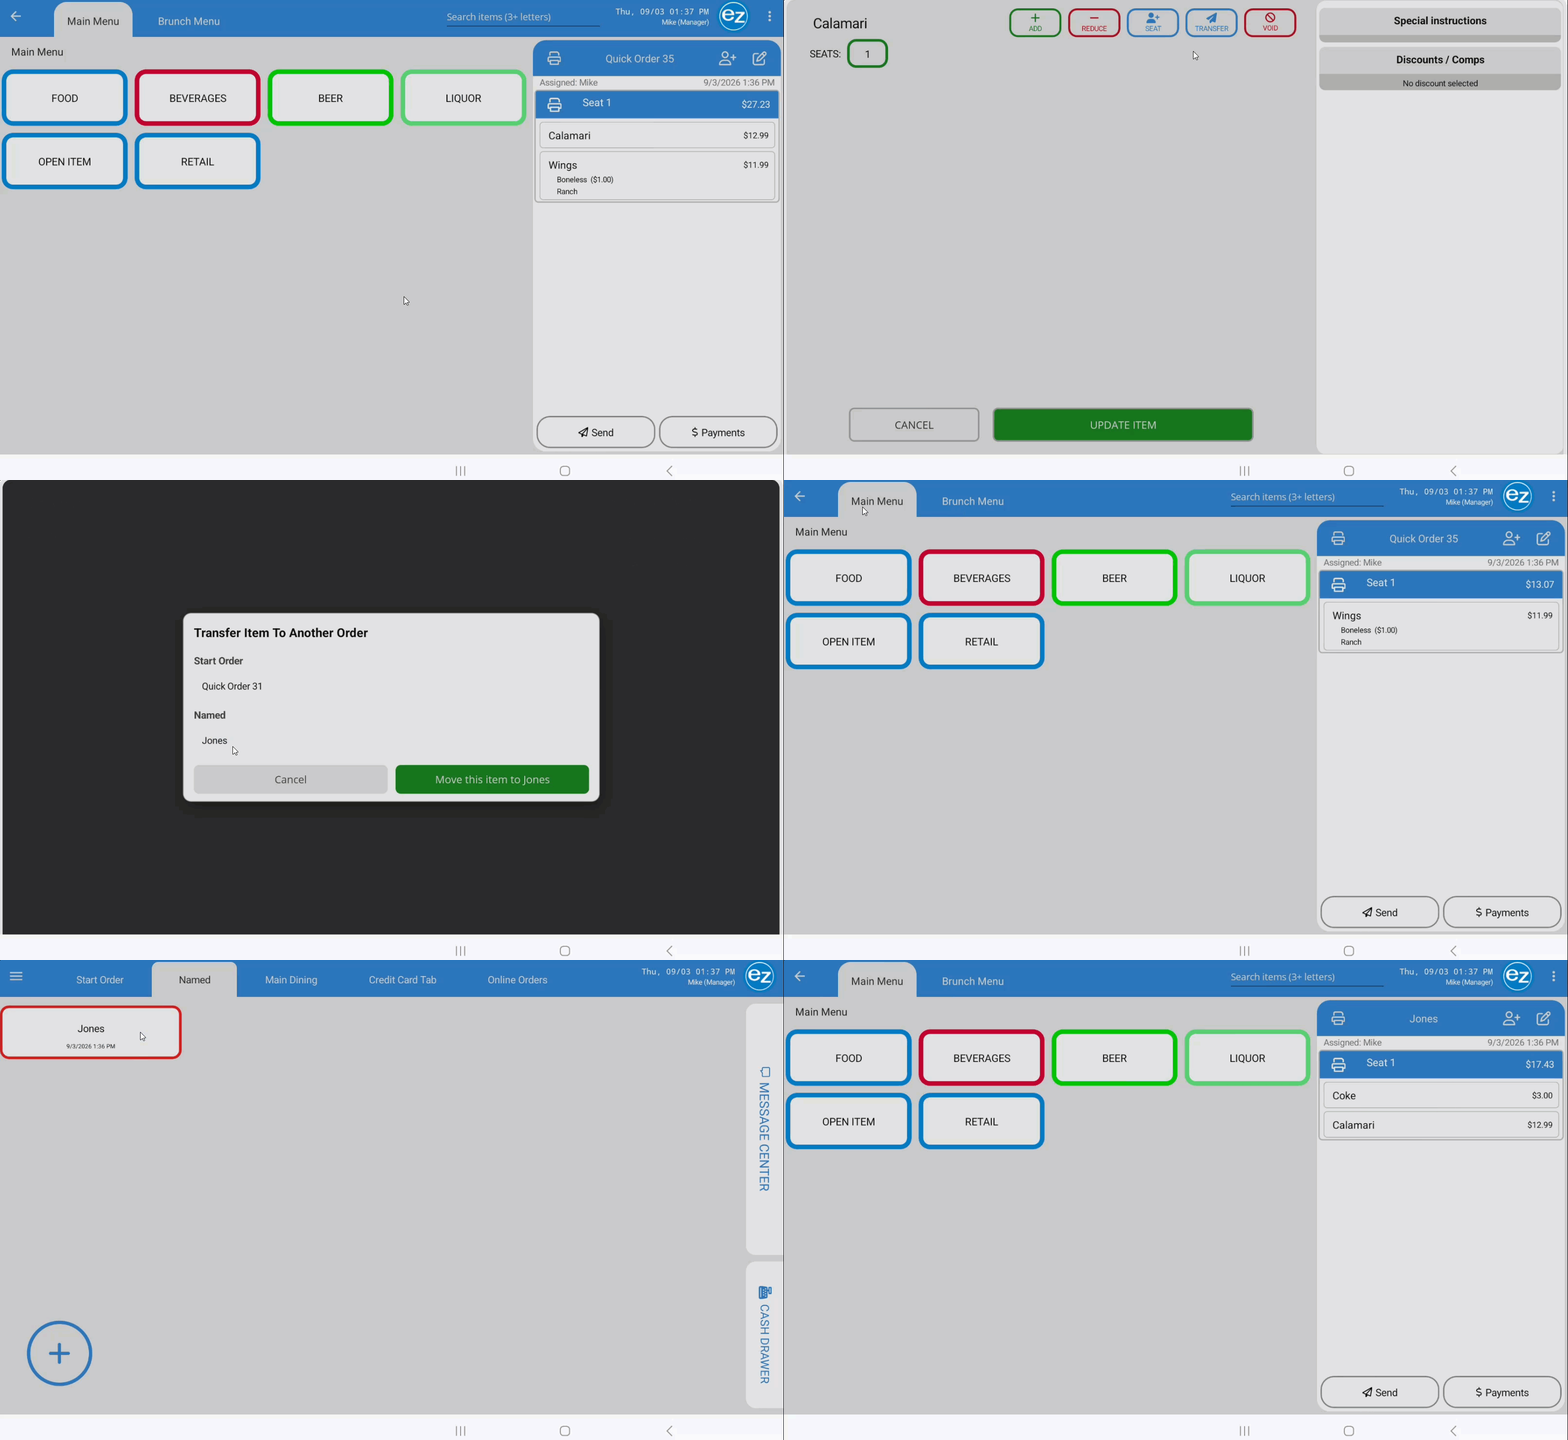
Transferring Items
Step 14: Applying Item Discounts
- Apply pre-configured discounts, enter manual adjustments, or manage existing item-level discounts directly from the order ticket
- Tap the item on the order ticket to open the Item Modifications window
- Tap the Discount/Comps section located at the top of the window, directly below the Special Instructions field
- Toggle Interface: Use the top toggle switch to navigate between Discounts (left) and Comps (right). The active selection highlights in red
- Pre-Configured Discounts: Select any pre-configured category or item-level discount from the populated listed (these are created and managed in EZ Dine Studio)
- Tap the desired discount and Update Item
- Verification: The applied discount name and adjusted negative amount will display directly beneath the item line on the order ticket
- Manual Discounts: Tap Manual Discount located at the top of the discount selection list
- Enter a Discount name for reporting and tracking purposes
- Select the discount calculation type. Percentage (%) or Dollar Amount ($)
- Input the adjustment value using the numerical keypad
- Auto-Applied Discounts: Any Auto-Applied Discounts configured in EZ Dine Studio will attach to eligible items automatically as soon as those items are added to the ticket. No manual application is required for these discounts
- ticket
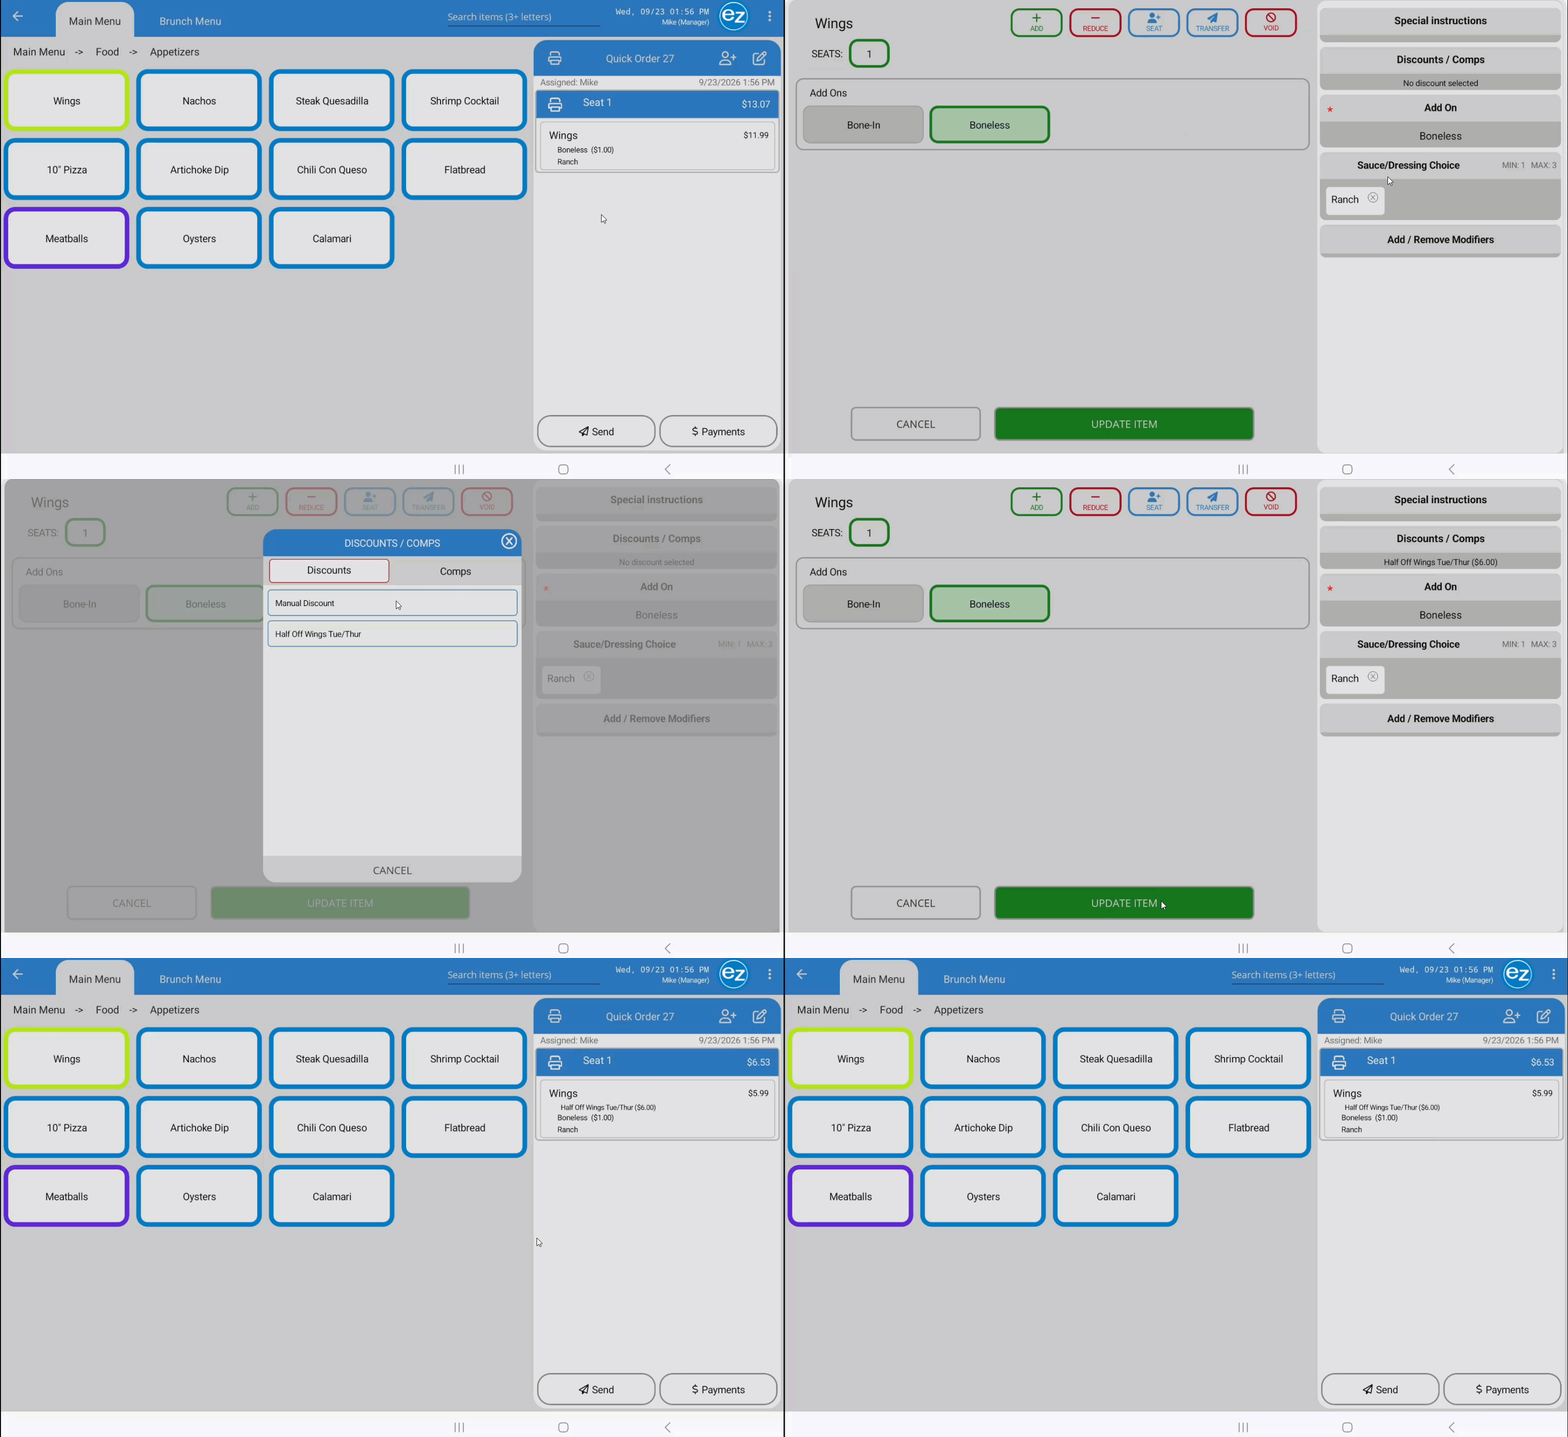
Pre-Configured Item Discount
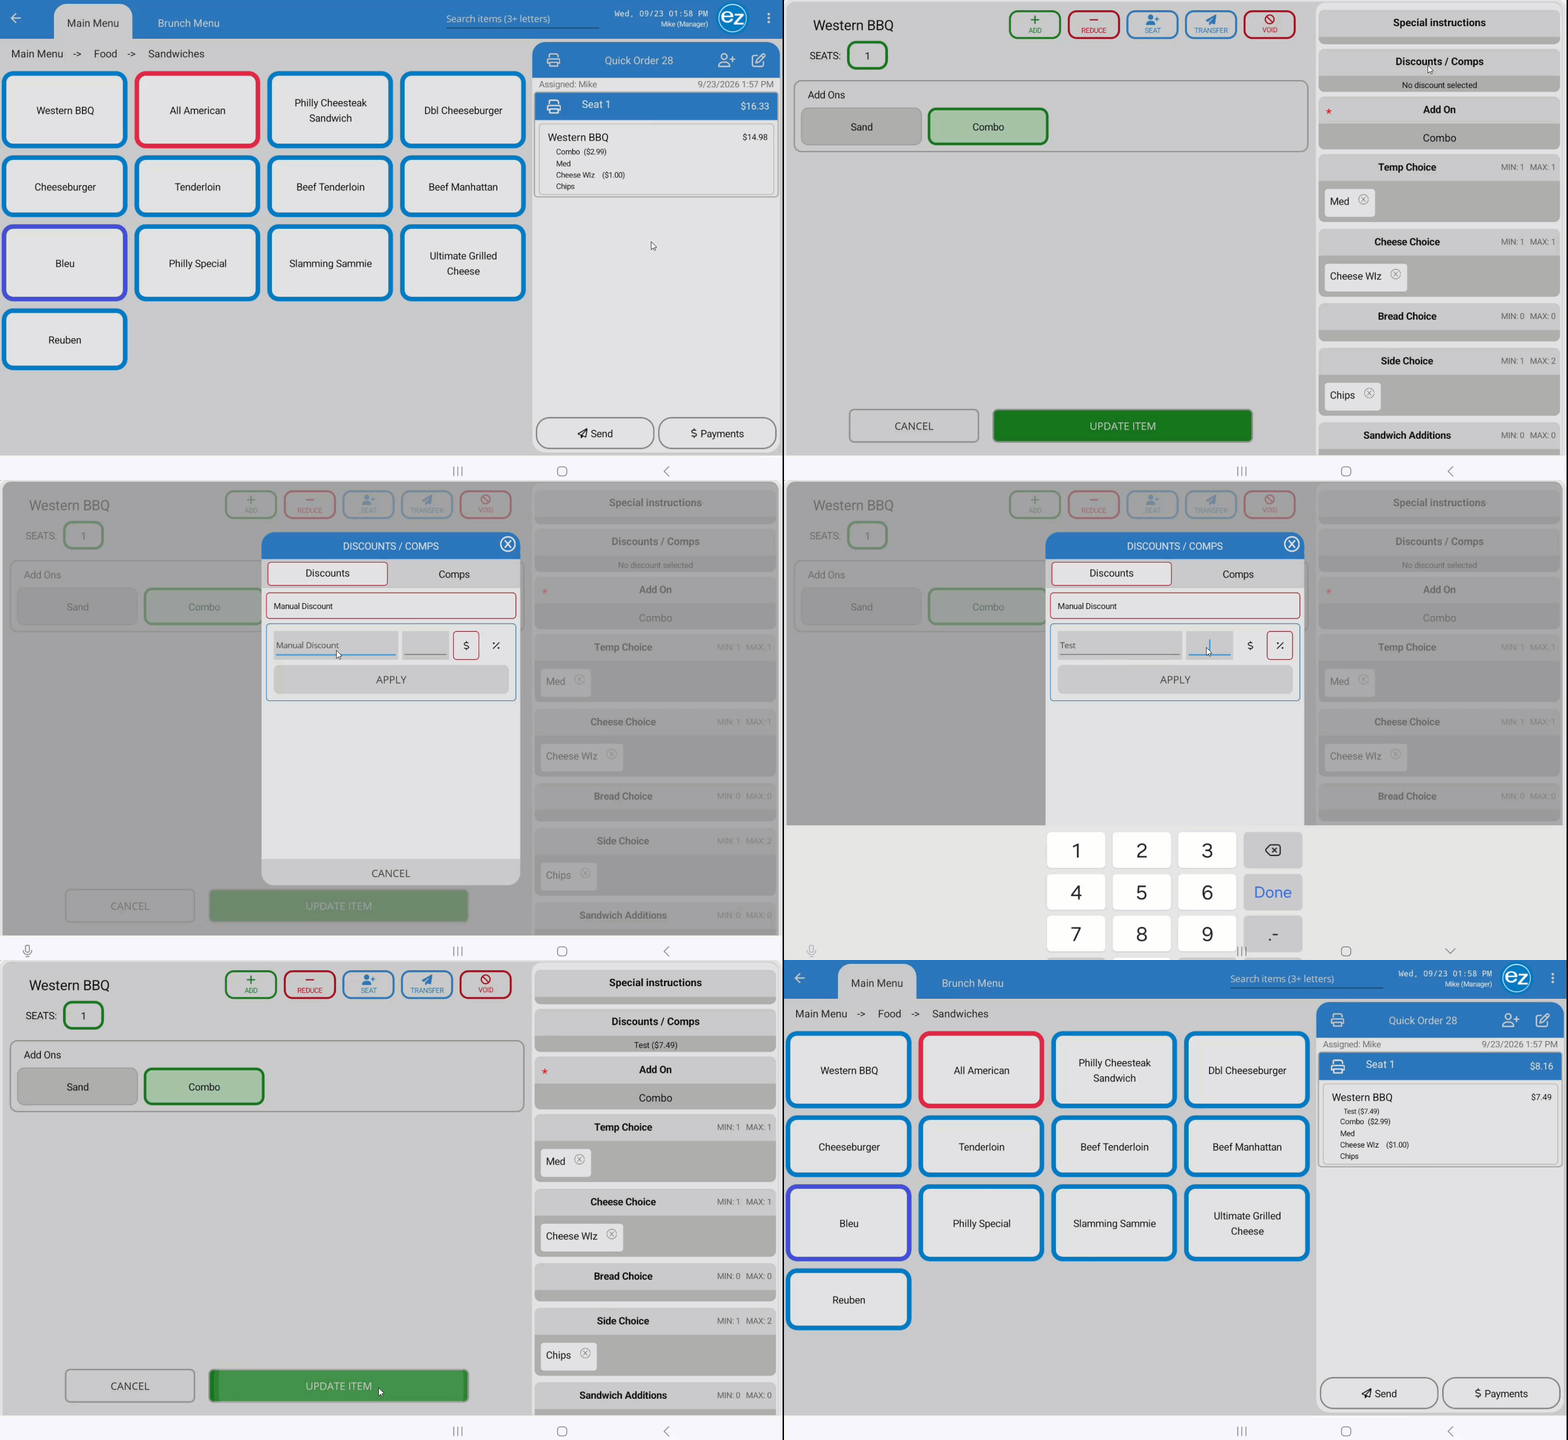
Manual Item Discount
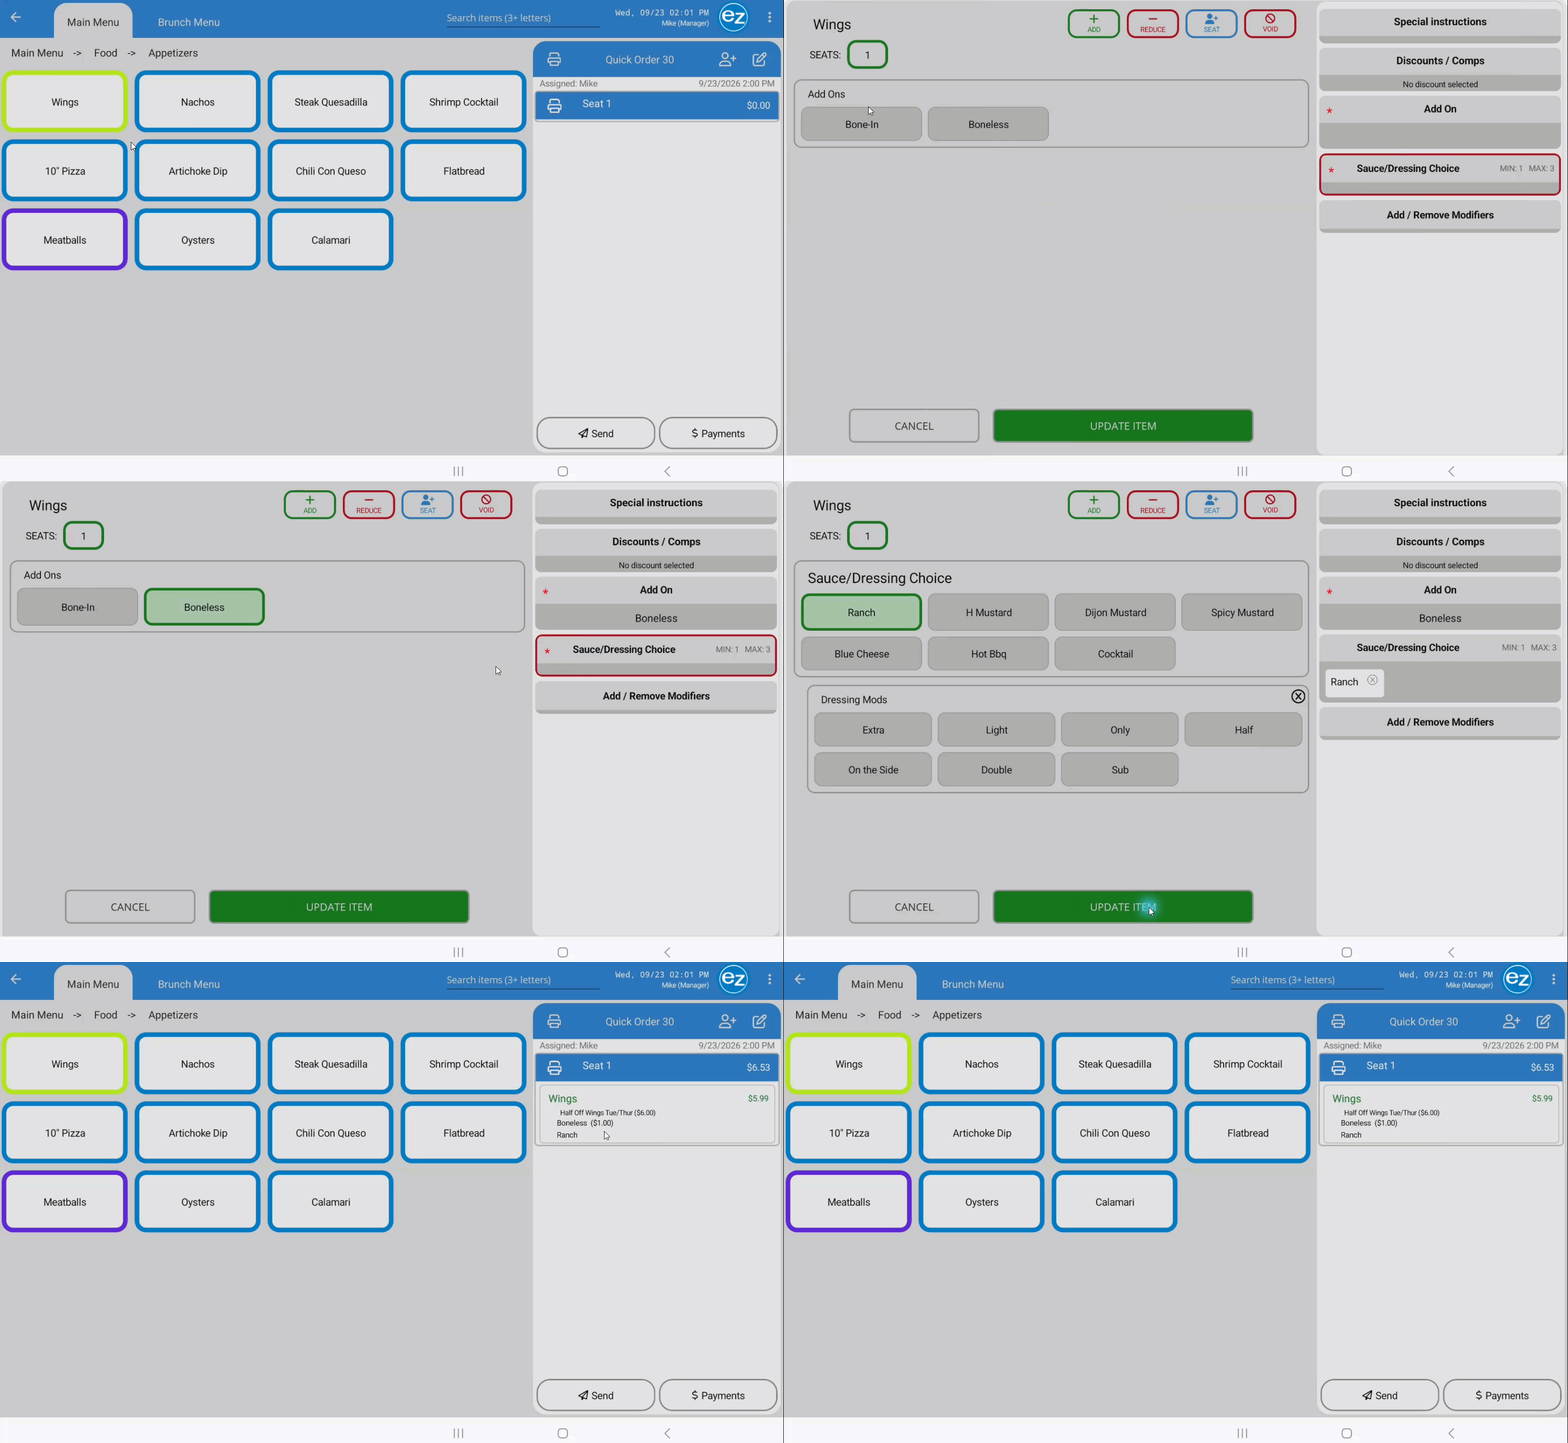
Automatic Item Discount
Step 15: Applying Item Comps
- Apply pre-configured comp reasons to remove the charge for individual menu items on an order ticket
- Tap the item on the order ticket to open the Item Modifications window
- Tap the Discount/Comps section located directly below the Special Instructions field
- Toggle the switch at the top to the right to select Comps. Pre-configured comp reasons from EZ Dine Studio will populate the screen
- Select the appropriate Comp Reason
- Tap Update Item
- Verification: The selected comp reason displays beneath the item on the order ticket, and the item price automatically updates to $0.00 to open the item modifications window
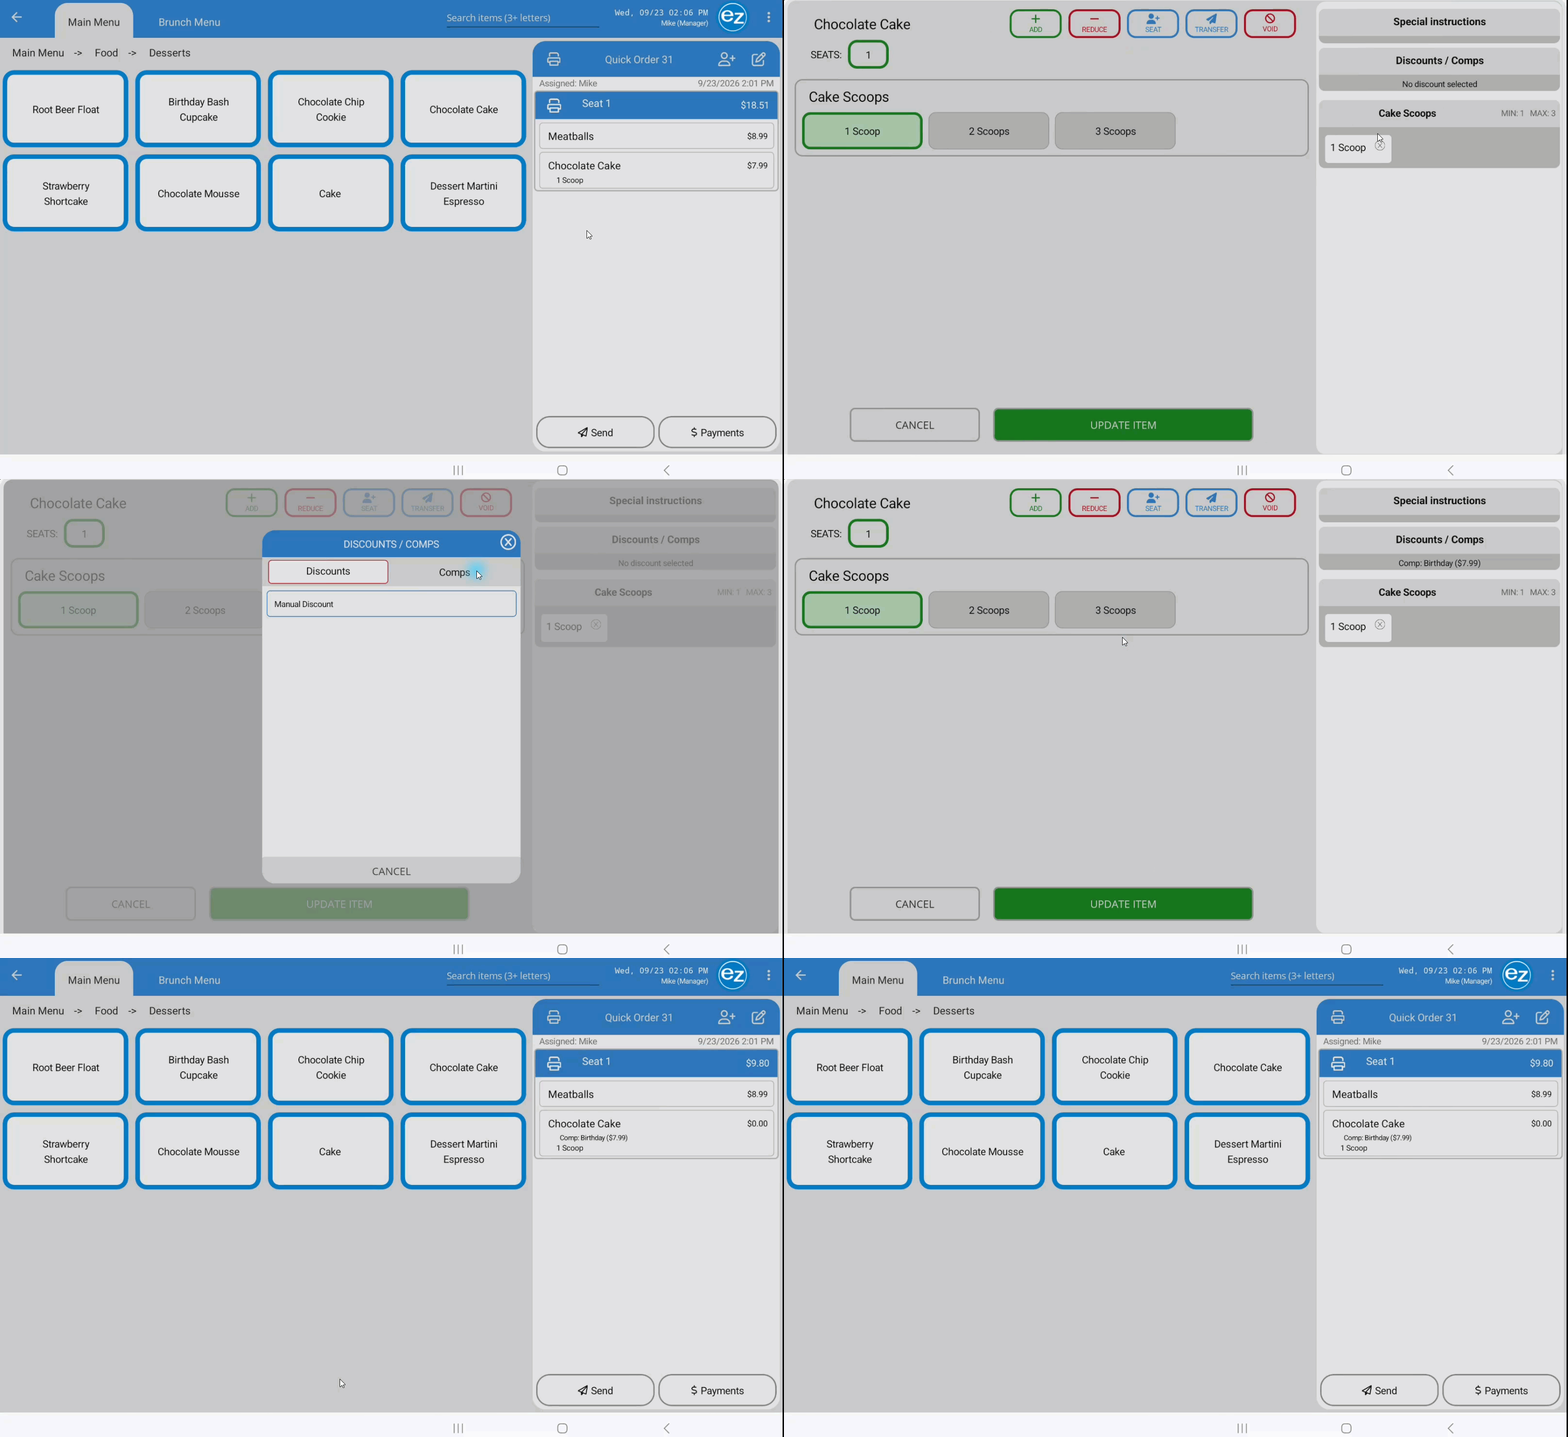
Item Comp
Step 16: Item Voids
- Tap the item to open the Item Modifications window. Tap the Red Void icon
- Select a pre-configured void reason from the EZ Dine Studio list
- Tap Submit and Update Item to apply the void
- The item name displays with a strikethrough and (voided) status in red text next to the item. Tap Send or Payment and the EZ Dine app automatically dispatches a void ticket the kitchen printer (if Print Voided Items/Orders to Kitchen is enabled in the store settings)
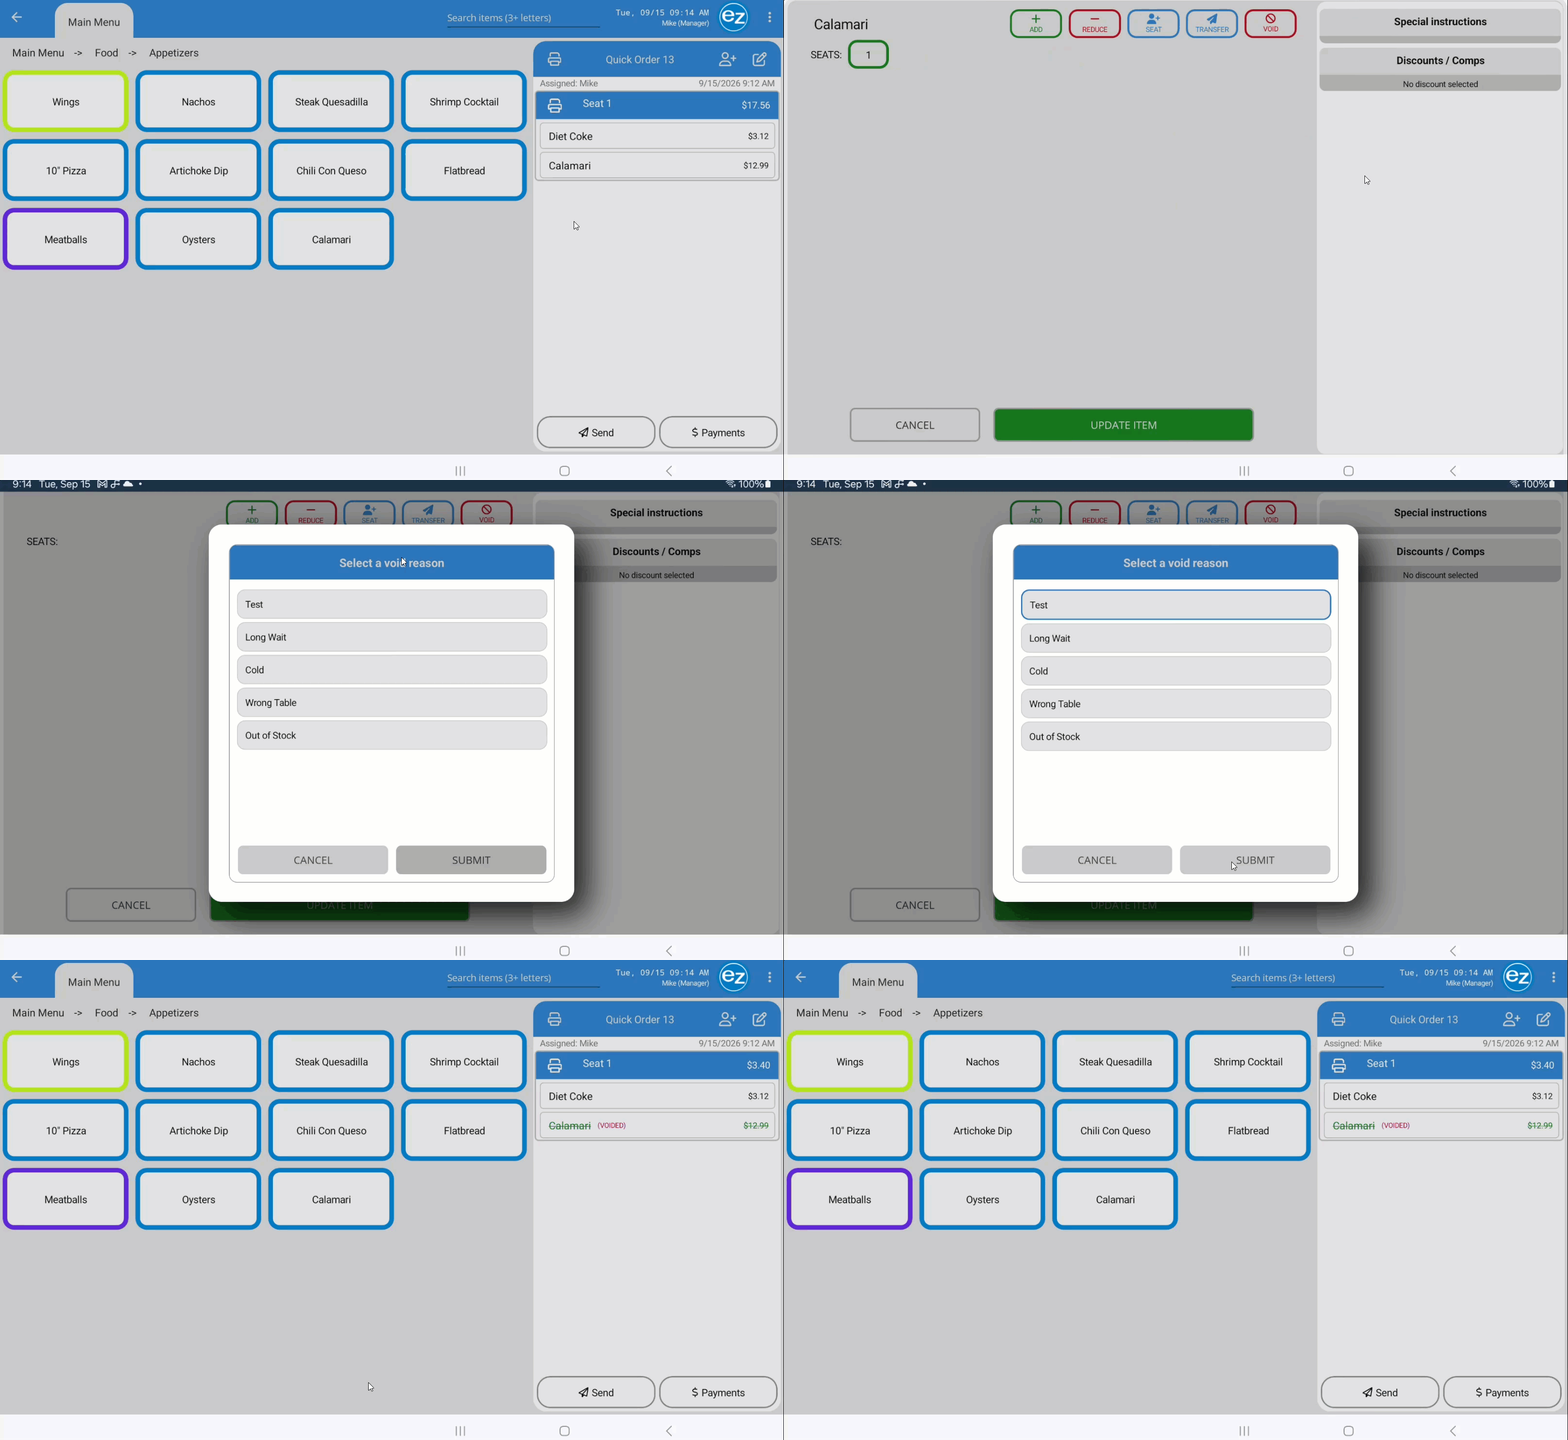
Step 17: Managing Seats on an Order Ticket
- Adding separate seats allows staff to organize items for kitchen staff and separate payments for guest checks across any ordering tab type
- Tap the Guest + icon in the top-right corner of the ticket form to create additional seats in sequential numerical order
- Tap any Seat Number header row to switch between seats. The active seat header highlights in blue, while details for inactive seats minimize to keep the ticket display scannable
- Removing an empty seat from the order ticket Tap and Hold the empty seat for a few seconds. The remove seat confirmation prompt is displayed. Tap Yes and the seat will no longer visible on the order ticket
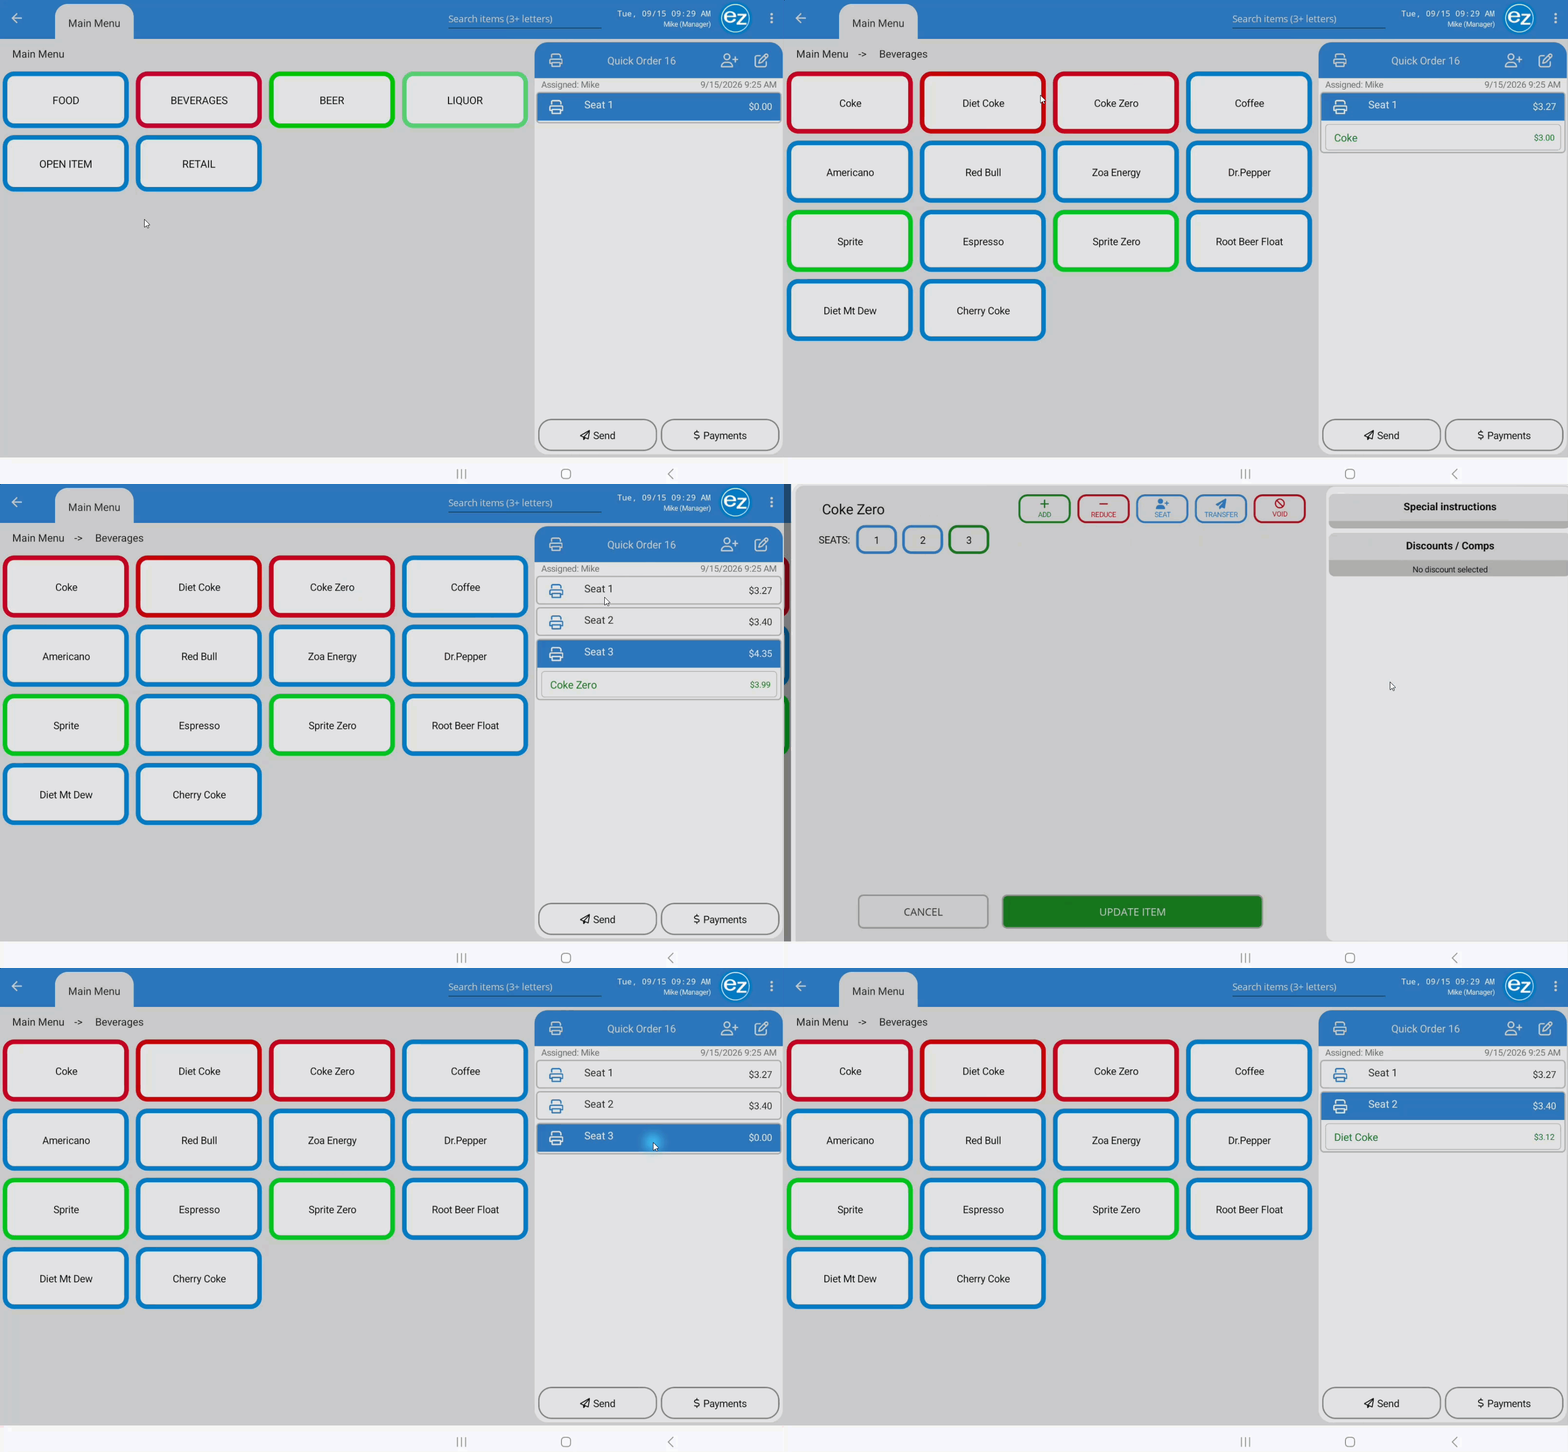
Step 18: Manager/Employee Override
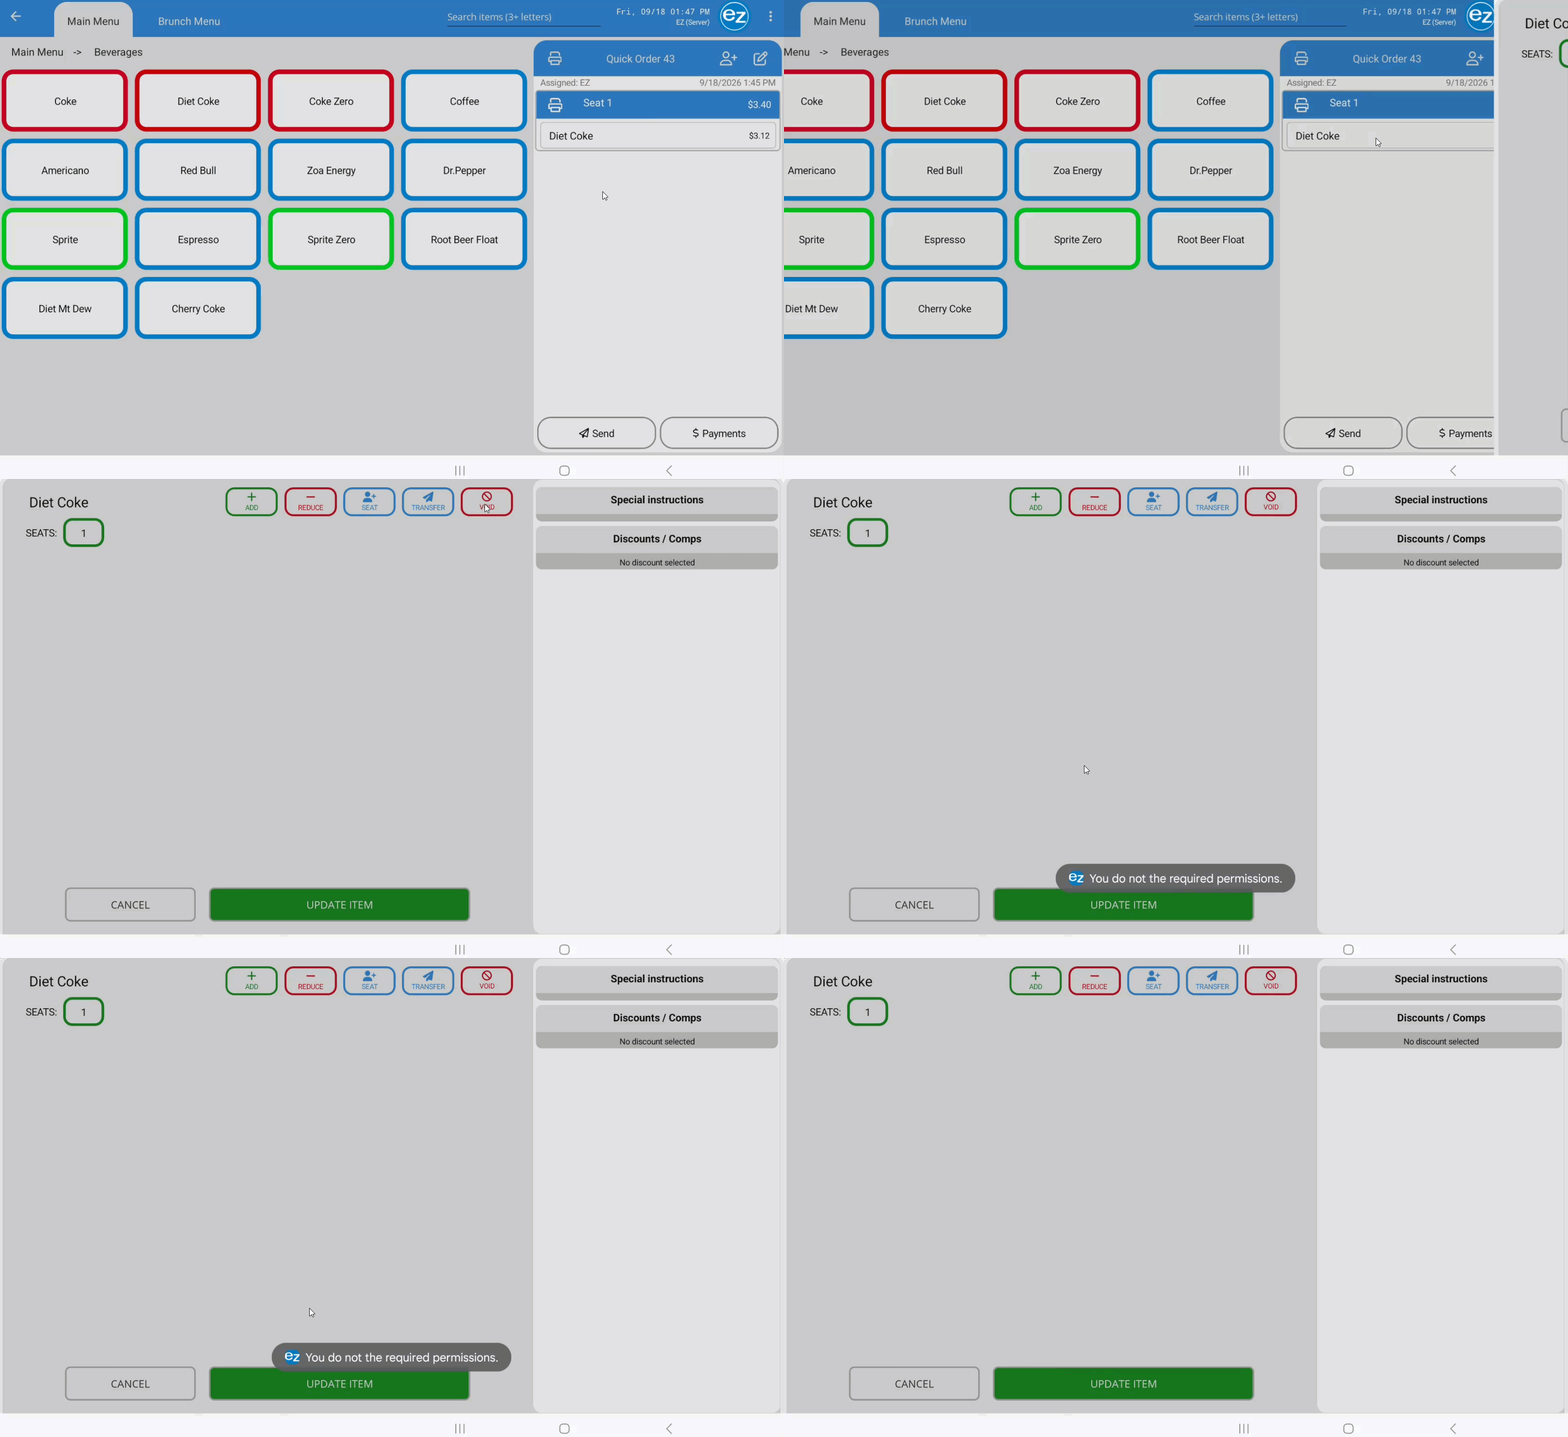
- When an employee attempts an action that exceeds their assigned authorization level, the EZ Dine app blocks the operation and requires authorization
- Permission Warning: The EZ Dine app displays a "You do not have the required permissions" warning message near the bottom of the screen
- Manager Authorization: An authorized manager or employee with the required permissions must log into the device to complete the restricted action
Step 19: Reassigning Orders
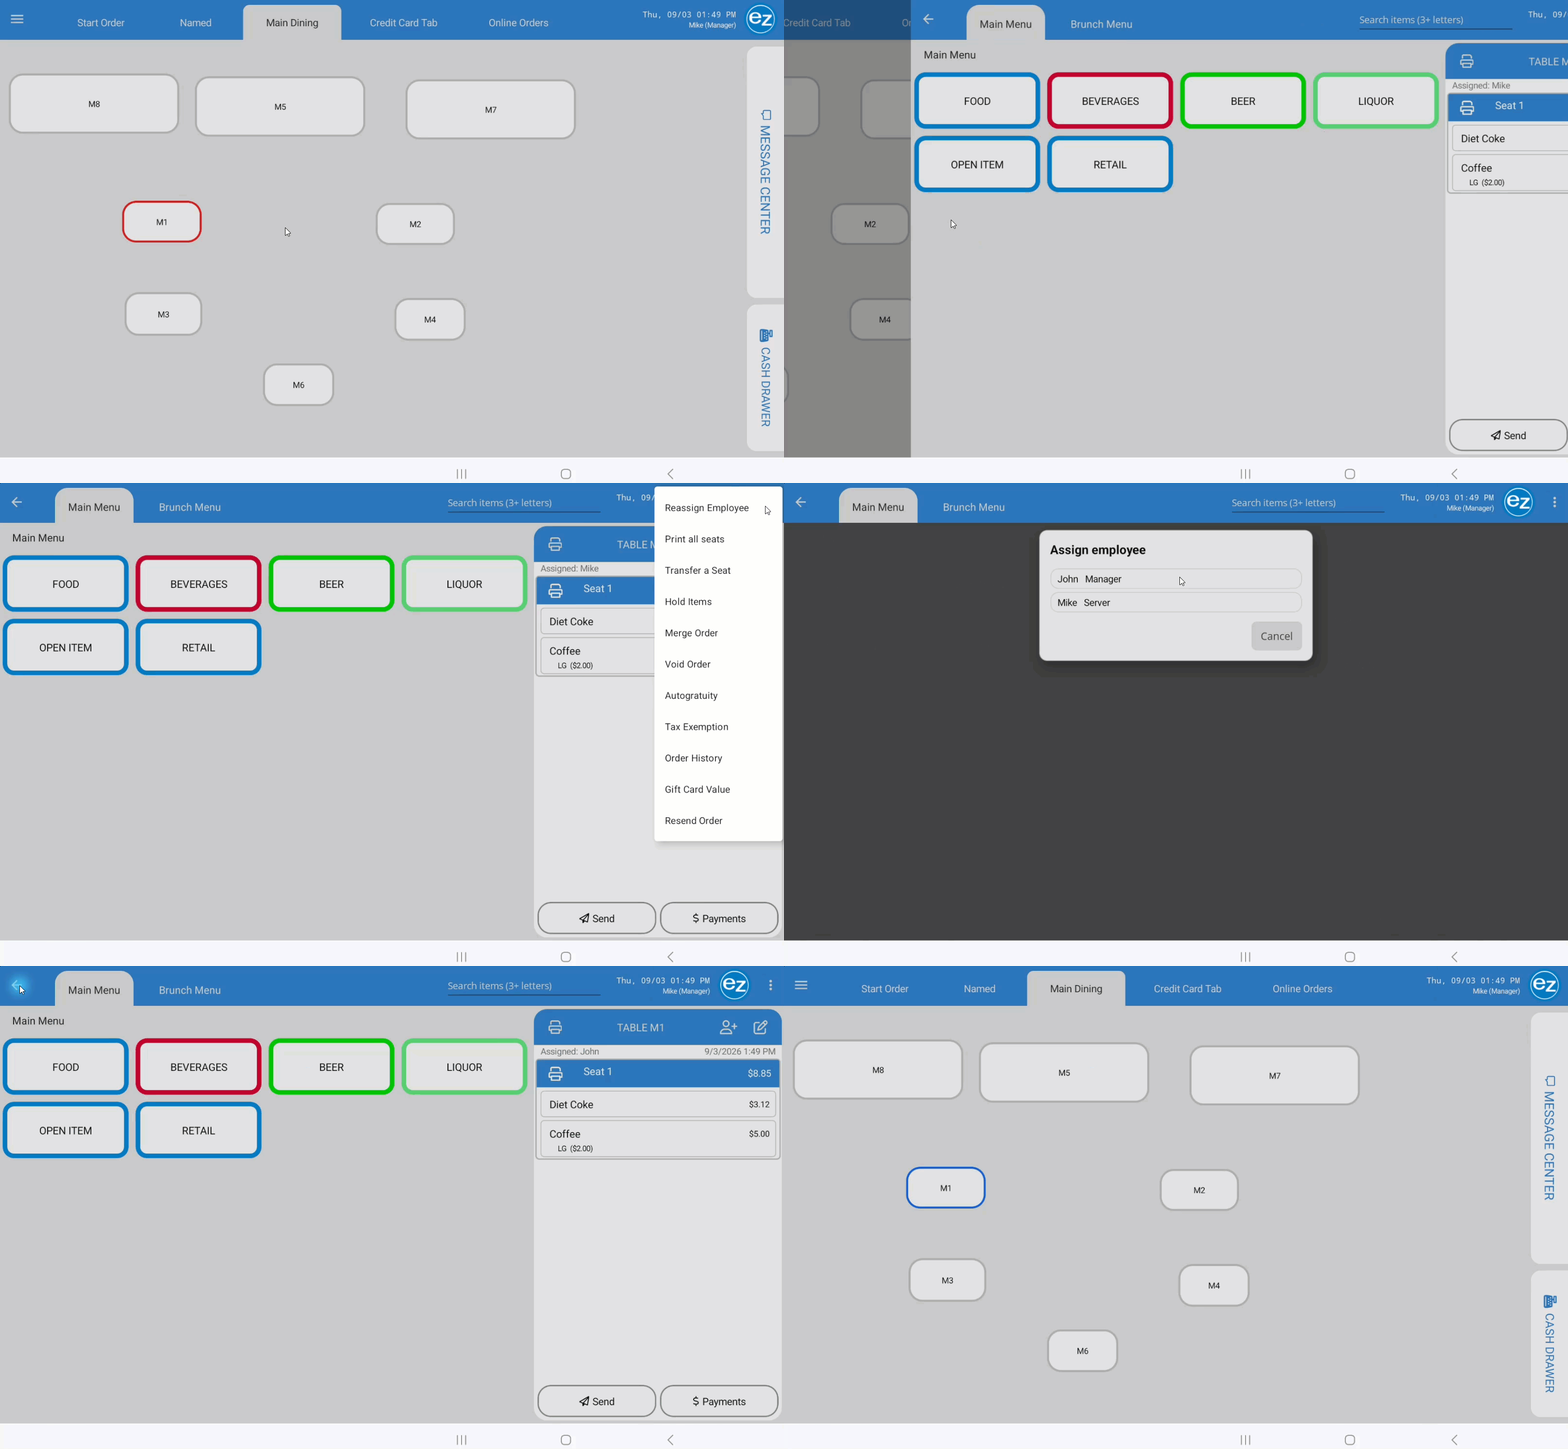
- Reassign active orders to another employee directly from the order ticket screen
- Tap the Order Options Menu Icon in the top-right corner
- Select Reassign Employee
- A list displays all currently clocked-in staff with Order Access permissions enabled
- Select the target employee's name to complete the transfer
- The order ticket updates immediately to reflect the new server's assigned name and color
- Tapping Cancel closes the selection list and returns to the menu/order page without saving changes
- Note: Transferring a ticket updates the order's assigned server, but the header display in the top-right corner continues to show the employee logged in the physical device
Step 20: Transferring Seats
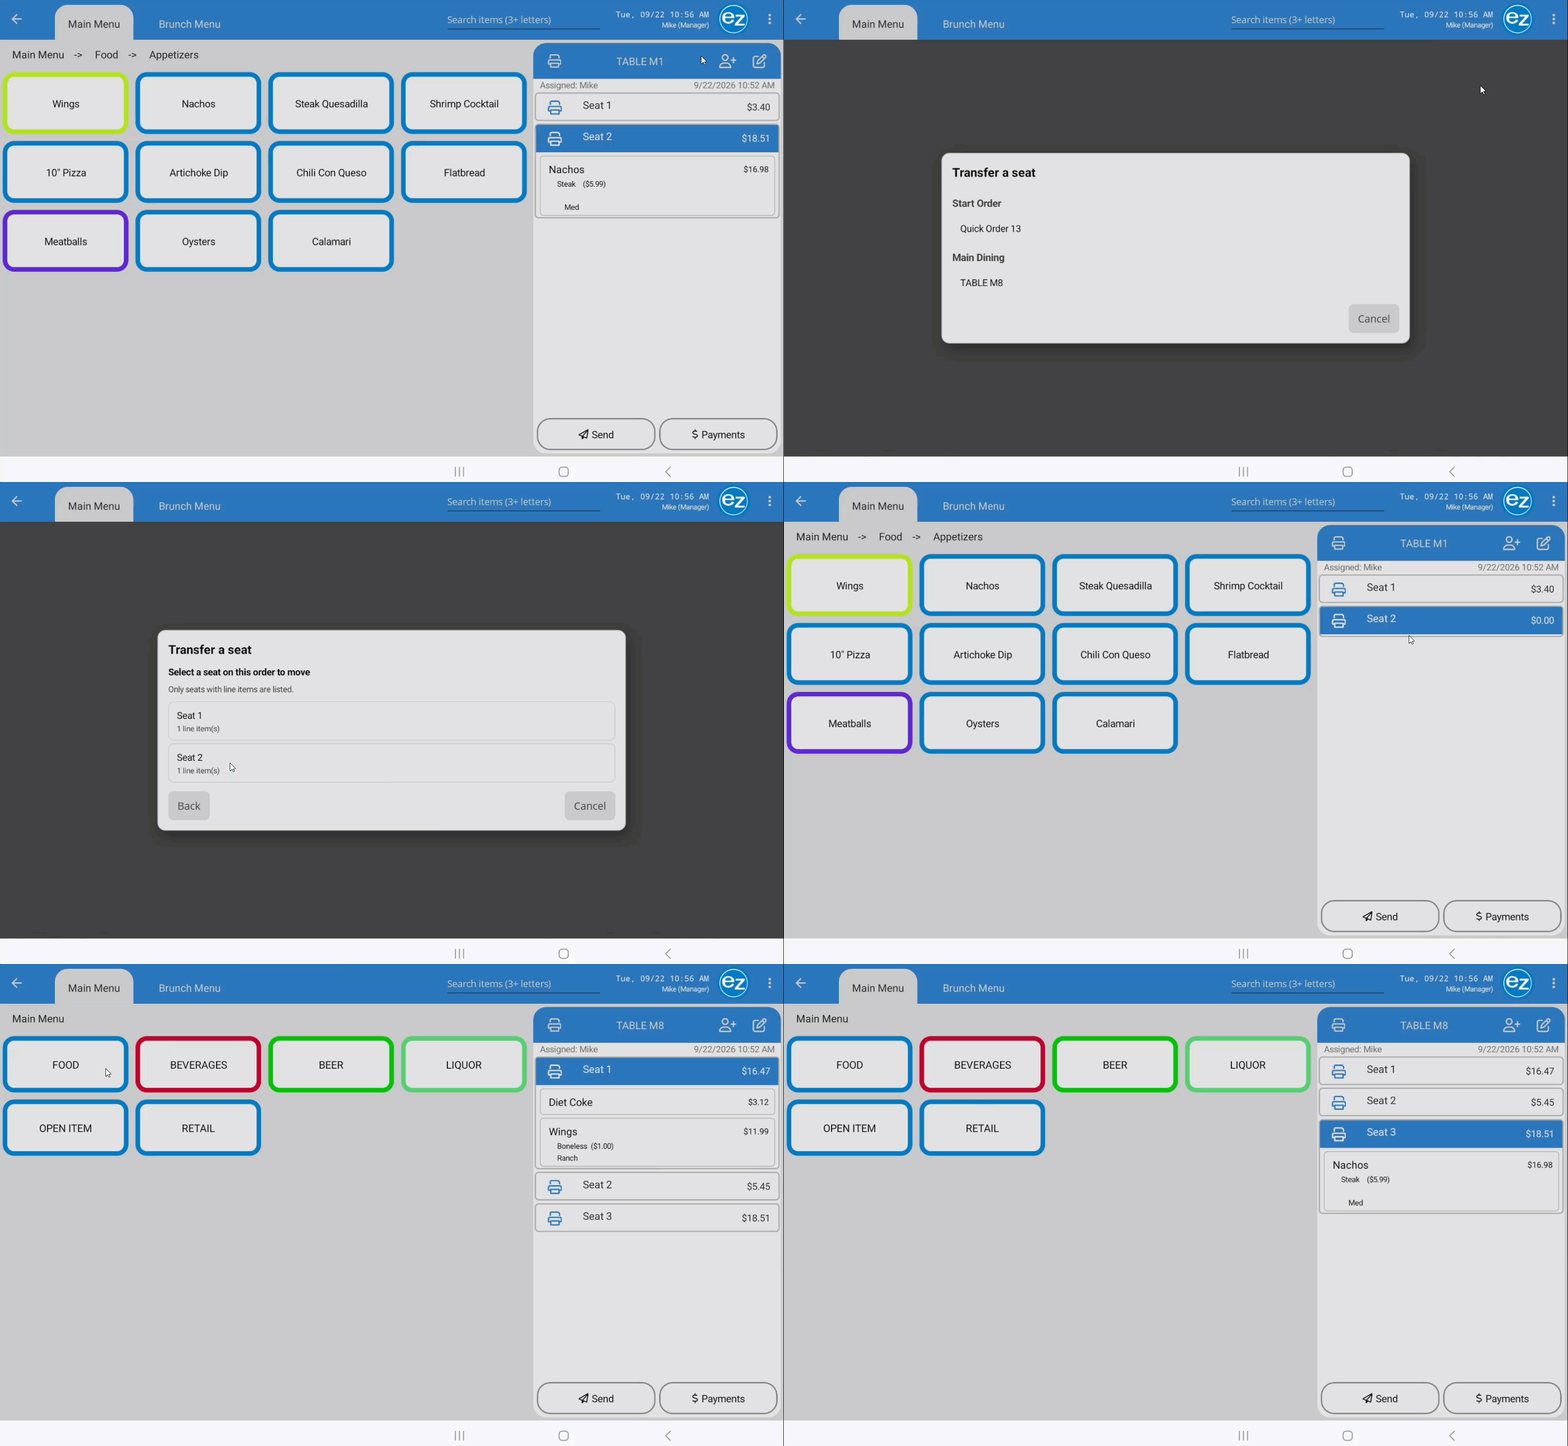
- Move items only for an individual seat instead of the entire order when using the Transfer Seats option
- Select the Orders Option Menu in the top-right hand corner
- Tap Transfer a Seat. List of current open orders will be displayed. Select the order and the seat number that needs to be moved
- Tap Move Seat and the item will be moved to the new order and automatically append as a new seat
Step 21: Merging Orders
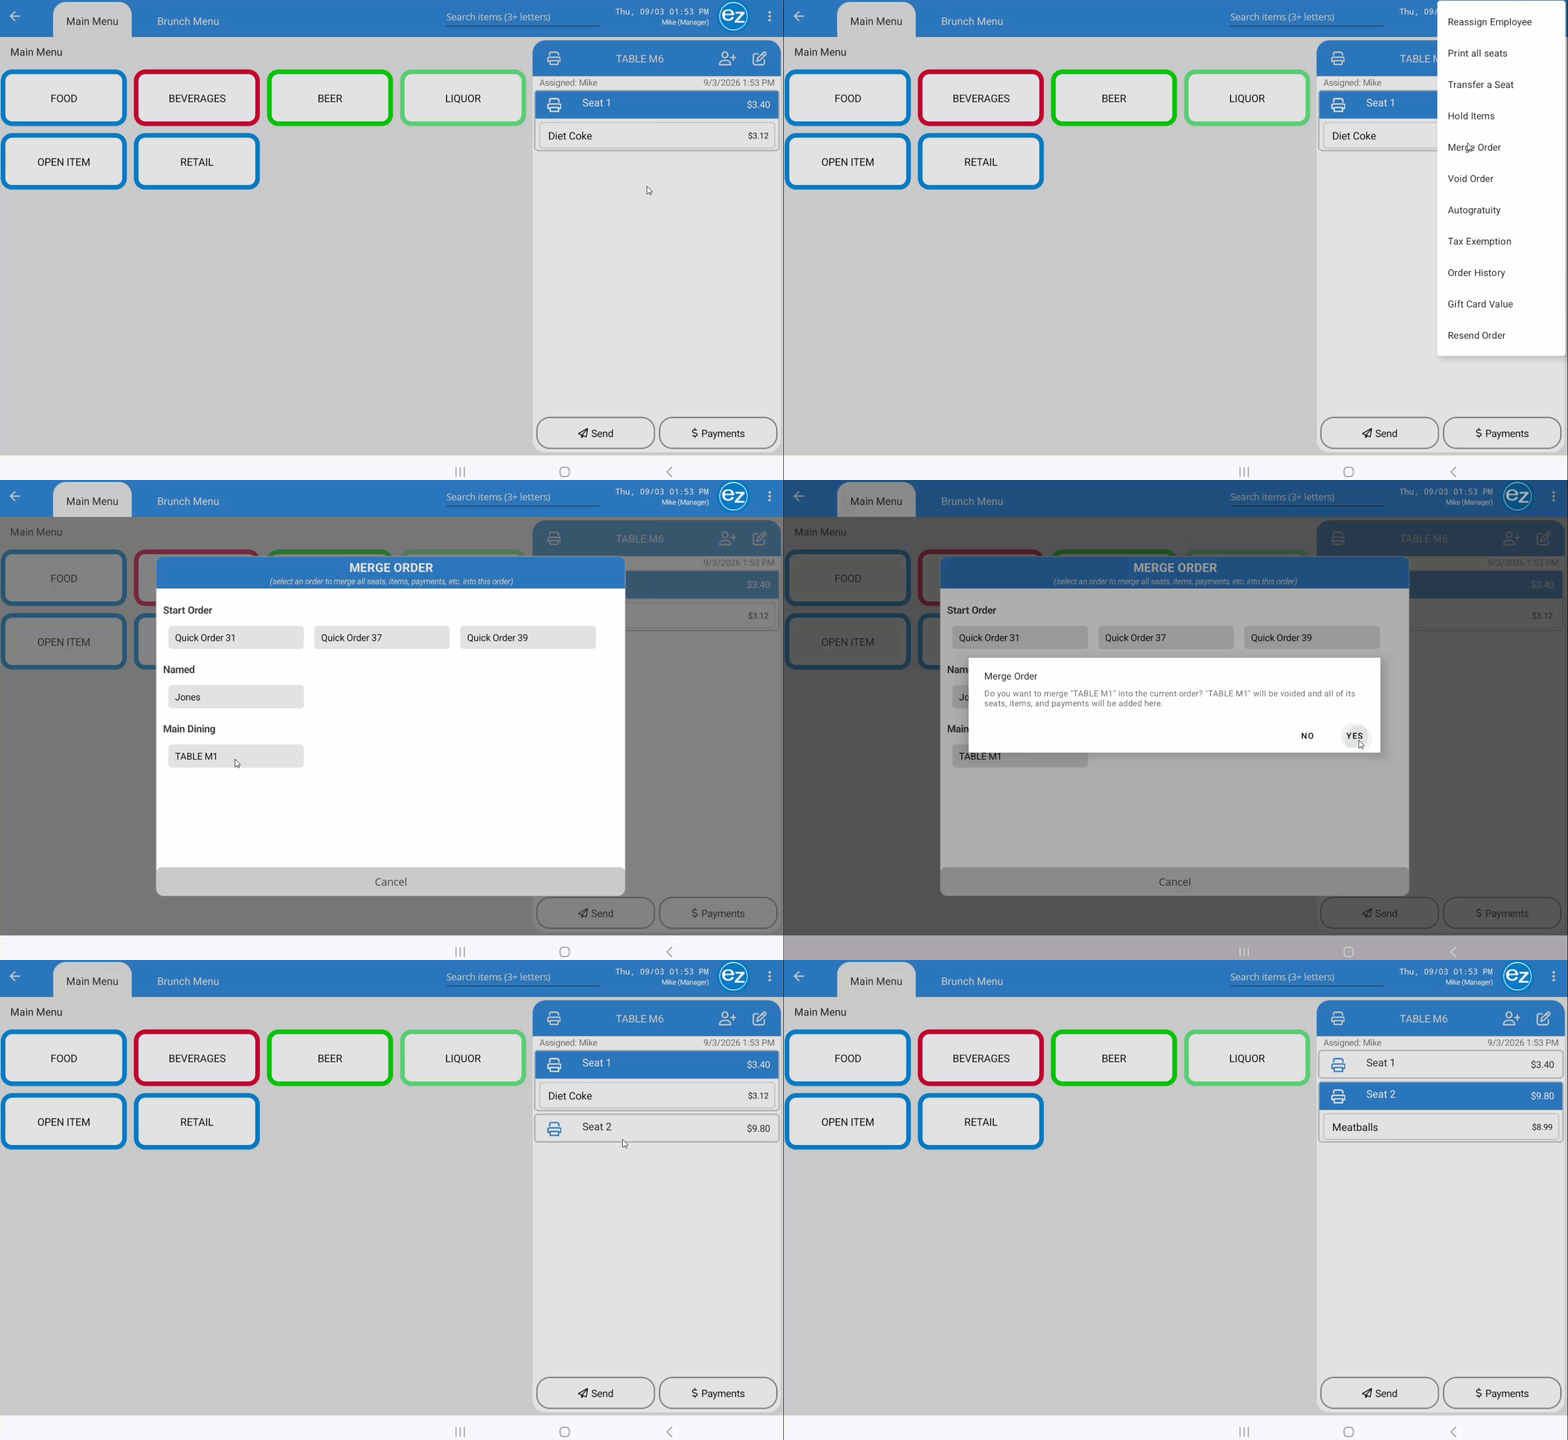
- Merging combines sent items from another open order into your active order ticket as a separate, dedicated seat
- Orders must have all items sent prior to merging. Only one order can be merged at a time
- Tap the Order Options Menu in the top-right hand corner
- Select Merge Order and all eligible open orders will be displayed from the merge view
- Select the order you want to merge and Tap YES on the merge order confirmation window
- The merged order is removed from the open order list, and its items automatically append as a new seat on your current order
Step 21: Voiding an Order
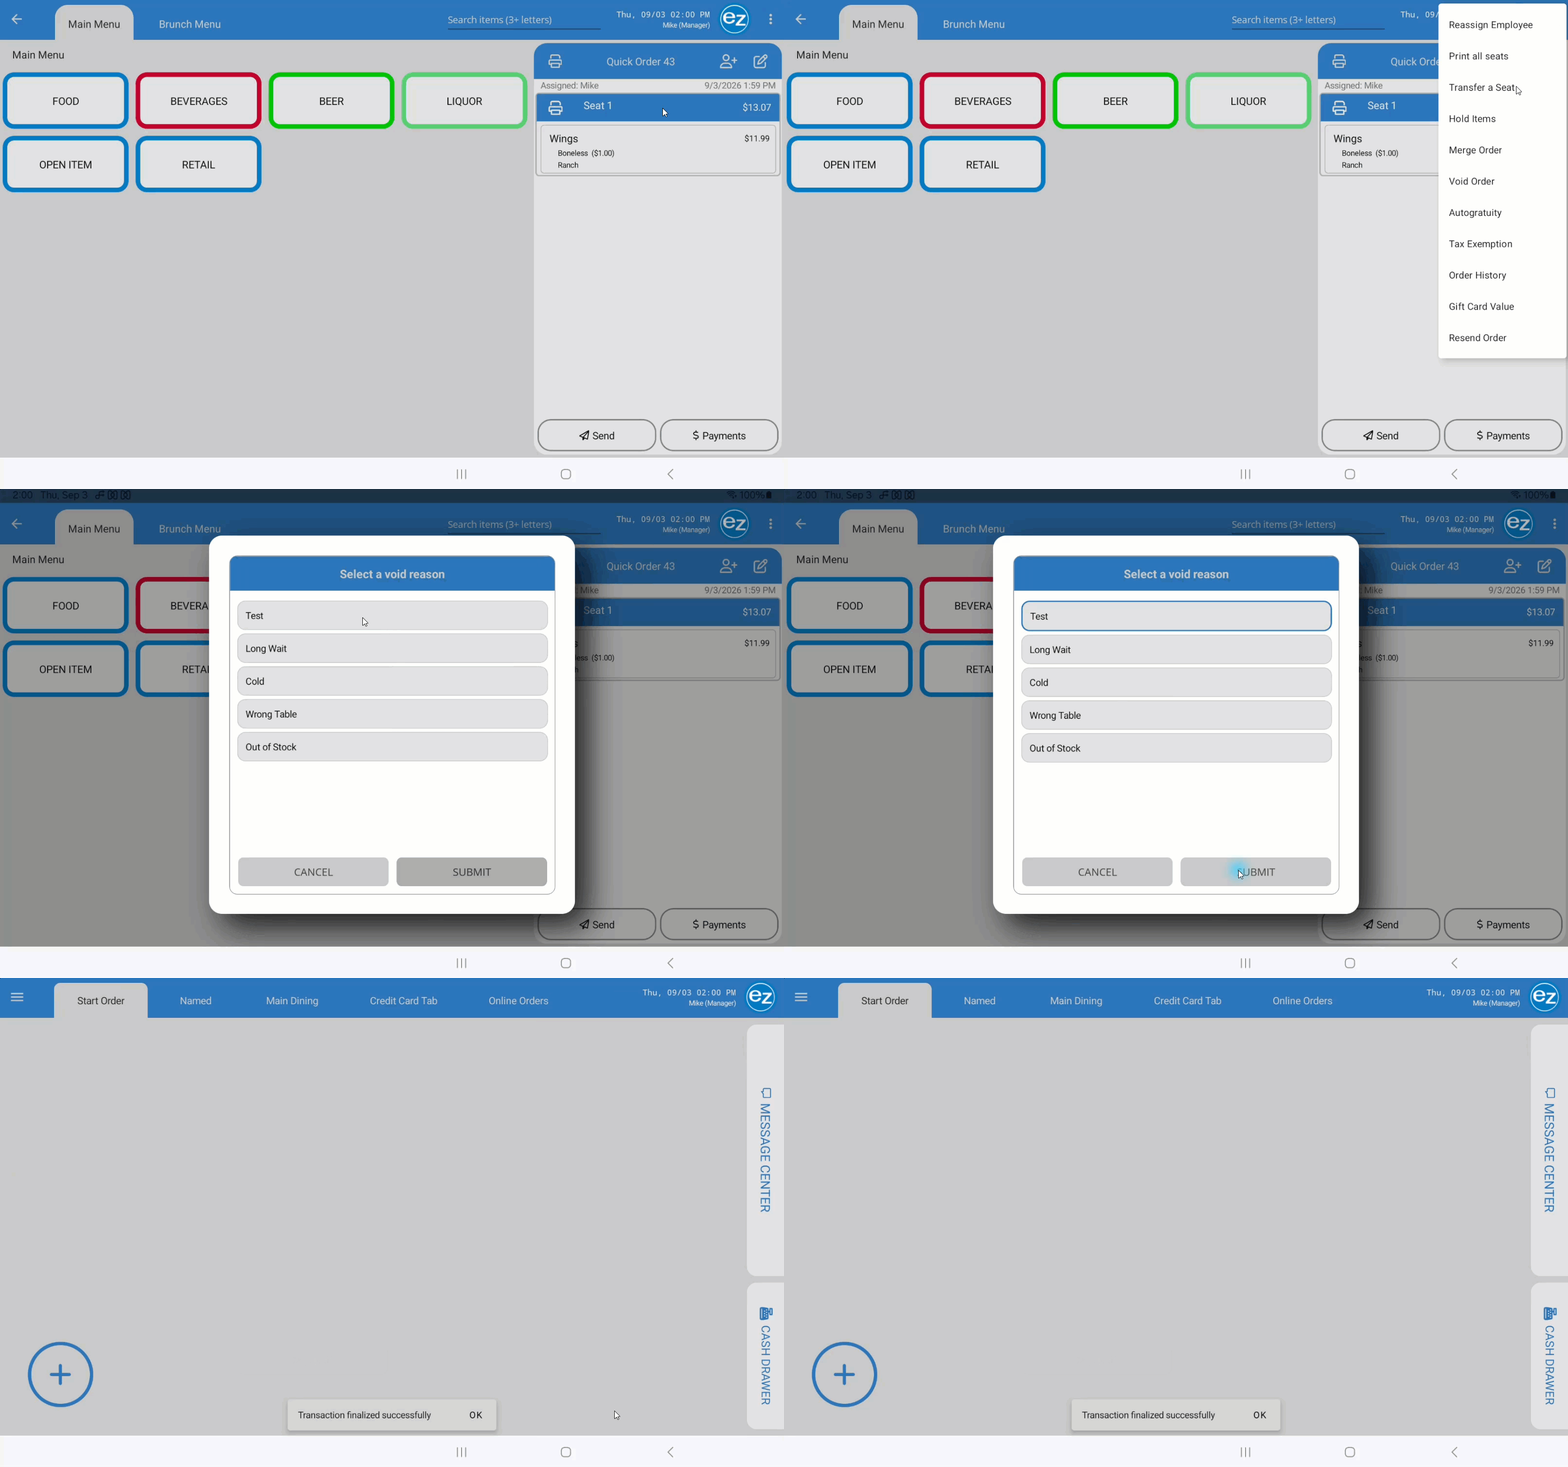
- Voiding an order cancels all items on the ticket simultaneously and closes out the active order automatically
- Tap the Order Options Menu in the top-right corner
- Select Void Order
- If any items on the ticket have already been sent to the kitchen, the system prompts the Void Reasons list. Select the appropriate reason and tap Submit
- Voiding an order requires Void Item permissions enabled on the employee account (or a manager override)
- If any payment has already been applied to the ticket, Void Order is disabled. You must void the existing payment first before you can void the order
Step 22: Re-sending Orders
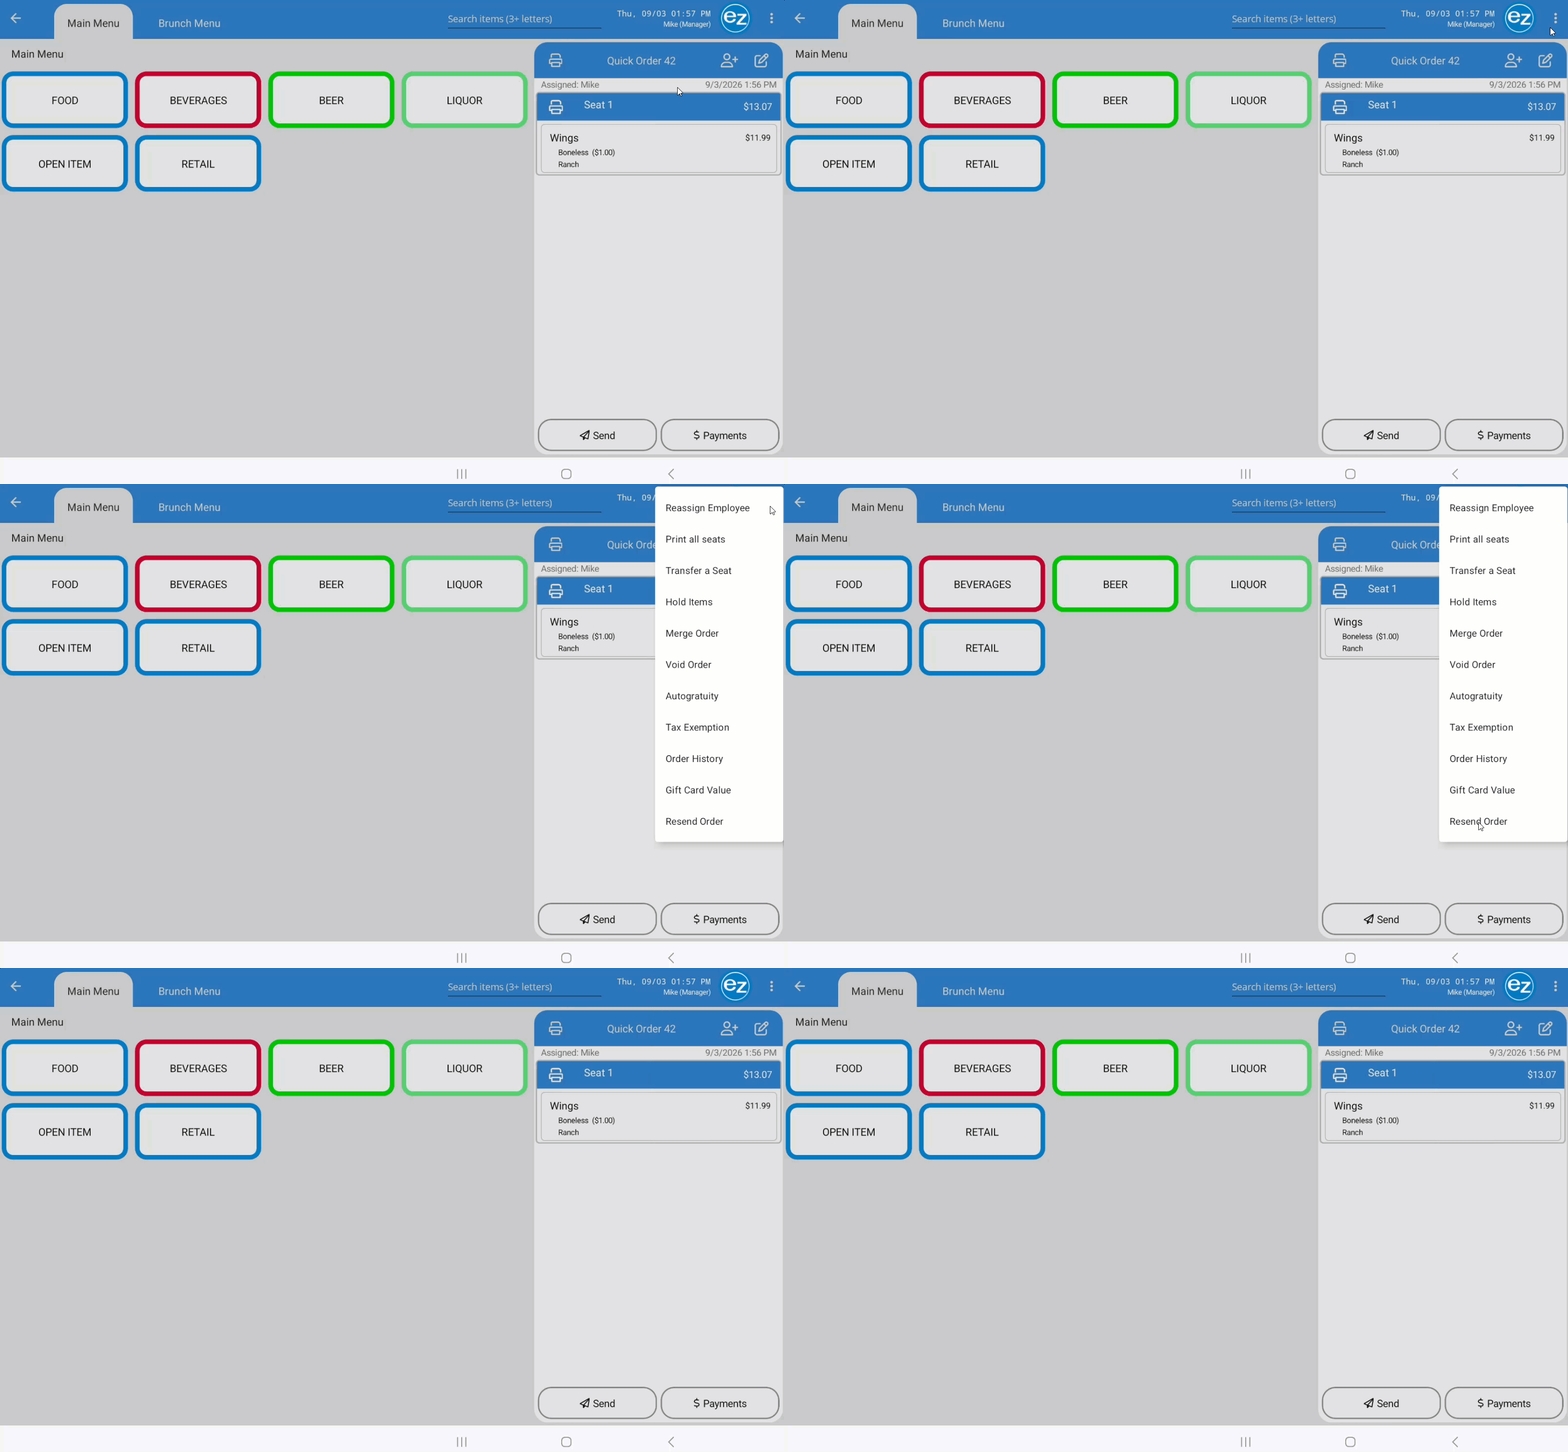
- Use the Re-Send feature to dispatch duplicate kitchen tickets for an entire order to the kitchen prep stations. Note: The Re-Send option is only visible after all items on the order have already been sent
- Tap the Order Options Menu in the top-right corner
- Select Re-Send
- All items on the ticket reprint at their assigned prep stations
- Re-Sent tickets print with "Duplicate" clearly displayed in red text across the header and footer to prevent kitchen staff from preparing duplicate meals
Step 23: Order History
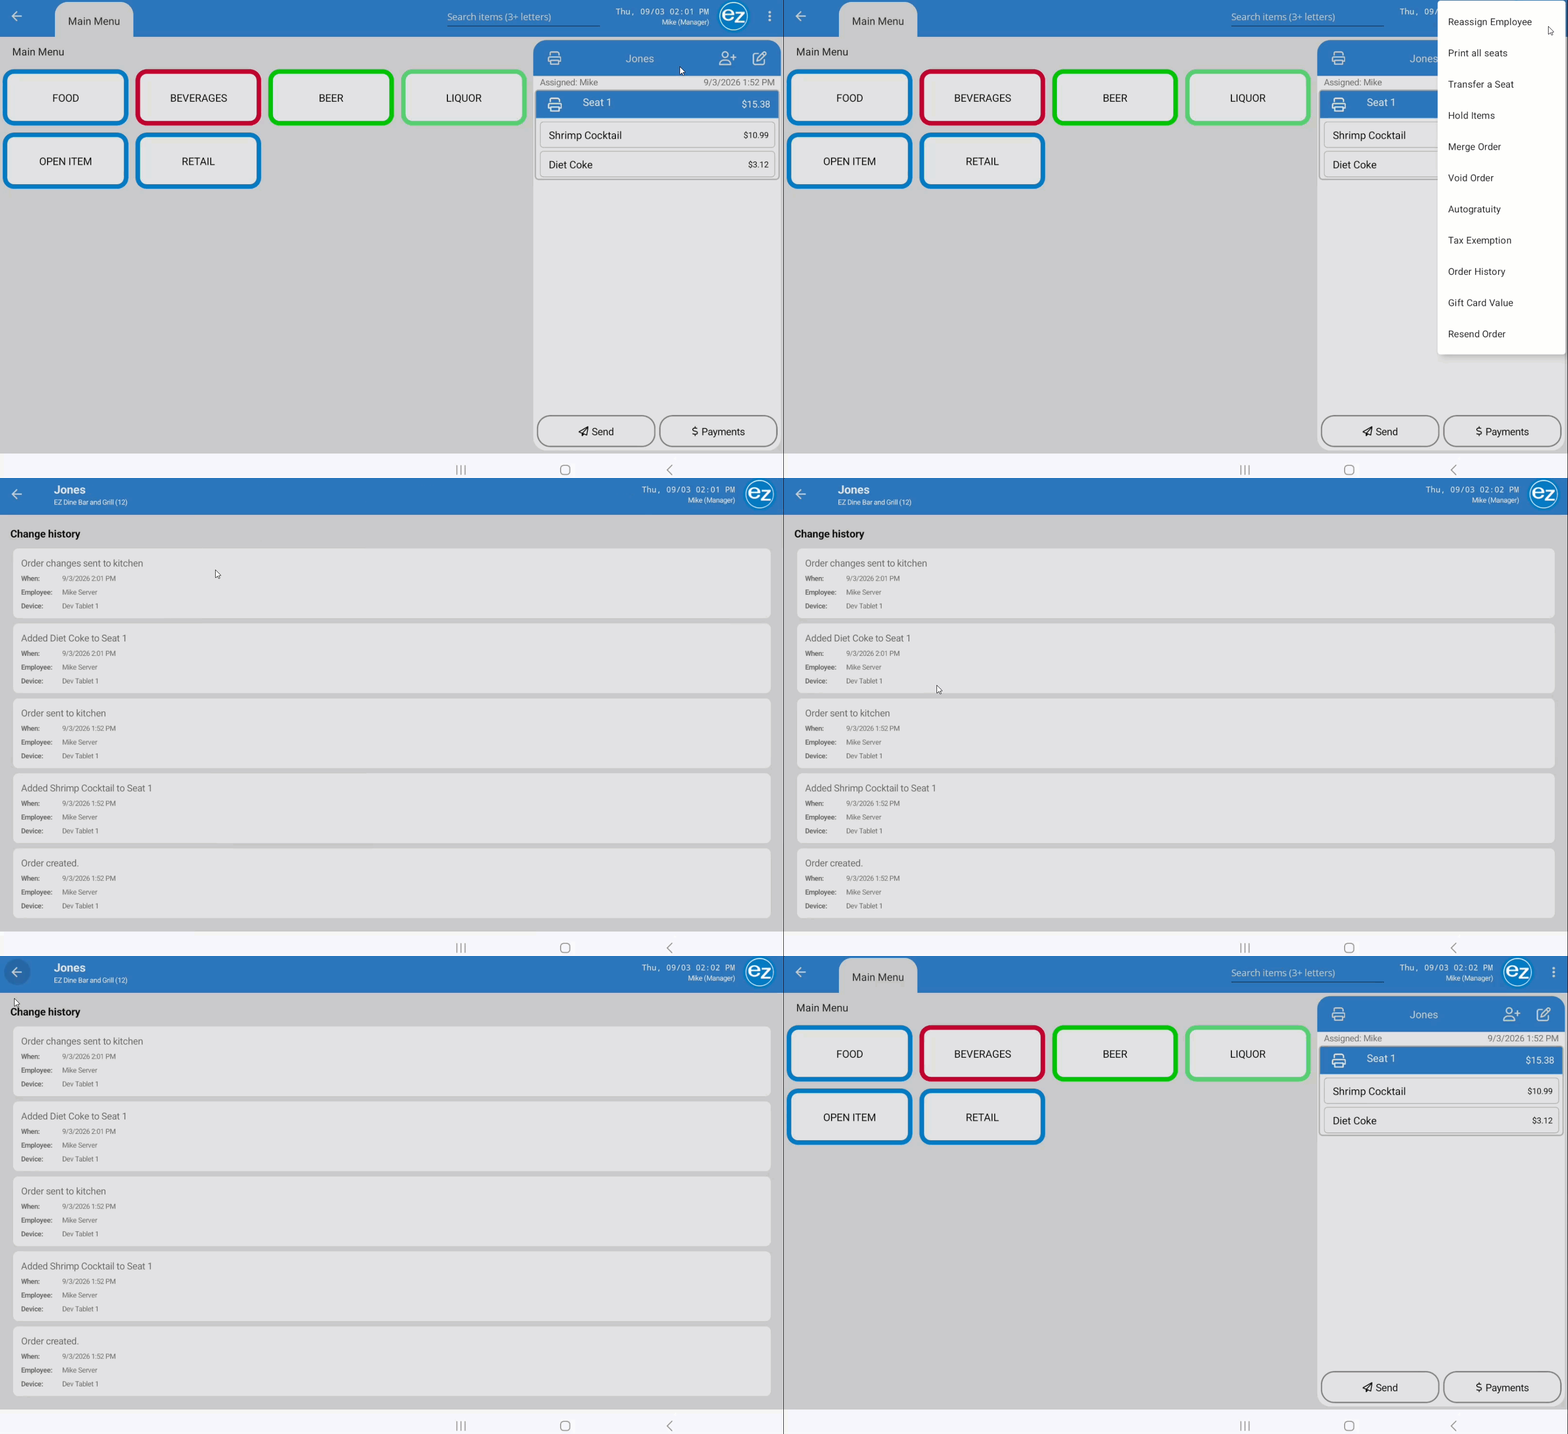
- Tracks all activity and changes on an order detailing the time, employee, and device
Additional Resources and Help!
Still have questions? Please contact us any time at support@ezsoftpos.com.
NOTE: If emailing, please include your business name in the subject line of the email
and provide your preferred contact information for the best response time.
Visit our help center Help Center for more guides and tutorials