TABLE OF CONTENTS
- Step 1: Store Device
- Step 2: KDS Settings
- Step 3: KDS Menu
- Step 4: Registering Your KDS Tablet
- Step 5: KDS Orders
- Step 6: Additional KDS Options
- Additional Resources and Help!
Kitchen Display System commonly referred to as KDS. Is the option to setup orders to be displayed on a tablet computer screen instead of a kitchen printer. KDS system provides additional features and flexibility with managing ticket times, larger view of current orders, saves on kitchen paper, and a number of other benefits. KDS can be used as an alternative to kitchen printers or in unison along side them

When using the KDS software you will need to turn on the KDS store feature in order for the EZ Dine App to communicate directly with the KDS system. For details on enabling the KDS feature please reference the Studio article here: Enable KDS
Step 1: Store Device
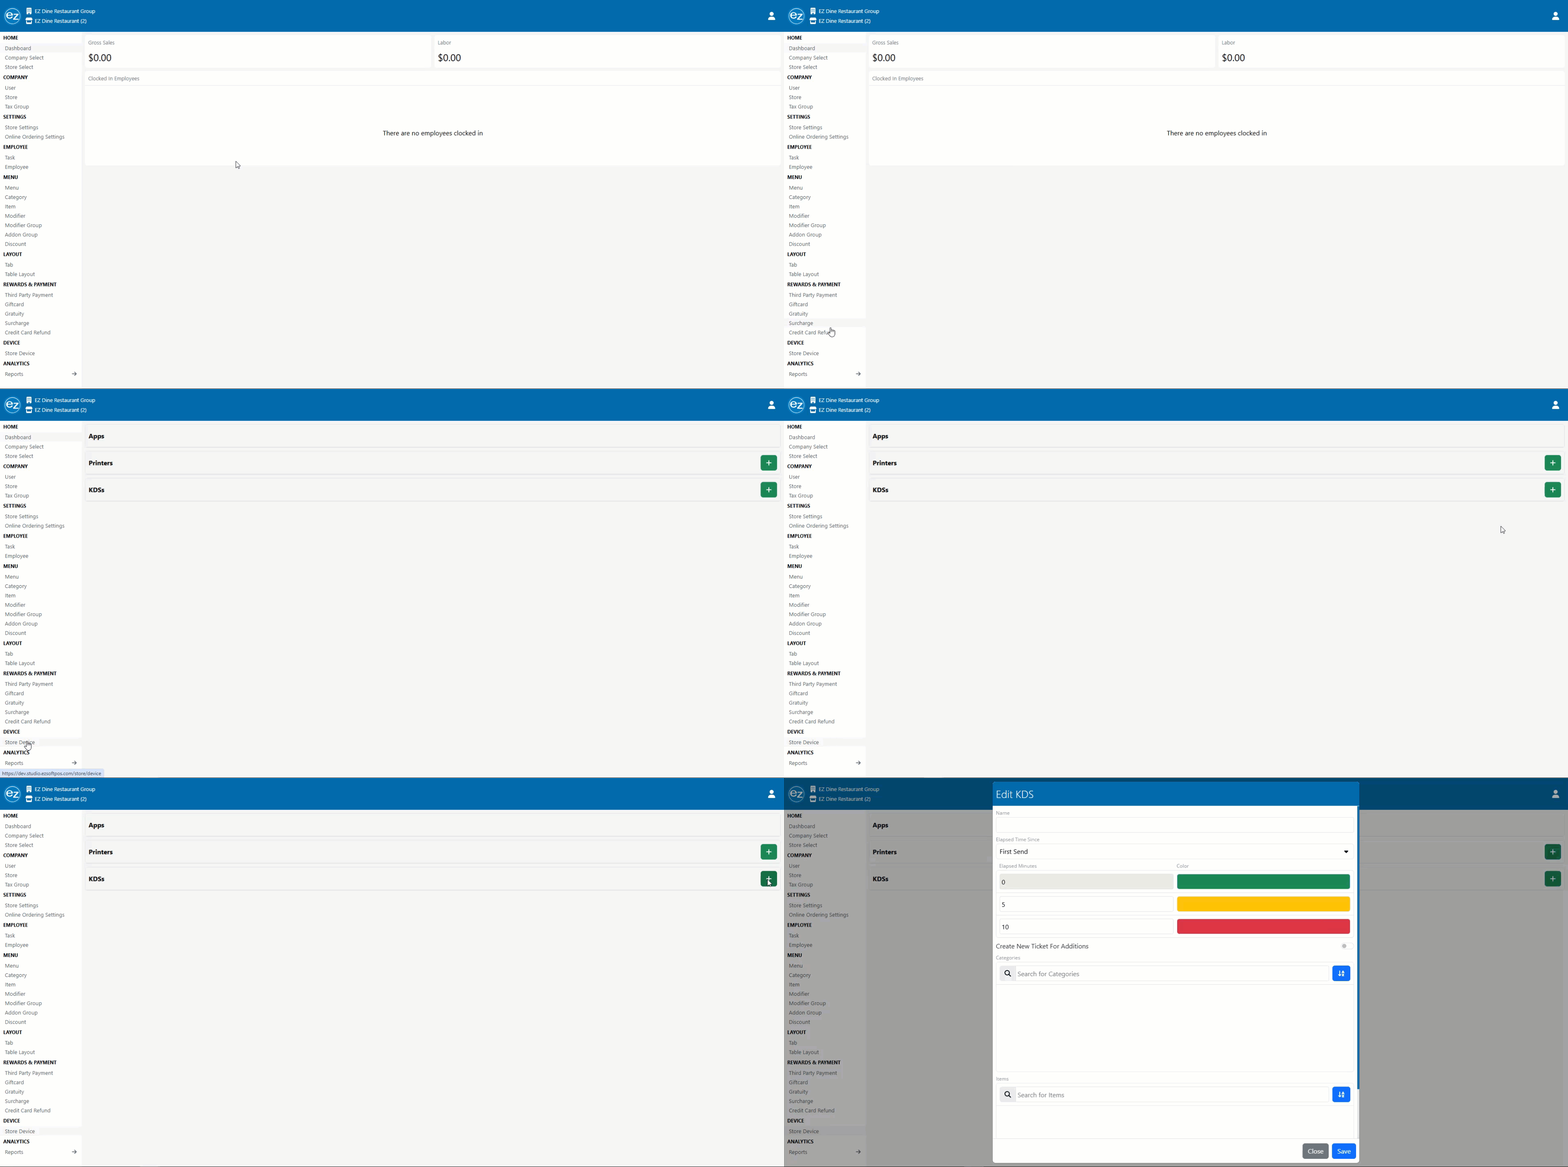
- Inside the Device section the store device page will list the current devices being used by the EZ Dine App
- Select store devices and navigate towards the bottom of the device page
- The KDS device section will be listed where you can add new and manage existing KDS devices
- Select the green plus icon to add a new KDS device
Step 2: KDS Settings
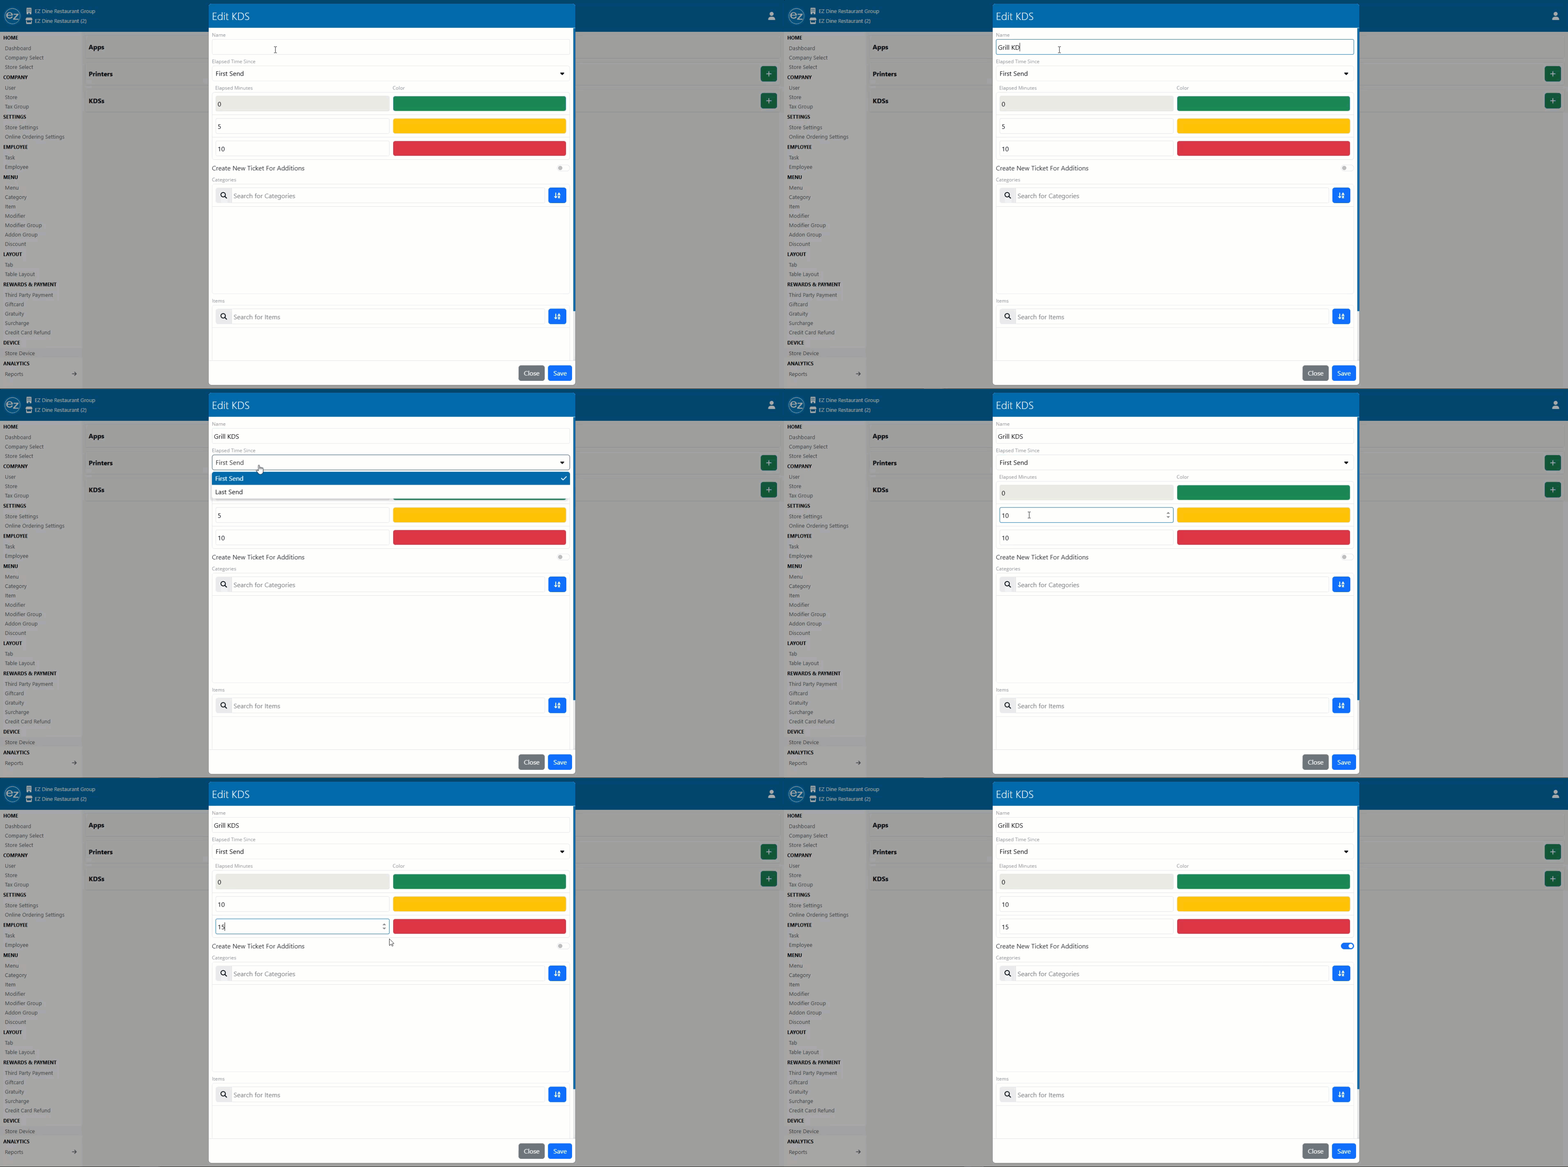
- Enter a KDS device name that will be used and displayed on the KDS tablet header. KDS names can be similar to kitchen printer names to designate the proper menu item routing
- Elapsed Time Since: This will be the running ticket time listed for the order
- You will have two options to base the order ticket time on the first or last send
- First send will use a continual running time based on when the order was first sent to the KDS. Any additional edits or sends on the order will not reset the ticket time
- Last send means anytime the order is edited and new items are sent the order time will reset and start back over
- Elapsed Minutes: Configuring the KDS tickets to change colors based on the running order ticket time. This provides a visual indication to the kitchen to prioritize the current orders in the que
- You will have three tiers for setting up the times based on the colors. The colors listed for each time are setup by default and cannot be changed
- The first tier 0 minutes time cannot be edited. This is the default time and color setting for all orders when they are first sent to the KDS
- Enter the desired minutes for the yellow and red tiers
- Create New Ticket For Additions: Similar to how kitchen printing works. When a new item is added and sent a new KDS ticket will be created. This will be in contrast to the default KDS ticket setting that updates the existing KDS ticket whenever edits are made to the order
Step 3: KDS Menu
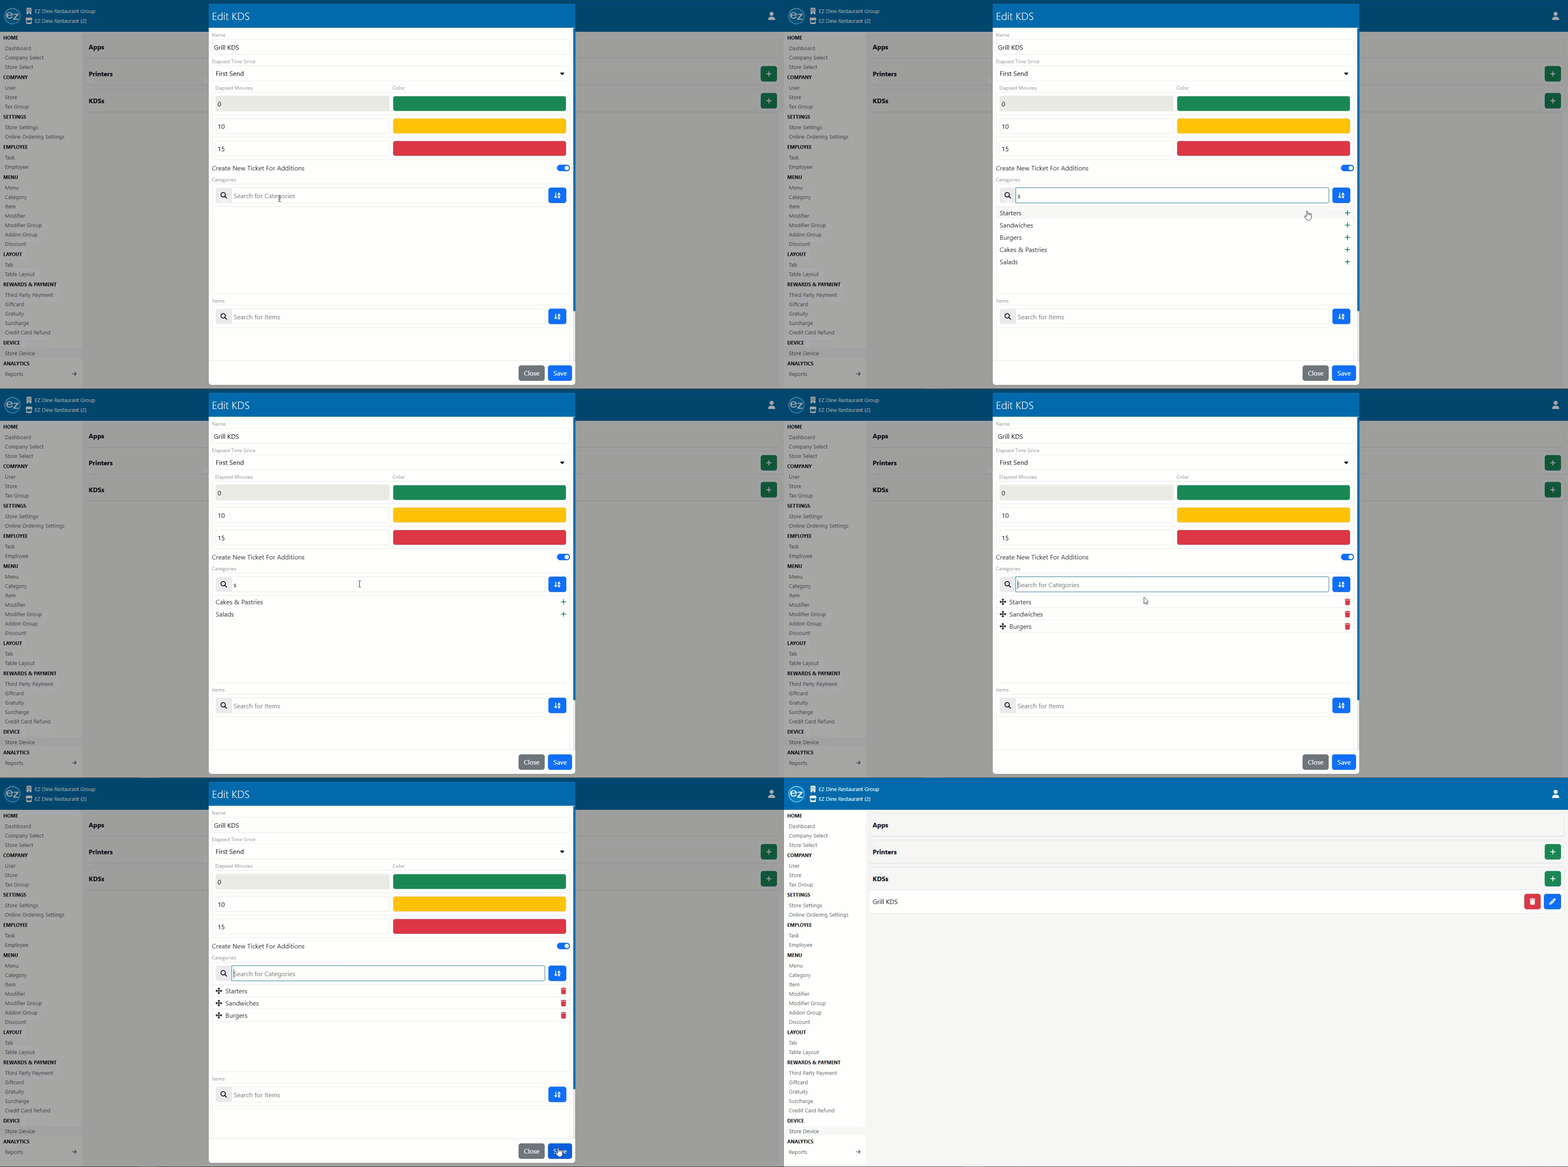
- Assign which categories and items will be routed to the KDS device
- Search inside the categories and items name fields to pull up the menu list to choose from
- Select the green plus add icon next to the name and that will link the category or item to the KDS
- Once all the categories and items are assigned tap save. The KDS will now be listed inside the KDS device section for editing or deleting
Step 4: Registering Your KDS Tablet
- The KDS tablet will need to be connected to a Wireless or LAN EZ Dine network for navigating to the KDS website
- Open a new browser window and enter the KDS website URL - https://kds.ezsoftpos.com/sign-in
- You will be required to sign into the KDS website with your Studio user email and password
- Sign in and select the company, store, and KDS device name that will be registered to the tablet
- Once registered the KDS device order page will be displayed
Step 5: KDS Orders
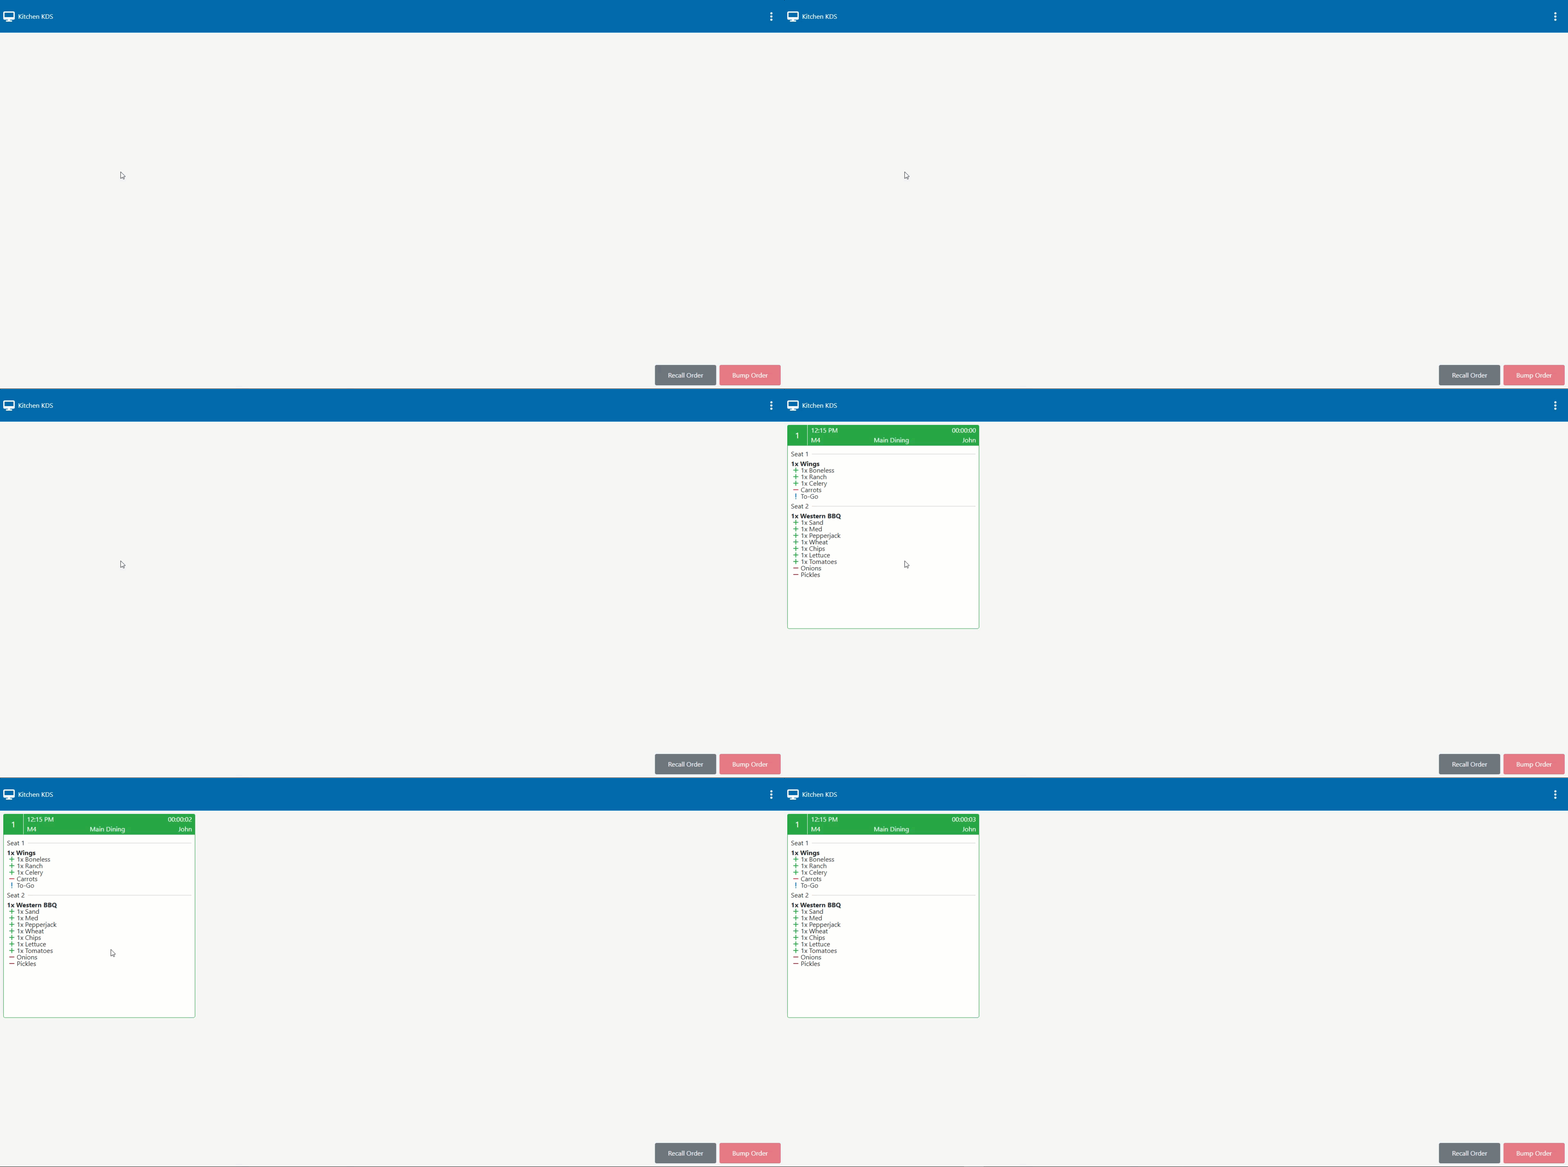
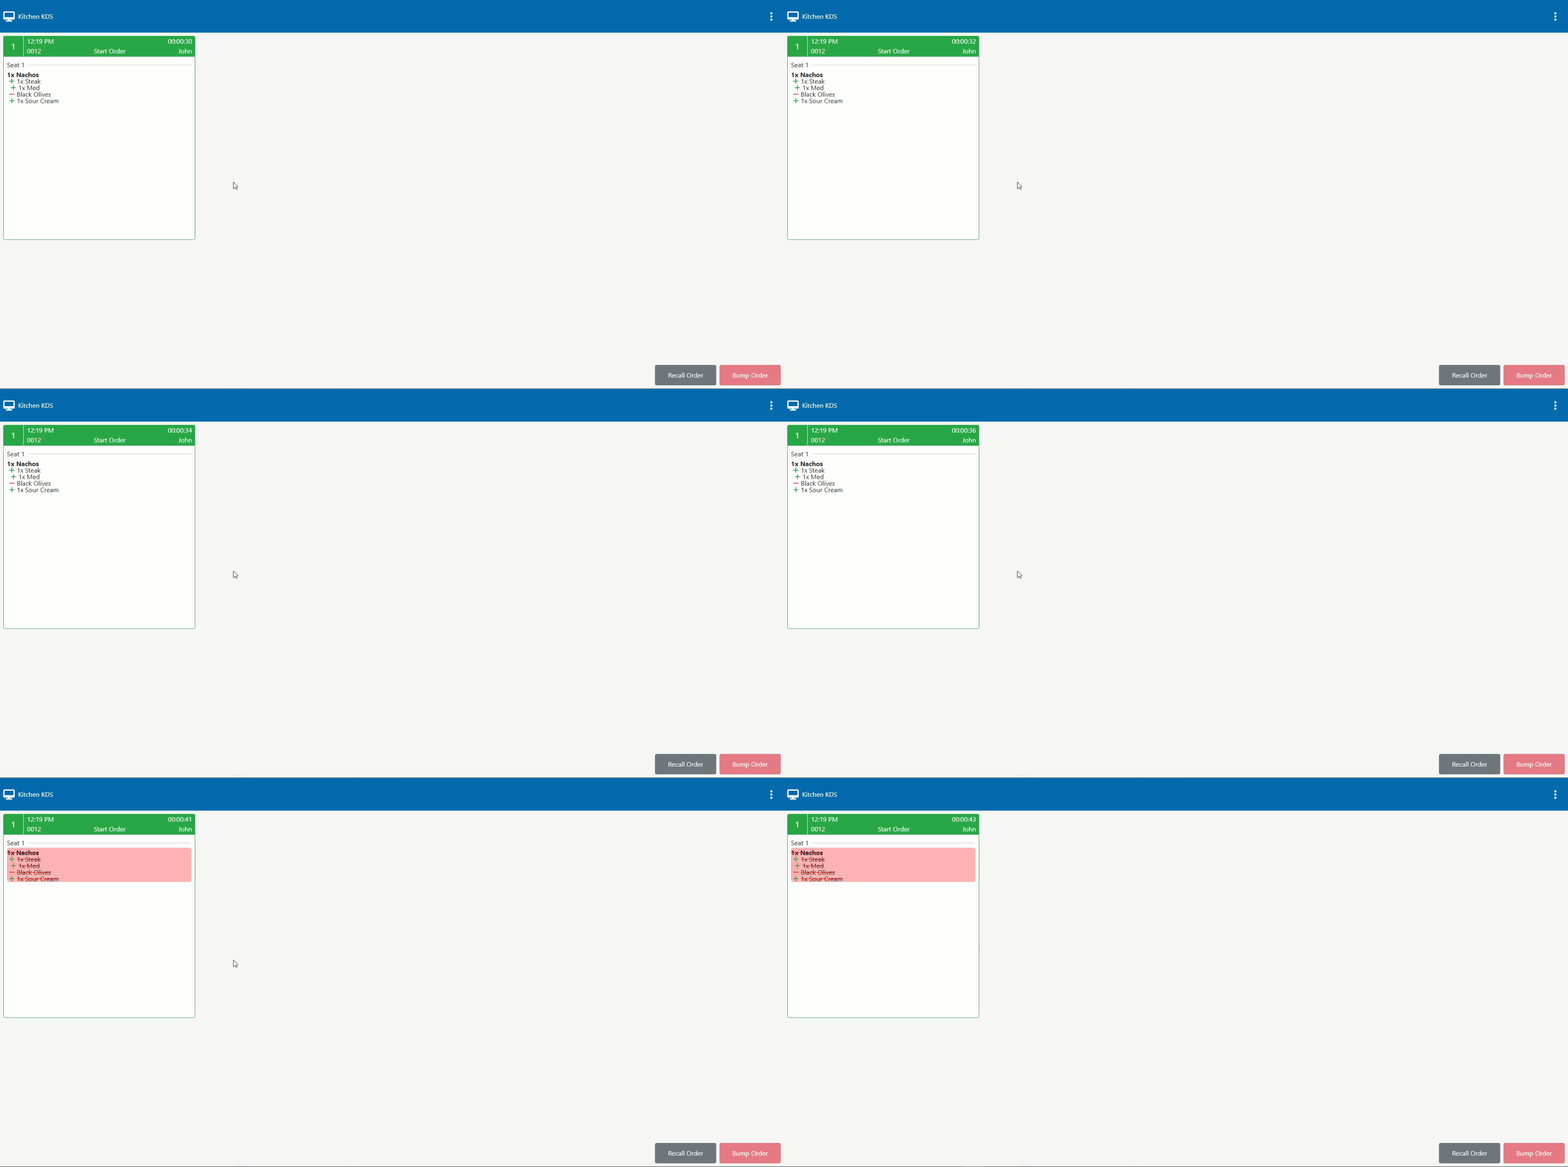
- KDS order ticket header will list the order position number in the top left corner. This will be in numerical order it was received and update automatically when orders are bumped
- The KDS ticket format will display the send order time and order identifier on the left side. The middle section detailing the ordering section tab name. And the right side listing the running order time and employee who is assigned to the order
- Item names will be displayed in bold below the corresponding seat number
- Any modifications made to the item will be listed underneath the item indented to right
- Add modifiers will display a green plus icon. Remove modifiers will display a red minus icon
- Special Instructions will display a blue exclamation mark icon
- Voided items will display the background color in red with a red strikethrough the item name and any modifiers or instructions associated to the item
- Order instructions will be listed above the seat number in red
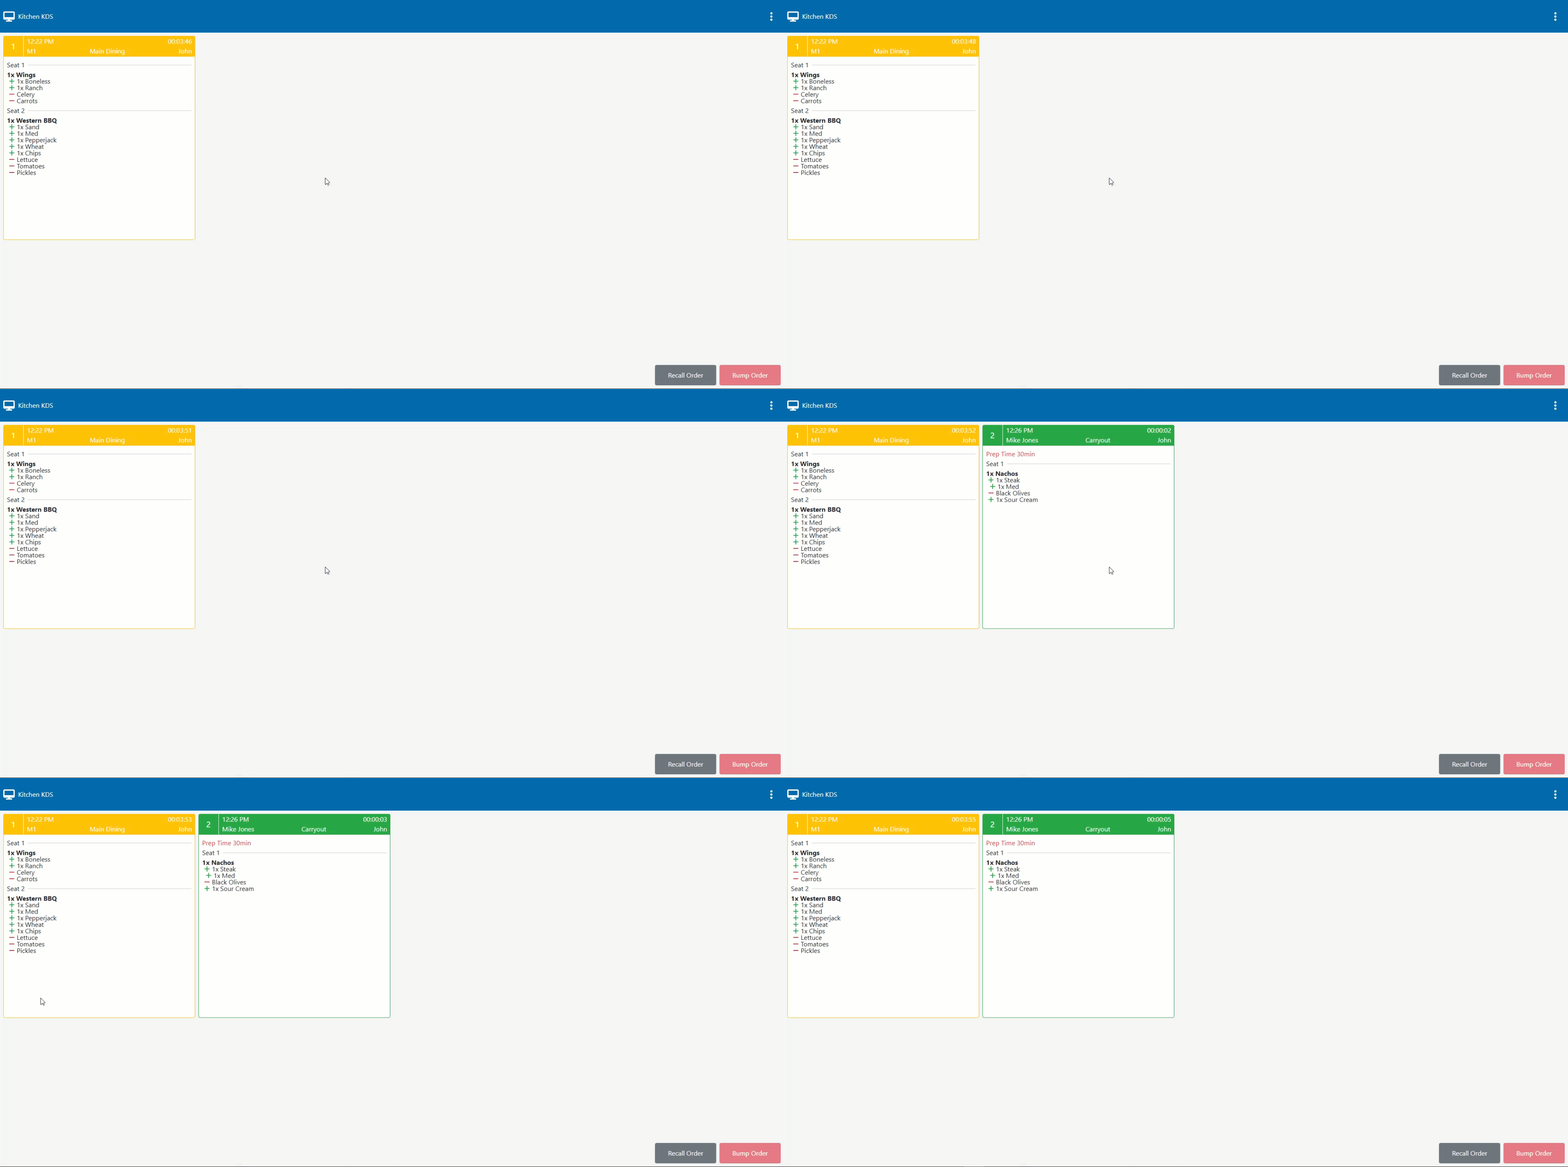
- Depending on the elapsed order time the KDS order heading and outlaying background color will change automatically reflecting the current order time tier
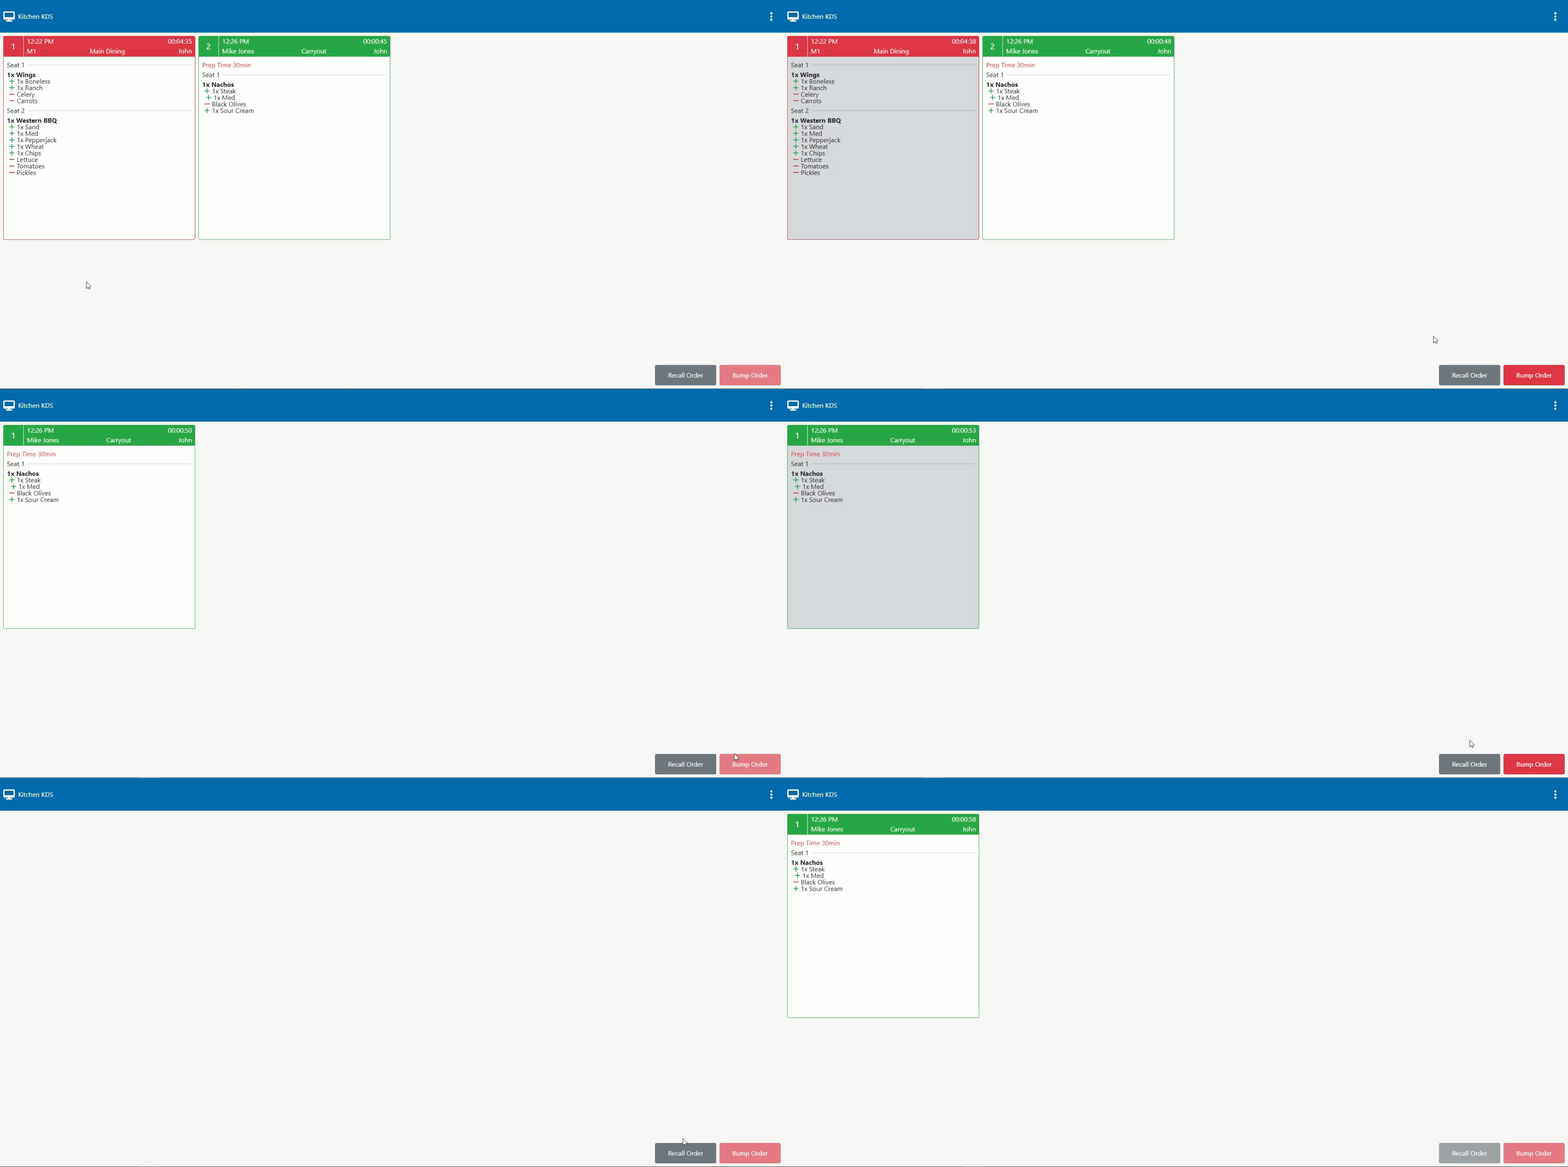
- Once the order is ready. Bumping the order will remove the order from the KDS screen
- Tap the KDS order to select the order. Tap the red bump order tab on the bottom right of the screen. This will remove the order from the KDS screen
- After an order is bumped the grey recall order tab will become enabled. This can be used to restore the previously bumped order if there was any mistake in removing the prior order
- When using multiple KDS screens the bumped order will be removed from all KDS screens simultaneously
KDS Order
Voided Item/Order
Multiple KDS Orders
Bumped/Recalled KDS Order
Step 6: Additional KDS Options
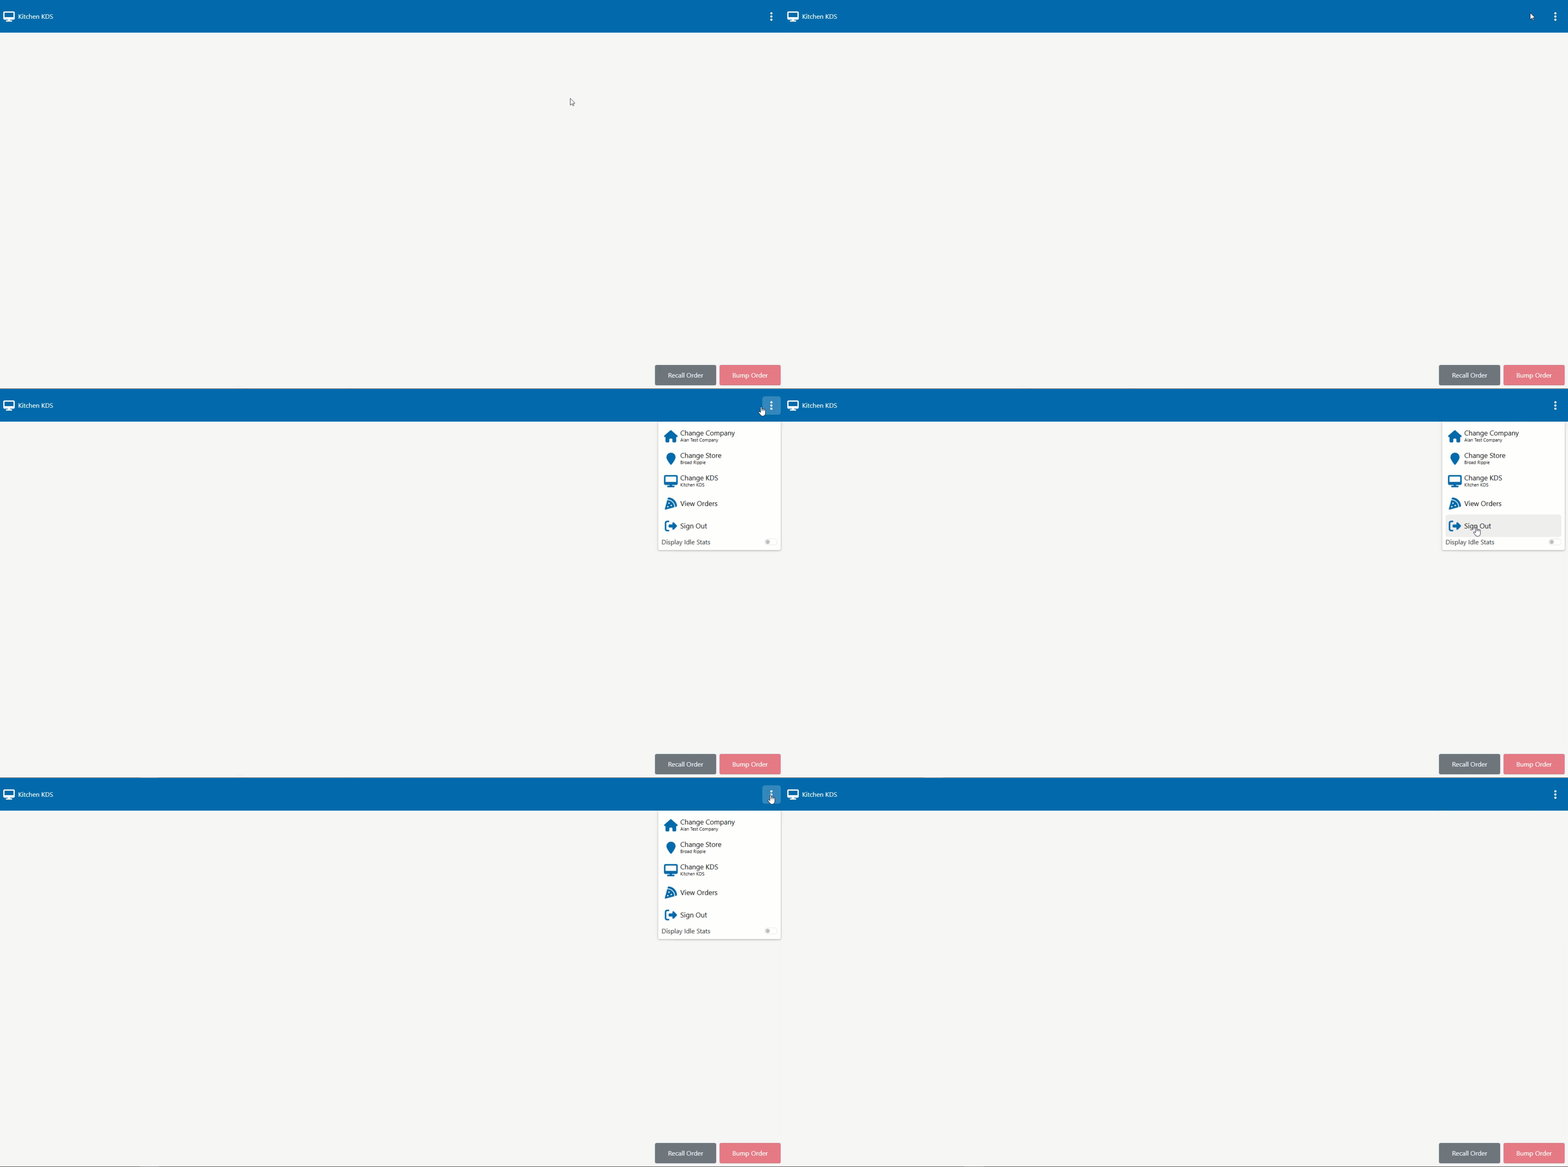
- The top right of the KDS header will list additional KDS options
- If a KDS screen is replaced selecting view orders will display the list of current orders
- If a KDS screen is moved to a different store the configuration can be updated through changing the store or company configuration
- Signing out will log the current user authenticated to the KDS and require re-authentication again to the KDS tablet
KDS Options
Additional Resources and Help!
Still have questions? Please contact us any time at support@ezsoftpos.com.
NOTE: If emailing, please include your business name in the subject line of the email
and provide your preferred contact information for the best response time.
Visit our help center Help Center for more guides and tutorials

